Before considering a migration to Environments and Services, teams should assess their current Honeycomb set up and determine:
If you need guidelines on how to structure your data for Environments and Services, visit Best Practices for Organizing Data.
In Honeycomb Classic, a classic dataset describes any dataset in a Classic team. With Environments and Services, datasets exist as two types:
To fully inventory your datasets:
Create a list of Datasets in your Classic Environment.
In the Honeycomb UI, select Manage Data and then Datasets in the left navigation menu to view a list. Alternatively, use the Honeycomb Datasets API. Use this list of Datasets to verify integrity after migration.
Categorize each existing Dataset as “Service” or “General”, based on their data.
A Service Dataset has one or more service names present, while a General Dataset does not.
Deliverables: A list of existing datasets, categorized as Service or General. Use this list to calculate the number of datasets in your new Environment, verify dataset integrity after migration, and as a starting point for the next step.
Next Step: Continue to the next step of inventorying service names for each Service Dataset.
In Honeycomb Classic, instrumented services sent data to a Dataset. With Environments and Services, each Service sends its data to an Environment, and the Environment creates and stores data for each service in its own Dataset. These Datasets are created on the the service name values in the trace data.
Before you migrate, it is important to:
Deliverables: A list of services for each existing classic dataset. In the new Environment, each service name creates its own dataset. Use this list of current services and future service datasets to calculate the number of service datasets in your new Environment, verify dataset integrity after migration, and as a basis for the next step.
For each dataset in your Classic environment, inventory what services exist.
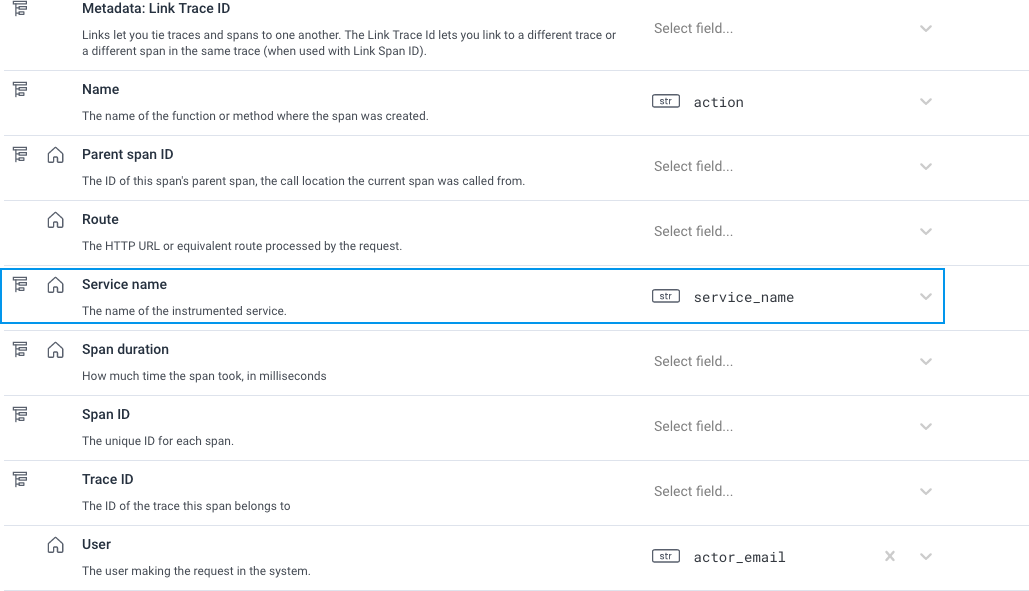
In Dataset Definitions, find the Service name field.

The value of this definition may vary based on the implementation chosen by your team.
OpenTelemetry uses service.name to define the service.
Beelines may use a different service name field depending on the language.
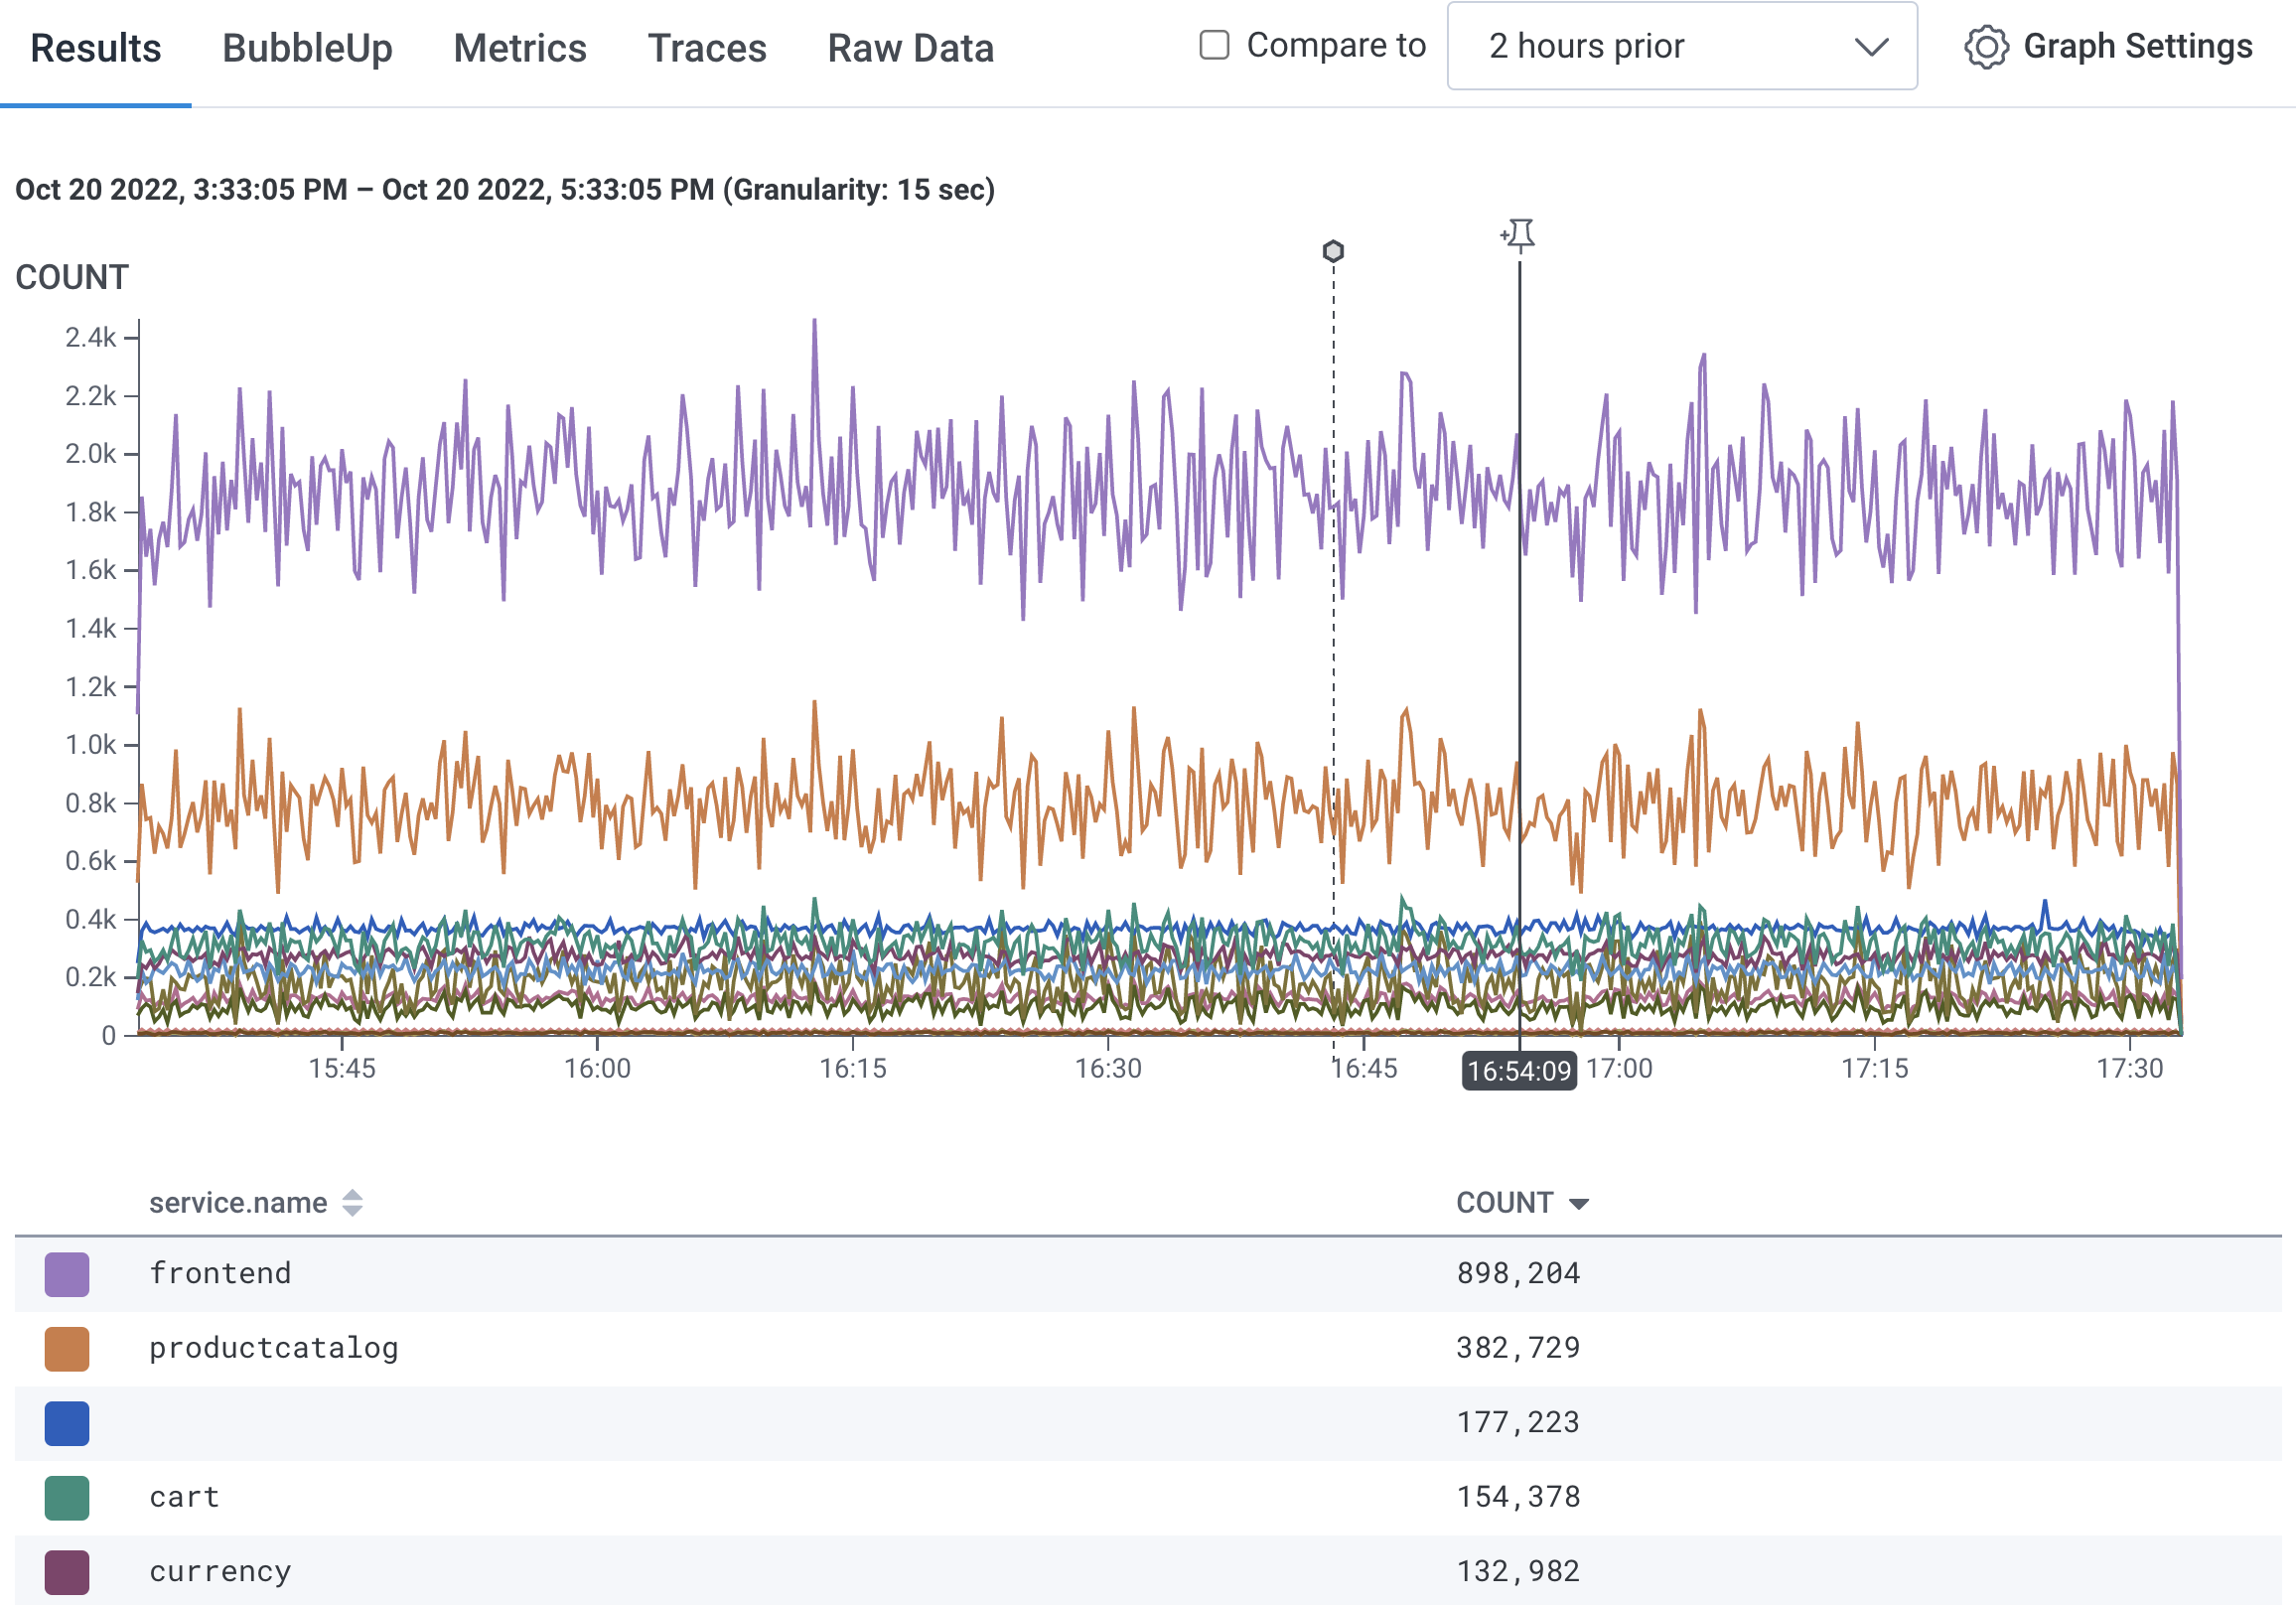
In Query Builder, create a query with VISUALIZE COUNT, GROUP BY the Service name, and LIMIT 1000.

Select Run Query.
Review the service names list below the visualization chart.

Find and correct any service name issues in your current instrumentation to avoid Dataset creation issues.
A Service exists with multiple service names.
Check for misspellings and inconsistent usage of dashes, periods or underscores in the service name.
When Environments ingest data, each service name variation creates a new Dataset.
For example, webapp_service and webapp-service creates two datasets in an Environment.
We encourage you to rename these services for consistency.
A Service name’s value is blank or null.
Data with no service name are sent to the unknown_service Dataset.
A service name that includes high cardinality values like process ID or build ID.
After correcting service names, run the query to find services, and save your list of service names.
Above the heatmap, select Graph Settings and choose Download CSV to download the query results in .csv format.
Use this file when migrating to confirm if all expected services migrated and exist in the new Environment with their own datasets.
Next Step: With the services list calculate the total number of expected datasets for the new Environment.
Use your inventory to calculate how many datasets, both Service and General, will be created in your new Environment.
For most plans, we limit datasets to 100 datasets per environment. For Enterprise plans, we limit datasets to 300 datasets per environment.
If you need more datasets per environment, contact Support via support.honeycomb.io or email at support@honeycomb.io.
Deliverables: A total number of expected datasets in the new Environment. Use this total to determine if a blocker exists and contacting Honeycomb Support is needed.
Next Step: Continue to the next step of auditing your Dataset Schemas to assure an optimized querying experience in your new Environment.
Review each dataset’s schema definitions for any mismatches that may impact your future environment querying experience.
Mismatches may include situations where Service A uses trace-id for the trace ID while Service B uses t.id for the trace ID.
If writing verbose environment queries, such as COUNT where trace-id = X or t.id = X, is unappealing, we recommend to update your instrumentation to send consistent fields.
Deliverables: A standardized dataset schema across your datasets. This data clean-up step assures that querying in your future Environment will not require verbose query logic to accommodate exceptions.
Next Step: Continue to the next step and if your instrumentation uses the correct Service name notation.
As a part of your migration preparation, the instrumentation for an Environment must send service.name for the Service name field.
In your Honeycomb Classic datasets, a different field may be configured to represent a service in your data.
Check each service dataset’s Dataset Definitions in your Dataset Settings.
If using a different field name than service.name for the Service name dataset field, update your instrumentation to use service.name instead.

Deliverables: Your classic datasets now use service.name.
This data clean-up step ensures the correct Service name format exists in your instrumentation.
Next Step: Continue to the next step and determine if your existing instrumentation requires updating.
Environments and Services in Honeycomb means major changes for the API used to send data. As a result, some libraries require updating, while other libraries recommend updating to a minimum version.
While minimum version guidance appears here, we recommend using the latest version to enjoy a library’s full benefits and features. Use the information below to determine if your instrumentation requires a version update, and to explore update benefits.
Once identified, update your instrumentation accordingly. This instrumentation update can be done before migration or as a migration step.
Deliverables: A list of existing instrumentation. Use this list to verify migration version requirements and troubleshoot if instrumentation issues are encountered in your new Environment. This step ensures that your current instrumentation can support sending data to an Environment.
We recommend using the latest version, but the minimum recommended version (below) provides Environment-friendly configuration and default behaviors:
honeycomb-opentelemetry-java), version 0.9.0 - Changeloghoneycomb-opentelemetry-dotnet), version 0.21-0-beta - ChangelogNext Step: Continue to the next step of determining what Honeycomb features you use.
Part of the migration involves recreating configurations in your new Environment for any currently used Honeycomb feature(s).
Prepare for migration by:
Deliverables: A inventory of existing Honeycomb feature use, their future configuration level (Dataset or Environment), and method of recreation. This inventory should adjust for any feature limitations while planning future configuration. Use this list to plan and track progress when recreating Honeycomb features in the new Environment.
Inventory your Team’s use of the following Honeycomb features:
Attributes, or fields in the dataset
NOTE: Attributes are typically created as data comes into the environment; however scenarios may exist where you want to create a configuration for an Attribute that does not exist yet, but may eventually exist. (For example, errors in an application.)
For each feature, assess whether a feature configuration should be recreated at the Dataset or Environment level in the new Environment. Use a Honeycomb feature throughout your Environment, and not limited to a specific dataset or repeated to multiple datasets. For example, use an Environment-wide Marker to indicate a deploy across all of the Environment’s datasets.
For Triggers and SLOs, no environment-wide configuration is available. If no environment-wide configuration is available, you will need to recreate the configuration for each Dataset.
For example, a Dataset in the Classic Environment may have a trigger that acts across multiple services. This trigger is needed on multiple services, like “CartService” and “PaymentService”. Therefore, during migration, create this trigger for both the CardService dataset and the PaymentService dataset.
Use your inventory so far to calculate how many of the following are needed in your new Environment(s):
Free teams have 2 Triggers across all Environments. Pro teams have 2 SLOs and 100 Triggers across all Environments. Enterprise teams have 100 SLOs and 300 Triggers across all Environments.
If these amounts are not sufficient, migration is not recommended. Join the #discuss-hny-classic channel in our Pollinators Community Slack for support and and to ask questions. For Pro and Enterprise users, contact Support via support.honeycomb.io, or email at support@honeycomb.io.
Determine your method for recreating feature configurations.
For features with a few configurations to recreate, use the Honeycomb UI.
For features with a large number of configurations to recreate, we recommend using the feature’s respective API to configure new configurations. If familiar with Terraform, use existing documentation to manage your Honeycomb configuration. Terraformer, an early-stage project, may help accelerate your transition to a Terraform-managed Honeycomb configuration.
Use the list below to explore UI and API documentation.
Attributes, or fields in the dataset -
NOTE: Attributes are typically created as data comes into the environment; however scenarios may exist where you want to create a configuration for an attribute that does not exist yet, but may eventually exist. (For example, errors in an application.) The only option to create fields before data exists is the Columns API.
Join the #discuss-hny-classic channel in our Pollinators Community Slack to ask questions and learn more.
For Pro and Enterprise users, contact Support via support.honeycomb.io or email at support@honeycomb.io.
You reached the end of your migration preparation!
As a result, you should be able to reference:
If all of the above tasks are completed, this means that your systems should be compatible with the new Environments and Service model with minimal impact. Proceed with the Migration!