

This feature is available as part of the Honeycomb Enterprise and Pro plans.
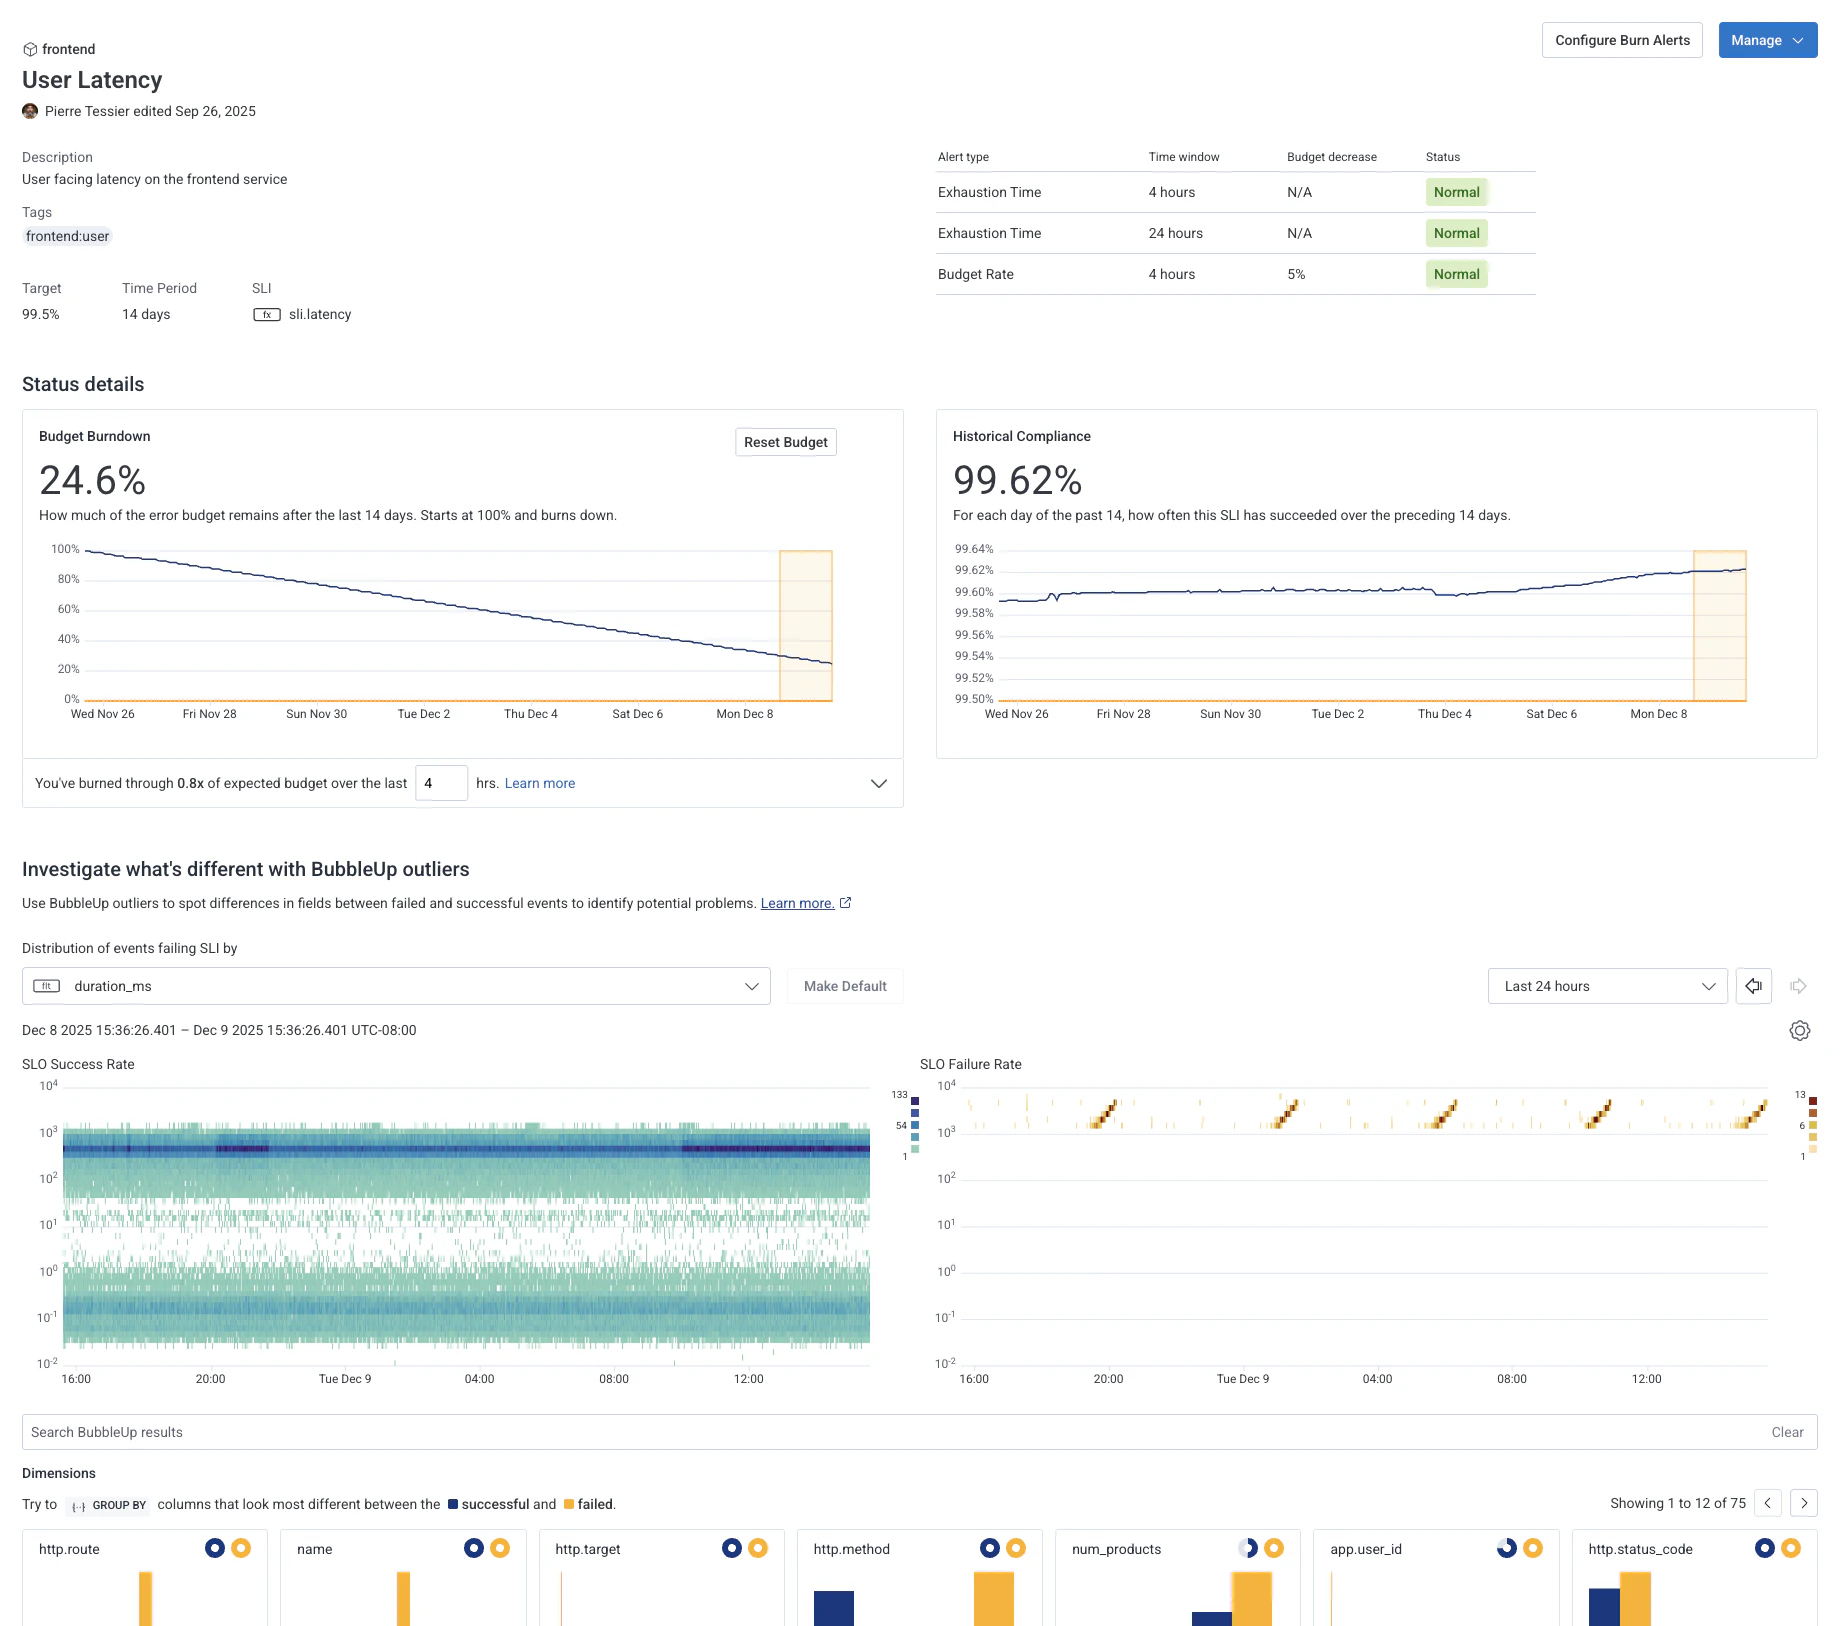
- Name
- Creator user name
- Creation date
- Description
- Tags of assigned key:value pairs
- Summary chart of existing Burn Alerts with set exhaustion time and status
- Budget Burndown - shows the cumulative error against the set SLO budget.
- Burn Rate - gives the ratio of actual failures in the SLO to expected failures in the given time window.
- Historical SLO Compliance - shows often the SLI has succeeded for each day over the preceding SLO Time Period.
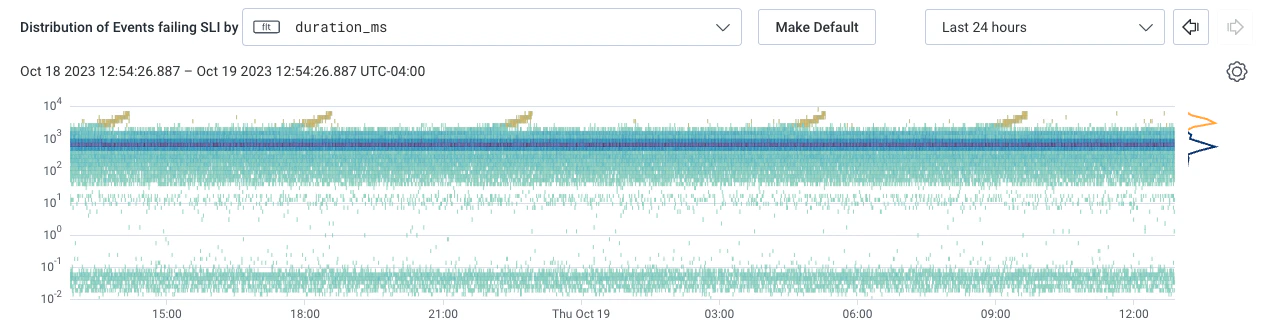
- Heatmap - shows events that succeed the SLI (in blue-green) and that fail (in yellow) on a heatmap of duration.
- BubbleUp - shows the dimensions where the events that pass the SLI (in blue) and those that fail it (yellow) are most different.
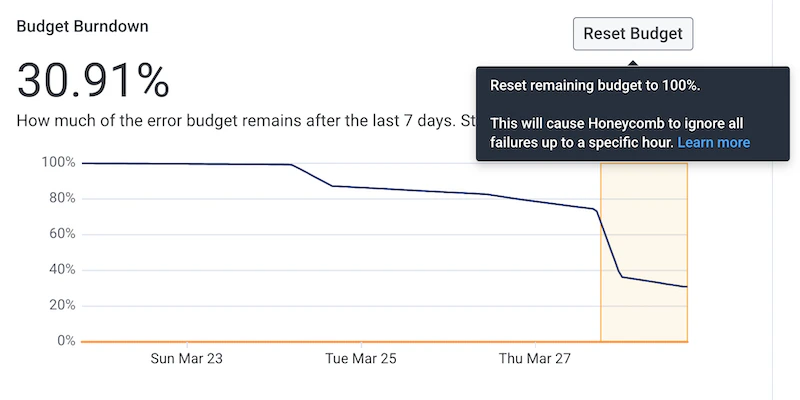
Budget Burndown
Budget Burndown shows the cumulative error against the SLO budget and projects how much budget remains over a given period of time. The Budget Burndown starts at100% and decreases as the budget reduces.
This value is computed as a rolling window, so every moment is based on the preceding time.
To receive alerts on this measurement under certain conditions, use Burn Alerts.
Burn Rate
Burn Rate gives the ratio of actual failures in the SLO to expected failures in the given time window. The burn rate, located below the Budget Burndown chart, tells the current burn rate in the lastX hour(s).
The time window defaults to 4 hours, but you can input a different value to recalculate the current burn rate for your situation.
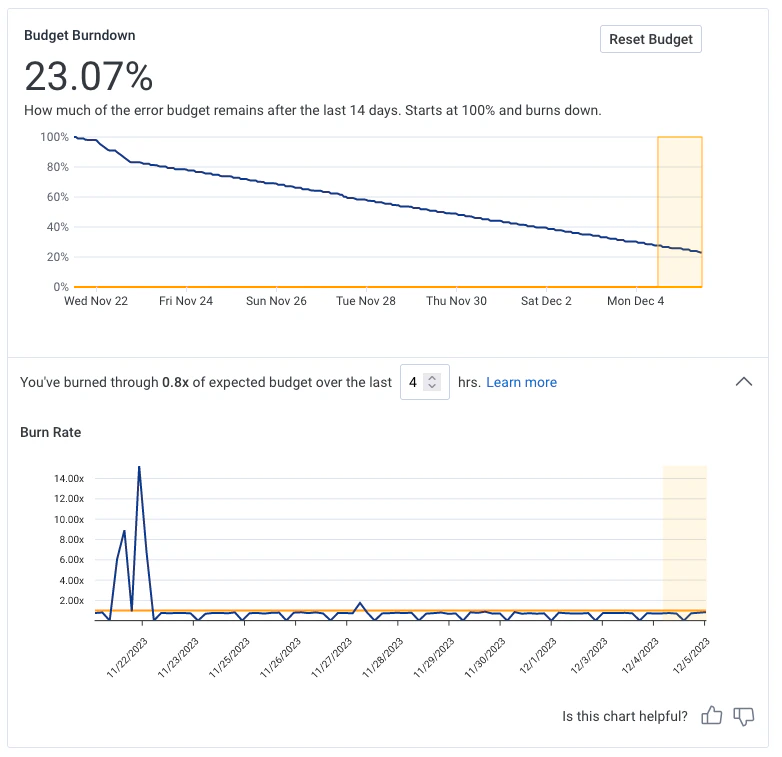
X hours in the time window, the Historical Burn Rate chart displays the burn rate over X hours for the SLO.
It is expected and acceptable for an SLO to sometimes burn at a higher rate than budgeted, and to sometimes burn at a lower rate than budgeted.
Over time, you will know if you meet your specific SLO budget; the burn rate, however, informs on your SLO budget’s recent behavior.
Interpreting a Burn Rate
A burn rate of1.0 means that the SLO budget is reducing as expected and as budgeted, given the parameters of the SLO.
This means the SLO experienced the expected number of failed events.
A burn rate of less than 1.0 means that less failures occurred than what was budgeted in the SLO.
If this burn rate is consistently below 1.0, this could be a signal of an SLO that you should revisit.
Is the SLO underambitious?
Is the SLO capturing the signal you care about?
A burn rate of greater than 1.0 means that more failures than expected occurred, given the budget of the SLO.
The higher the multiplier, the more likely the SLO is impacted by the high count of failures.
This may indicate that something is clearly wrong with your service and that you need to investigate.
For example, for an SLO with a 30 day period, the following multipliers correlate to the amount of time until the SLO budget reaches zero:
- 1x = 30 days
- 2x = 15 days
- 4x = 7.5 days
- 8x = 3.25 days
- 16x = 39 hours
- 32x = 19 hours and 30 minutes
- 64x = 9 hours and 45 minutes
- 128x = almost 5 hours
Historical SLO Compliance
Historical SLO Compliance shows how often the SLI has succeeded for each day over the preceding SLO Time Period, such as 14 days.Heatmap
This Heatmap display shows events that succeed the SLI and events that failed the SLI on two heatmaps of duration. The time axis runs over a much shorter period than the full SLO period, which allows you to focus on individual events and times that set off the SLO. You can modify the heatmap using the following controls:- Selected Column
- Time Range
- Linear or Log Scale
duration_ms is the selected column and displays duration_ms over time and how frequently each duration - time period combination occurs.
In many cases, you do not need to change the selected column, or field.
If your SLI consists of multiple fields like duration, status codes, and other measures, you may want to explore seeing successful and failed events across different fields.
Time Range specifies the start and end time for data in your heatmap and BubbleUp display.
Modify the time range using the time picker in the upper right corner above the heatmap.
This time range appears as an orange range within the Budget Burndown and Historical Compliance charts.
Adjust the time range if you seek more information on your SLO, such as a sudden drop in SLO Budget.
View the heatmap in log scale or linear scale.
By default, SLO heatmaps display in log scale.
Log scale displays a heatmap with a LOG() transformation applied to your data, which helps visualize duration times and large outliers.
Linear scale displays a heatmap with a linear axis, which helps with less extreme outliers such as status codes.
Select the Settings icon () above the heatmap to change this setting.
This setting is locally saved to the browser and does not save to the SLO.
BubbleUp
The BubbleUp series at the bottom of the screen shows the dimensions where the events that pass the SLI (in blue) and those that fail it (yellow) are most different. This information can provide insight into the causes for current burndown activity. The BubbleUp looks at the same time period as the heatmap.Reset Your Remaining SLO Budget
Burn Alerts will only activate if a SLO budget remains above zero. If the error budget was depleted due to some issue and then you fixed the problem, it is worth resetting your error budget so Burn Alerts will start working again.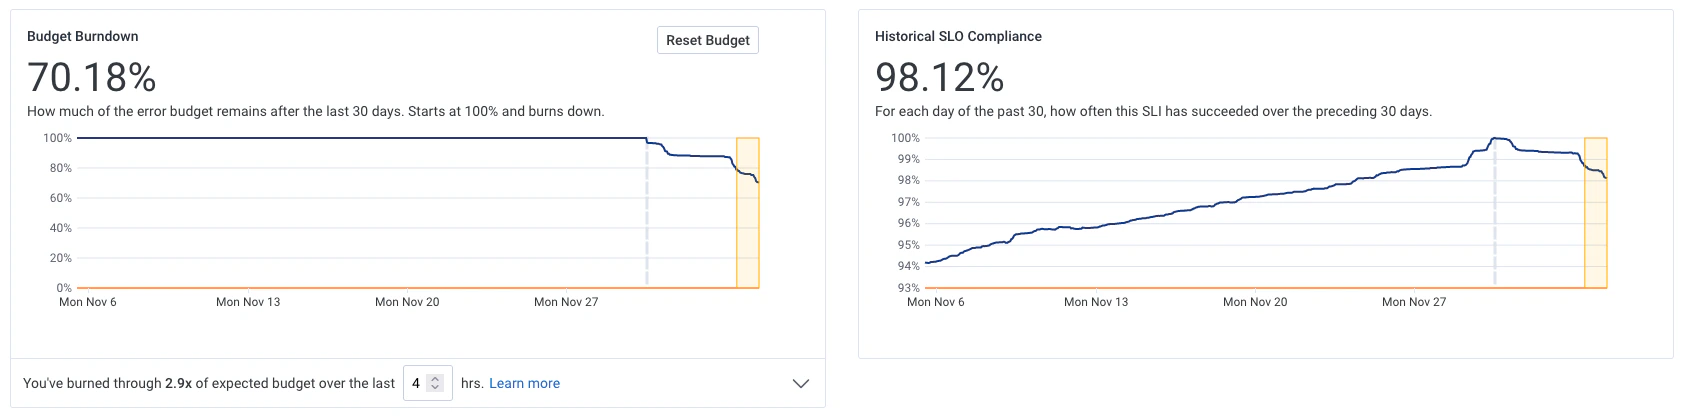
- The SLO Budget Burndown chart starts at 100% compliance to the left of the dashed line because all errors before that reset and after the start of the compliance period were erased.
- The Historical SLO Compliance chart increase over time in the time period before the reset and after the start of the compliance period when the SLO was reset.
- Go to the target SLO’s SLO detail view.
- Locate the Budget Burndown chart.
-
Select the Reset Budget button in the Budget Burndown chart.
-
In the confirmation window that appears, select when Honeycomb starts counting new failures after resetting the SLO. Choose between:
- before the current hour: ignores prior failures up to the current hour. For example, if the SLO budget is reset at 8:15, then Honeycomb starts counting new failures from 8:00 onwards. Use if you want to continue to catch issues on your SLO for the current hour.
- after the current hour: ignores prior failures up to and including the current hour. For example, if the SLO budget is reset at 8:15, then Honeycomb starts counting new failures from 9:00 onwards. Use if you no longer want to be alerted about errors for the current hour. If you are confident that no more issues will occur on your SLO, choose this option to fully reset your alerts and ignore events up to the hour.
- Select Reset to reset your SLO budget.
Ignore Past Budget Resets
If you used Budget Reset to reset your SLO’s budget, then Ignore Budget Resets gives the ability to view the SLO Budget Burndown and SLO Historical Compliance charts without accounting for past resets. This setting does not permanently remove past resets and allows you to toggle between two perspectives. To modify the charts’ view and ignore previous budget resets, select the Ignore Budget Resets checkbox above the SLO Historical Compliance chart.
Tasks
- Configure Burn Alerts
- Delete
- Edit SLO
- Use Ignore Budget Resets to modify charts’ view