

If not yet ready to use OpenTelemetry, you can use the Honeycomb Lambda Extension. This extension is designed to run alongside your Lambda Function. It integrates with the Lambda Logs API and receives log messages from your lambda function, which are then sent to Honeycomb as events. Structured log messages sent toDocumentation Index
Fetch the complete documentation index at: https://docs.honeycomb.io/llms.txt
Use this file to discover all available pages before exploring further.
stdout or stderr from your lambda function will be sent to Honeycomb as events.
The extension can be run inside a container or added as a Lambda Layer.
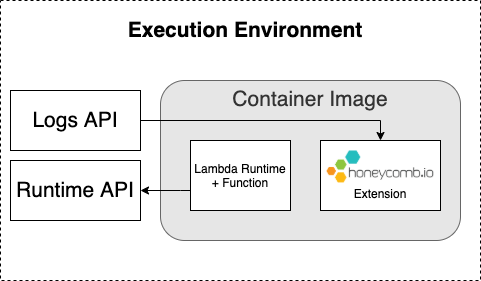
How It Works
AWS Lambda Extensions allow you to extend the functionality of Lambda functions through configuration as Lambda Layers or run inside a container image. Extensions run alongside the Lambda Runtime and can read data environment variables from the environment. Once the Honeycomb Lambda Extension is configured, any structured logs emitted tostdout or stderr by your Lambda function will be parsed by the extension and sent to a dataset that you specify in Honeycomb.
Logs emitted in a Lambda invocation will be parsed during the following invocation, and any remaining logs will be parsed whenever the Lambda runtime shuts down.
This means that you may experience some delay in seeing events arrive in Honeycomb, especially if your Lambda function receives low traffic.
Architectures
The Honeycomb Lambda Extension is available as an external extension pre-built in a lambda layer for eitherx86_64 or arm64 architectures.
Graviton2
arm64 is supported in most, but not all regions.
See AWS Lambda Pricing for which regions are supported.Installing as a Lambda Layer
To start using the Honeycomb Lambda Extension, add the extension to your function as a Lambda Layer. Add the following environment variables to your Lambda function configuration:LIBHONEY_DATASET- The Honeycomb dataset you would like events to be sent to. This could be the service name representing the function or a generic dataset name representing the data.LIBHONEY_API_KEY- Your Honeycomb API Key (also called Write Key).
LIBHONEY_API_HOST- Mostly used for testing purposes, or to be compatible with proxies. Defaults to<https://api.honeycomb.io/>.LOGS_API_DISABLE_PLATFORM_MSGS- Optional. Set to “true” in order to disable “platform” messages from the logs API.HONEYCOMB_DEBUG- Optional. Set to “true” to enable debug statements and troubleshoot issues. Enabling this will subscribe to Libhoney’s response queue and log the success or failure of sending events to Honeycomb.HONEYCOMB_BATCH_SEND_TIMEOUT- Optional. Default: ”15s” (15 seconds; refer to note below about timeout durations). The timeout for the complete HTTP request/response cycle for sending a batch of events Honeycomb. A batch send that times out has a single built-in retry; total time a lambda invocation may spend waiting is double this value. A very low duration may result in duplicate events, if Honeycomb data ingest is successful but slower than this timeout (rare, but possible).HONEYCOMB_CONNECT_TIMEOUT- Optional. Default: 3s (3 seconds; refer to note below about timeout durations). The timeout for establishing a TCP connection to Honeycomb. This is useful when there are connectivity issues between your Lambda environment and Honeycomb, allowing upload requests to fail faster and avoid waiting for the longer batch send timeout to elapse.
TIMEOUT options should be given a value in a format parseable as a duration, such as “1m”, ”15s”, or “750ms”.
There are other valid time units (“ns”, “us”/“µs”, “h”), but their use does not fit a timeout for HTTP connections made in the AWS Lambda compute environment.
Installing in a Container Image
AWS Lambda functions can now be packaged and deployed as container images. This allows developers to leverage the flexibility and familiarity of container tooling, workflows and dependencies. AWS Lambda provides a number of base images you can use. You can also use a custom base image, and adjust the examples accordingly.Performance Implications
The Honeycomb Lambda Extension runs independently of your Lambda Function and does not add to your Lambda Function’s execution time or add any additional latency. However, it does increase your Lambda Function’s size in proportion with the size of the Honeycomb Lambda Extension binary.Examples
Below are some structured logging examples using some libraries we are familiar with at Honeycomb. Feel free to use your own!Go
Python
JavaScript
Do not use
console.log to write structured log lines in Lambda.
Lambda uses a patched version of console.log, injecting extra information with each line that does not work correctly with the Honeycomb Extension Lambda Logs integration.