

This feature is in beta, and we would love your feedback!
- Gate deployments based on error rates introduced by the current build
- Run automated performance checks in blue/green style deployments
- Drive canary release patterns
- Check SLI error rates in staging before promoting to production
- Prevent automated deployments during an ongoing incident
- Ensure deployments are sensitive to the current service status in any environment
The Honeycomb Deployment Protection Rule is available to all Honeycomb customers.
However, you must be a GitHub Enterprise Cloud customer to use GitHub Actions Deployment Rules.
How It Works
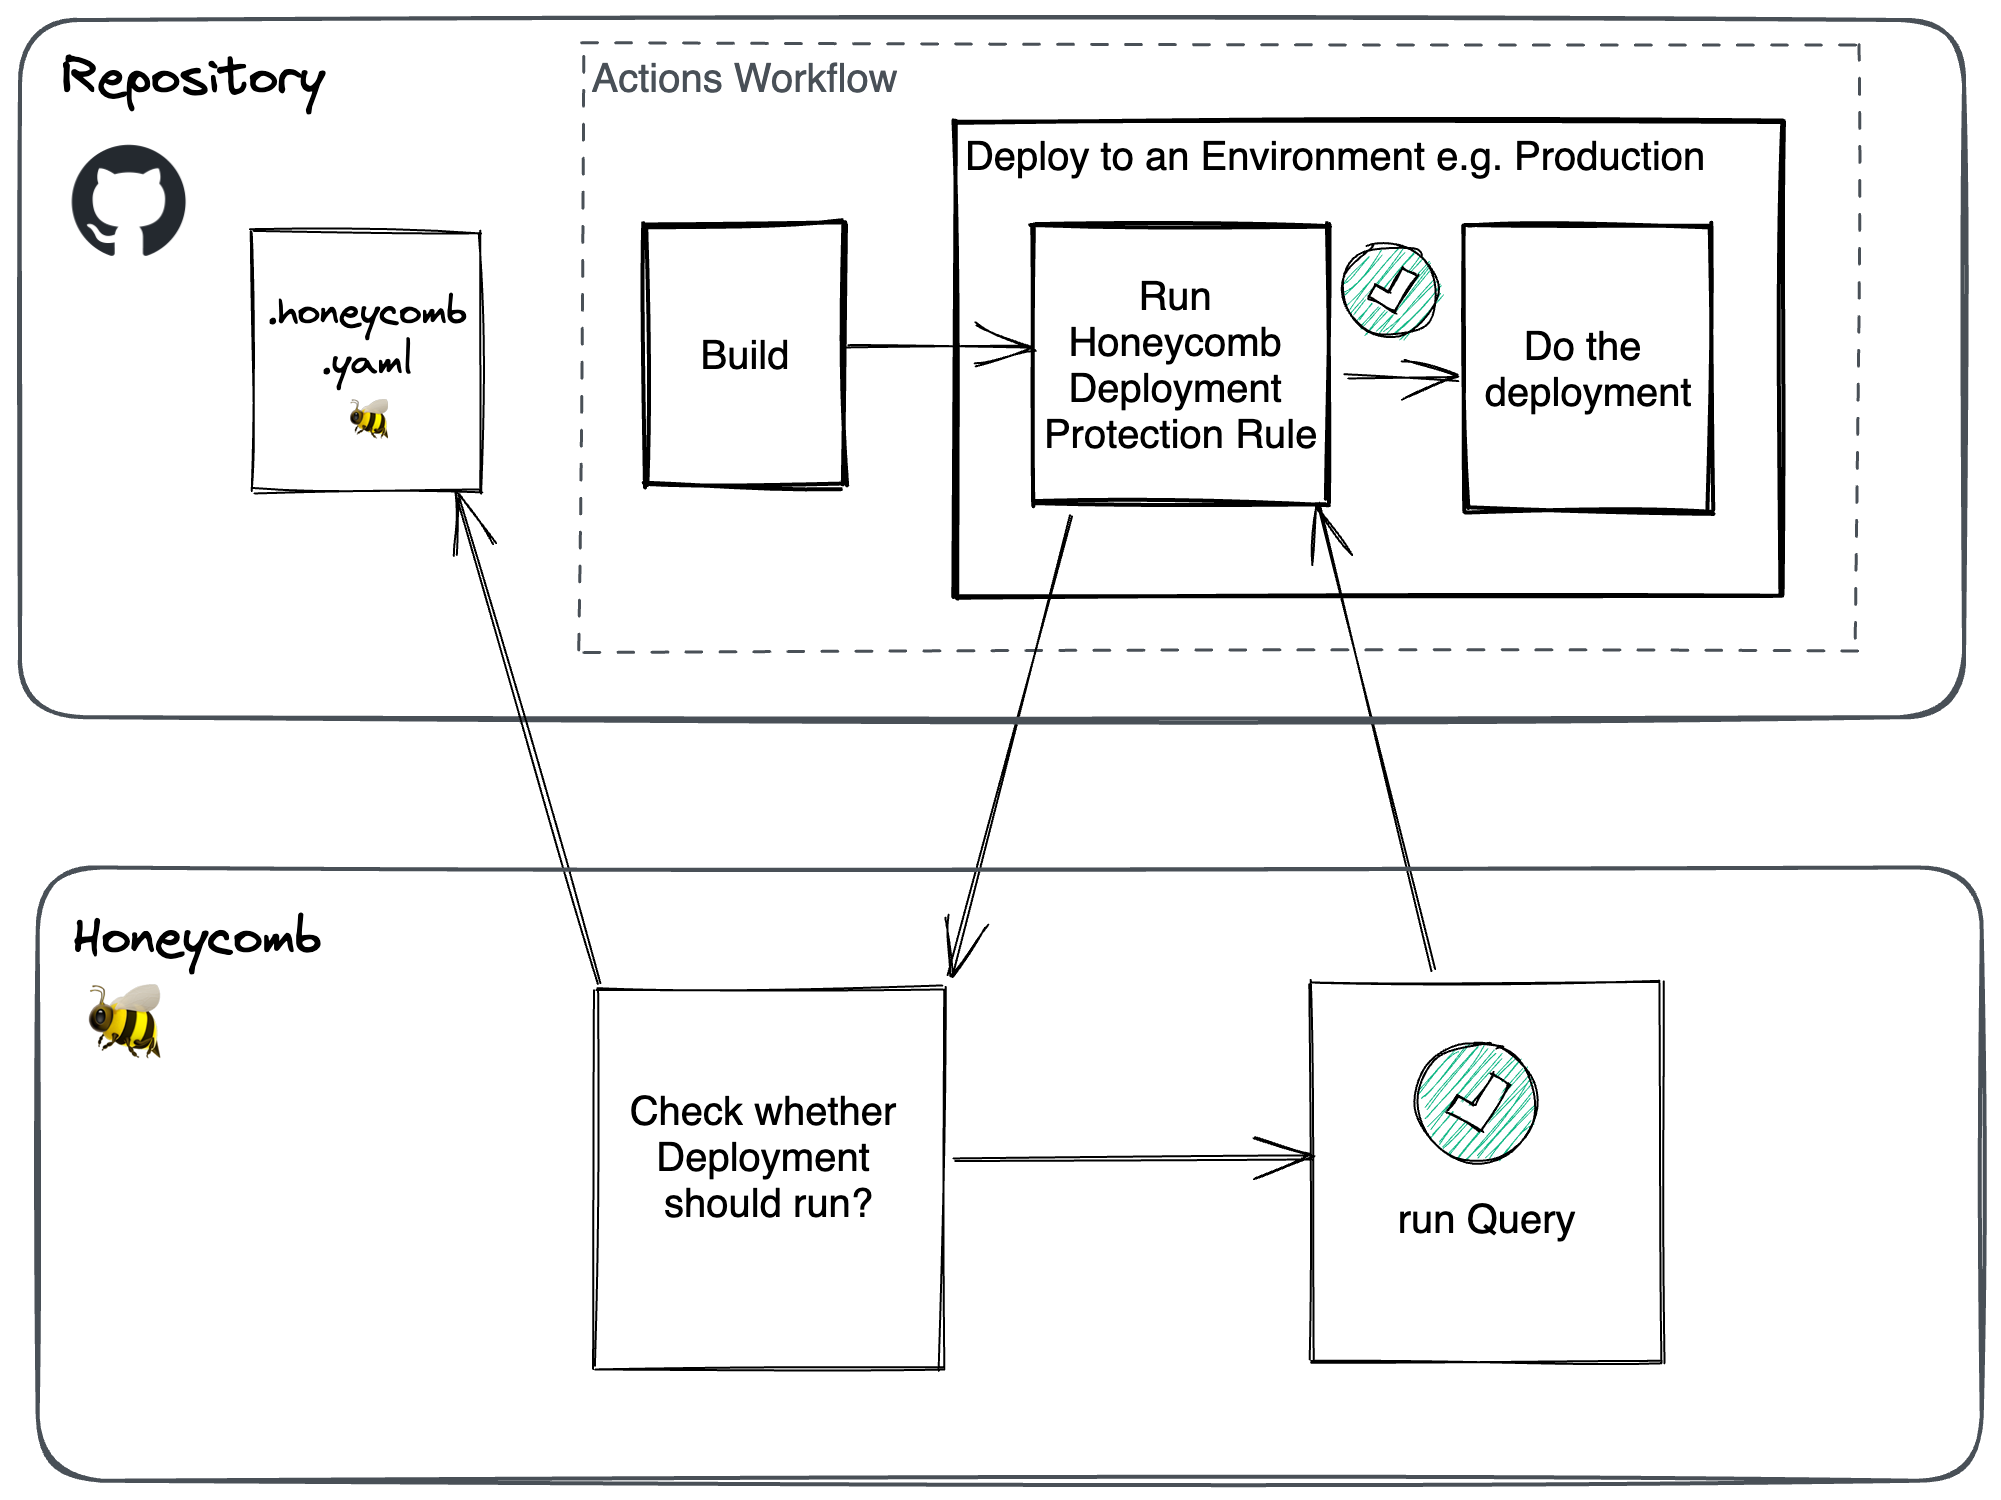
When enabled, the Honeycomb Deployment Protection Rule runs as a check prior to any deployment actions. It determines whether a deployment into the target GitHub environment is allowed to proceed. Honeycomb deployment protection rules consist of a Honeycomb query, a threshold, and an operator (>, <, or =).
When a deployment is requested in your Actions workflow, the rule sends its payload to Honeycomb for evaluation, where it asks if the deployment is allowed to proceed.
After Honeycomb completes the query evaluation, it returns a pass/fail response.
All deployment protection rules are configured in a .honeycomb.yaml file that must be checked and located in the root directory of your GitHub repository.
Otherwise, Honeycomb does not have permission to access this file.
The .honeycomb.yaml file can contain a configuration block for each GitHub environment that the repository is deployed.
Prerequisites and Limitations
- GitHub Actions Deployment Protection Rules are only available to GitHub Enterprise Cloud customers.
- Completing the GitHub App installation requires a GitHub Owner to grant authorization and allows Honeycomb access to your GitHub organization and its repositories.
- Linking GitHub to a Honeycomb team requires Honeycomb Team Owner permissions in Honeycomb.
- Maximum Honeycomb query limits exist.
- Deployment protection rules only work with GitHub Actions workflows that use GitHub environments as part of deployments.
Installation and Setup
Install the Honeycomb GitHub App
The Honeycomb Deployment Protection Rule is provided via the Honeycomb GitHub App. To install:- Navigate to the Honeycomb GitHub App.
- Select Install.
-
Then, select which organization to install the Honeycomb GitHub App.
The GitHub App installation flow requires a GitHub Owner to grant authorization that allows Honeycomb access to your GitHub organization and its repositories.
-
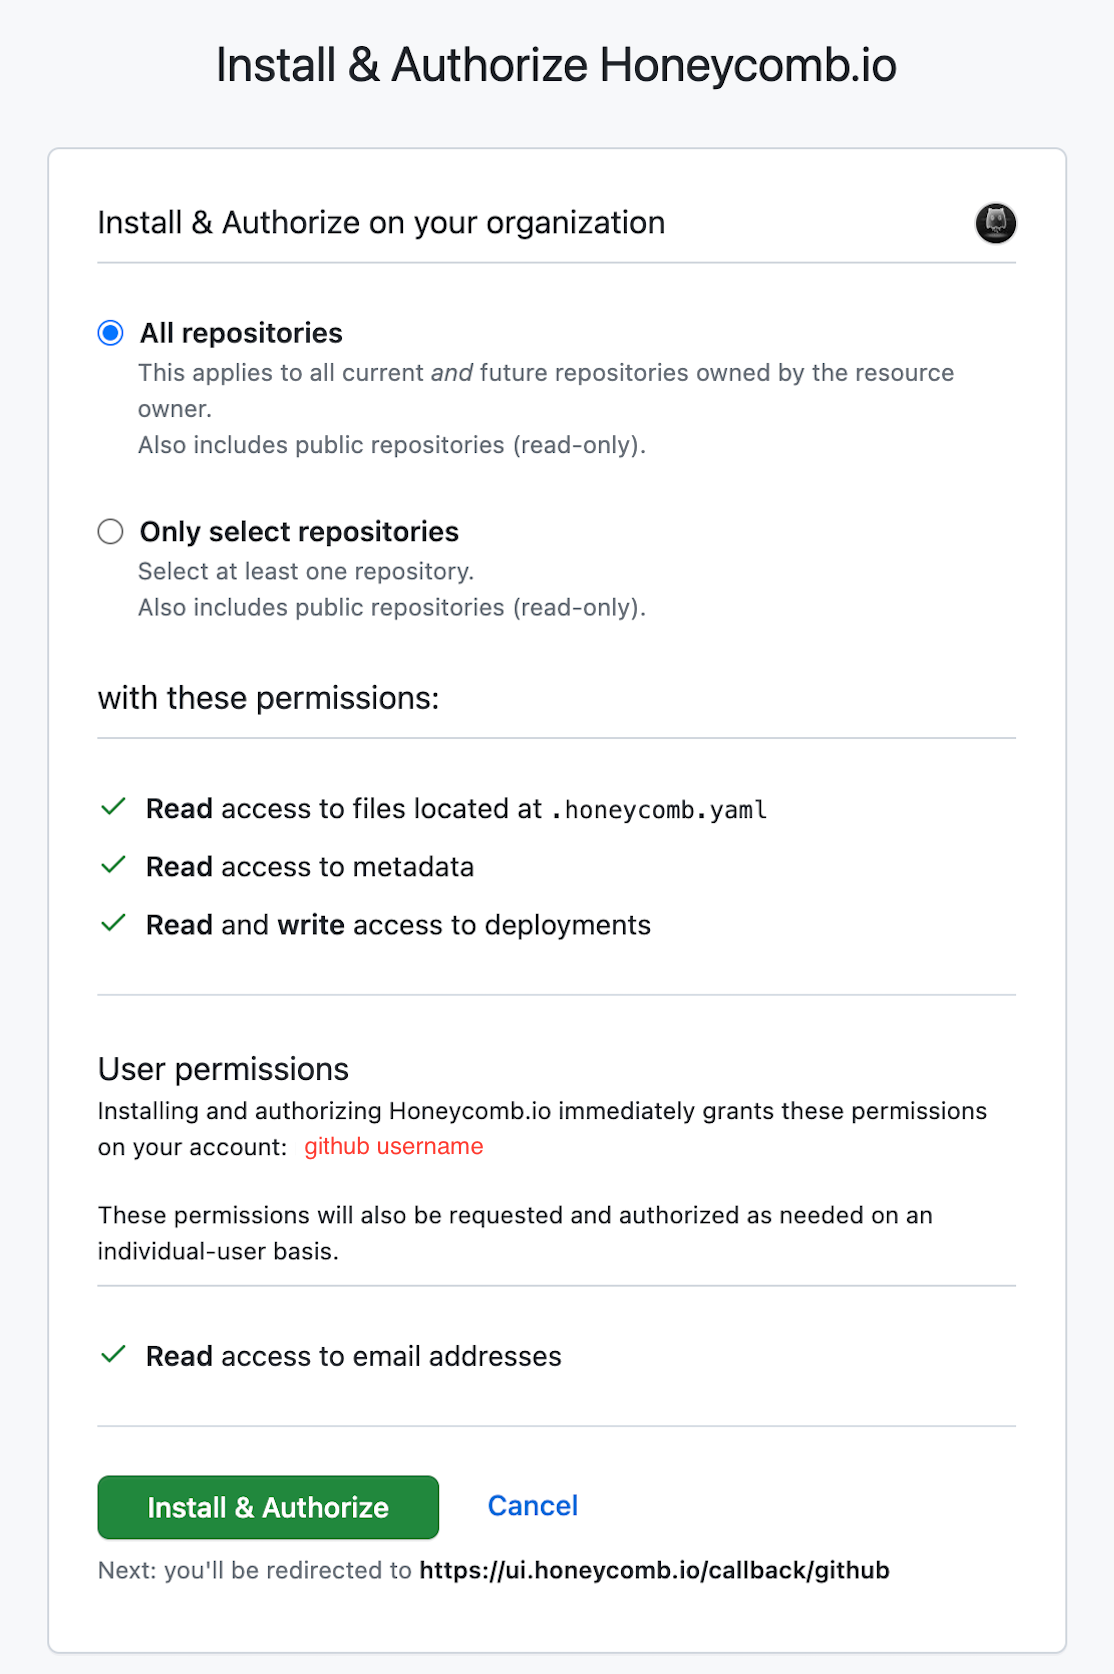
Authorize the Honeycomb GitHub App to your GitHub organization.
An example of requested permissions appears below.
- Once the GitHub authorization is complete, you are taken to Honeycomb to continue the installation process.
-
In Honeycomb, select the Honeycomb team to connect.
The Honeycomb team selection flow requires Honeycomb Team Owner permissions to complete.
- Then, confirm which team’s Honeycomb environments and datasets can be queried from your deployment protection rules.
Enable the Honeycomb Deployment Protection Rule in Each GitHub Environment
After installing the Honeycomb GitHub App, it must be enabled as an environment protection rule for your various GitHub environments.GitHub Actions Deployment Protection Rules apply at the GitHub environment level, not at the repository level.
Therefore, you must repeat this step for each GitHub environment where you wish to use the Honeycomb Deployment Protection Rule.
- Navigate to your GitHub repository.
- Under Settings > Environments, select the GitHub environment by its name.
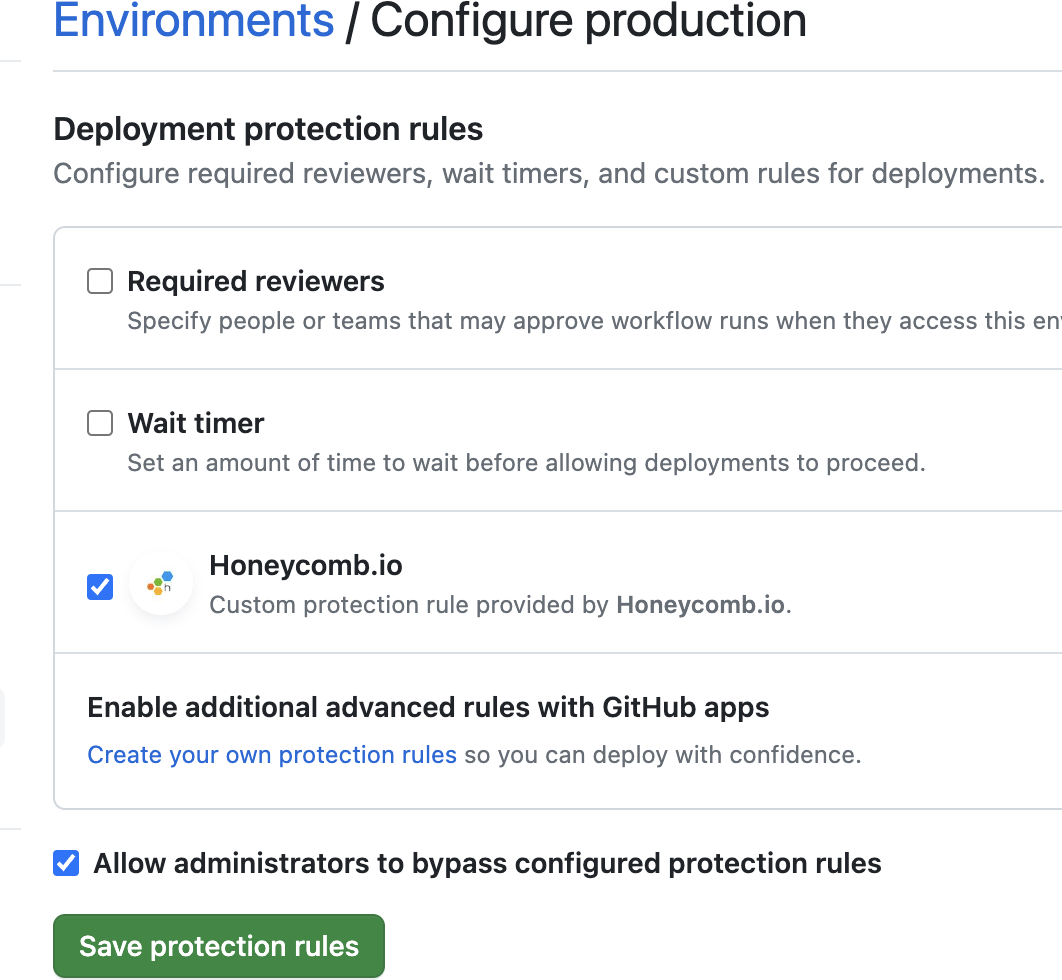
- Next, under Deployment protection rules, select the Honeycomb.io option. Optionally, select Allow administrators to bypass configured protection rules to allow GitHub Owners the ability to force a deployment when a deployment protection rule is in a failure state.
-
Select Save Protection Rules to continue.
Configure Honeycomb Deployment Protection Rules
You must create a.honeycomb.yaml file in the root of your repository to configure the queries and thresholds that act as a deployment protection rule for each GitHub environment.
The YAML file must have a configuration block for every environment with a deployment protection rule enabled; otherwise, the stage fails.
The
.honeycomb.yaml file must be in the root directory of your repository.
Honeycomb cannot access this file in a subdirectory..honeycomb.yaml file.
Guidance and resources exist for writing deployment protection queries.
Below is an example of a standard .honeycomb.yaml file.
honeycomb_teammust be the team where queries for all deployment protection rules runs. This is checked against the team authorized when installing the GitHub App.GITHUB_RUN_IDis a special variable interpolated by the GitHub App as the unique identifier of the GitHub Actions workflow run.
To configure GitHub Deployment Protection Rules against Honeycomb Classic:
- Specify
$classic$as the environment slug - Specify the dataset (because environment-wide queries are not compatible with Honeycomb Classic)
Writing Deployment Protection Queries
When writing Deployment Protection Queries, remember the following:- They operate similar to Triggers. The same queries and thresholds used to define Triggers can be used in deployment protection rules. For inspiration, visit our Trigger Examples.
-
Use the Query Builder UI to generate Query Spec JSON. As an alternative to composing JSON directly, you can use Honeycomb’s Query Builder to create the JSON for you.
To write a deployment protection query:
- Compose the query you wish to use as a deployment protection rule in the Query Builder and select Run Query.
-
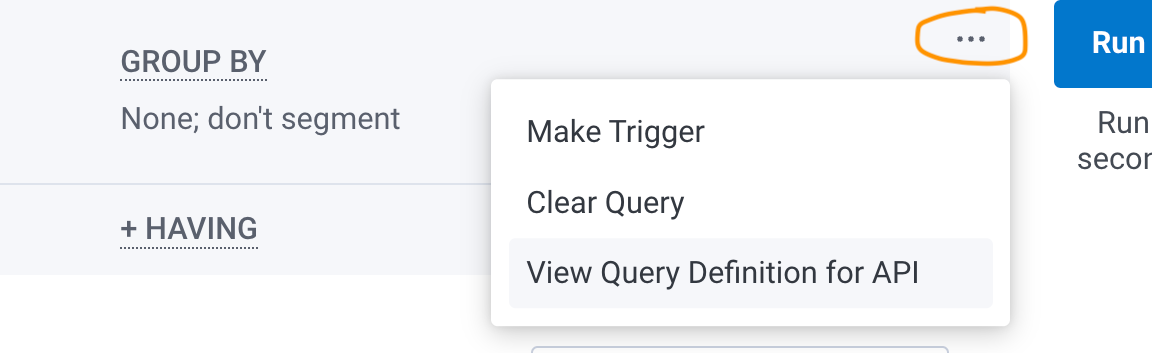
After you are satisfied with the query results that appear, select the three-dot overflow menu, located to the left of Run Query. Then, select View Query Definition for API.
-
A modal appears with the Query JSON. Use the copy button to copy the content, and paste it into the
specof your.honeycomb.yamlfile.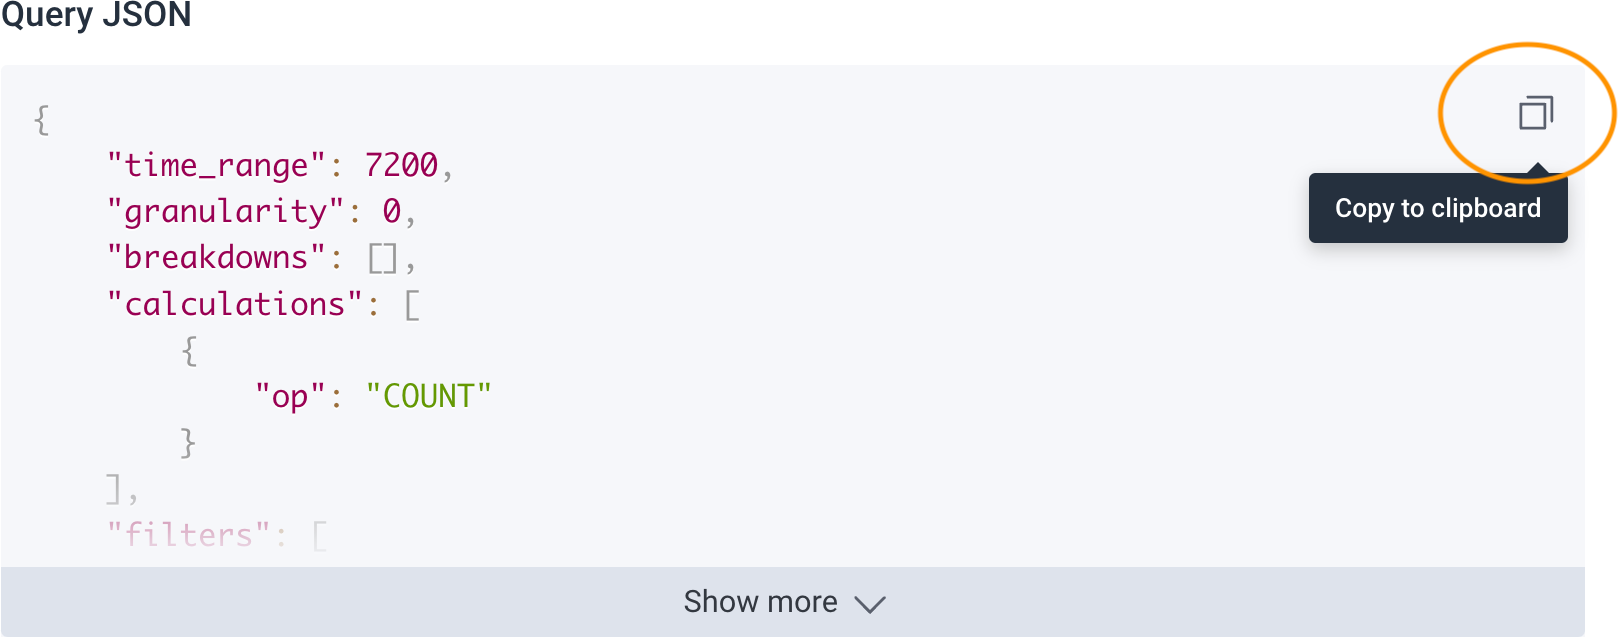
- Deployment Protection Queries can be extremely versatile. The only constraint is that query results must be evaluated against a numeric threshold. Otherwise, deployment protection rules can be used to extract very granular data about the state of your application and its systems. For detailed information on queries, refer to Honeycomb Query Builder documentation.
View the Result of Your Actions Workflow Deployments
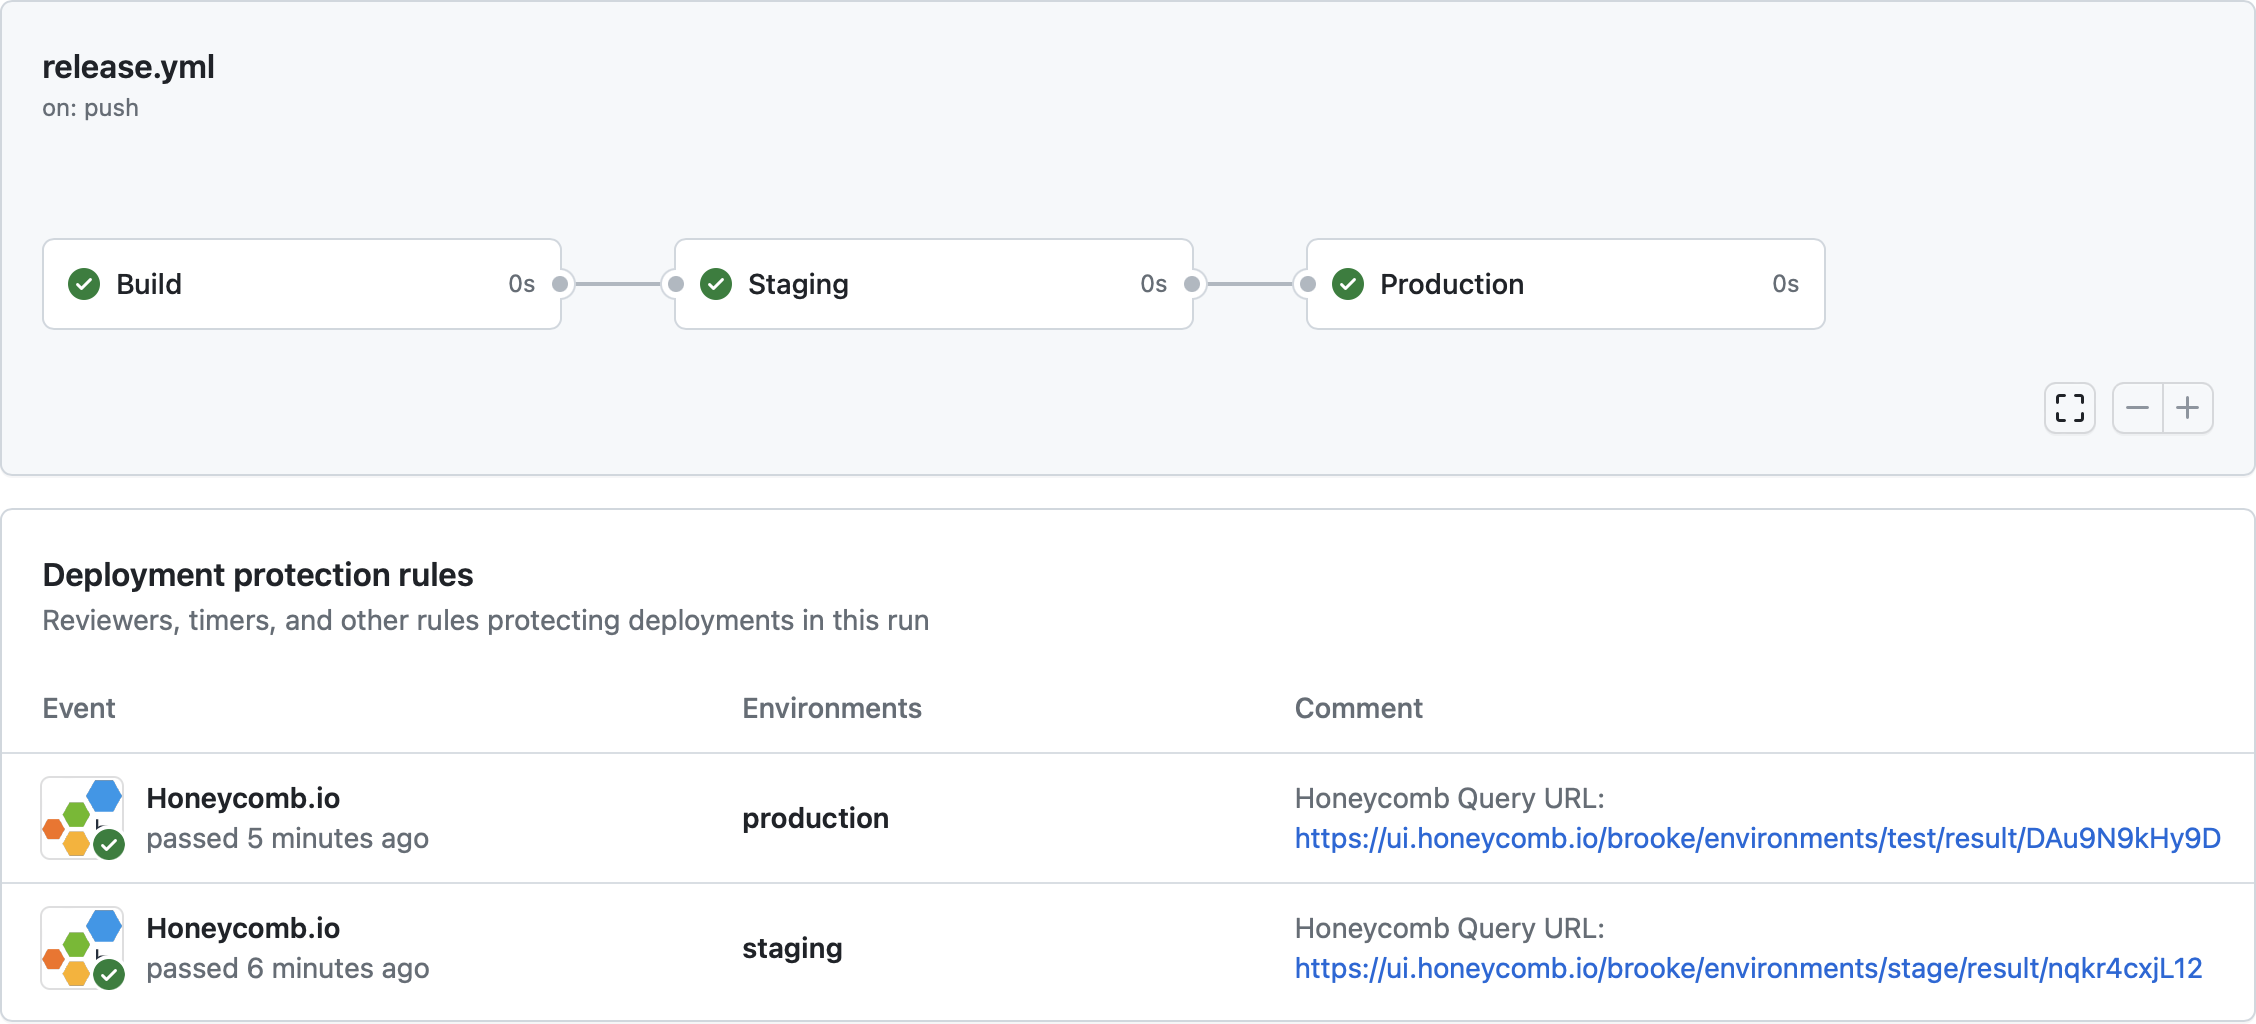
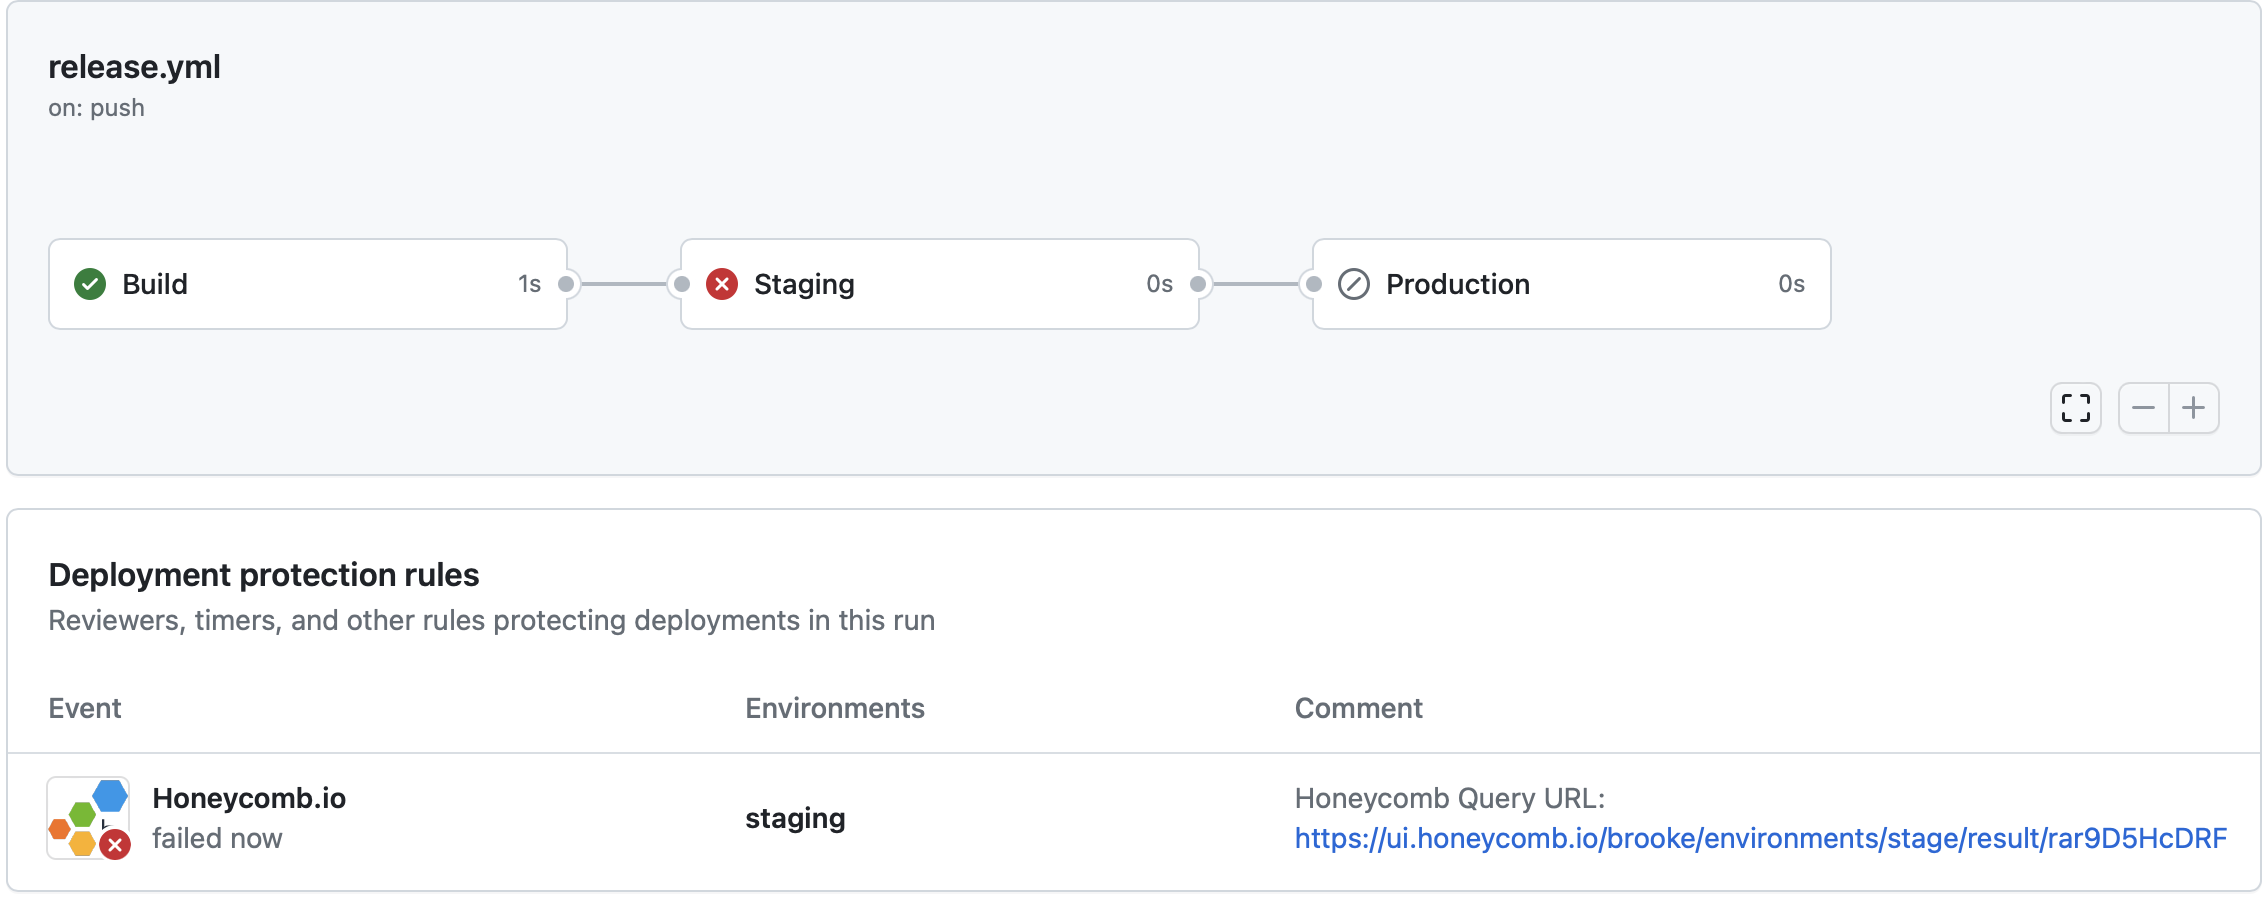
After being configured and merged into your repository, Honeycomb deployment protection rules runs when a deployment is requested and waits to receive a pass/fail status before a deployment can occur to the target GitHub environment. View the results of the Honeycomb deployment protection rules in the GitHub Actions Workflow run. Examples of passing and failing deployment rules appear below.- Passing deployment rule example
- Failing deployment rule example
Troubleshooting
GitHub App not Authorized
If the deployment protection rule fails with “GitHub App not authorized to access Honeycomb team”, uninstall and reinstall the GitHub App.Changing the Honeycomb Team
Only one Honeycomb team can be configured during installation of the Honeycomb GitHub App. You cannot change the Honeycomb team where deployment protection rule queries run without re-initializing the authorization flow. To change the Honeycomb team, you must uninstall and reinstall the GitHub App, and select the desired team during the new installation.Checking GitHub App Permissions
You can use Honeycomb to verify the status of the GitHub App installation. In Honeycomb’s left navigation menu, select Account and then select Team settings. Then, select the Integrations tab. Refer to the Honeycomb + GitHub section to determine the installation status.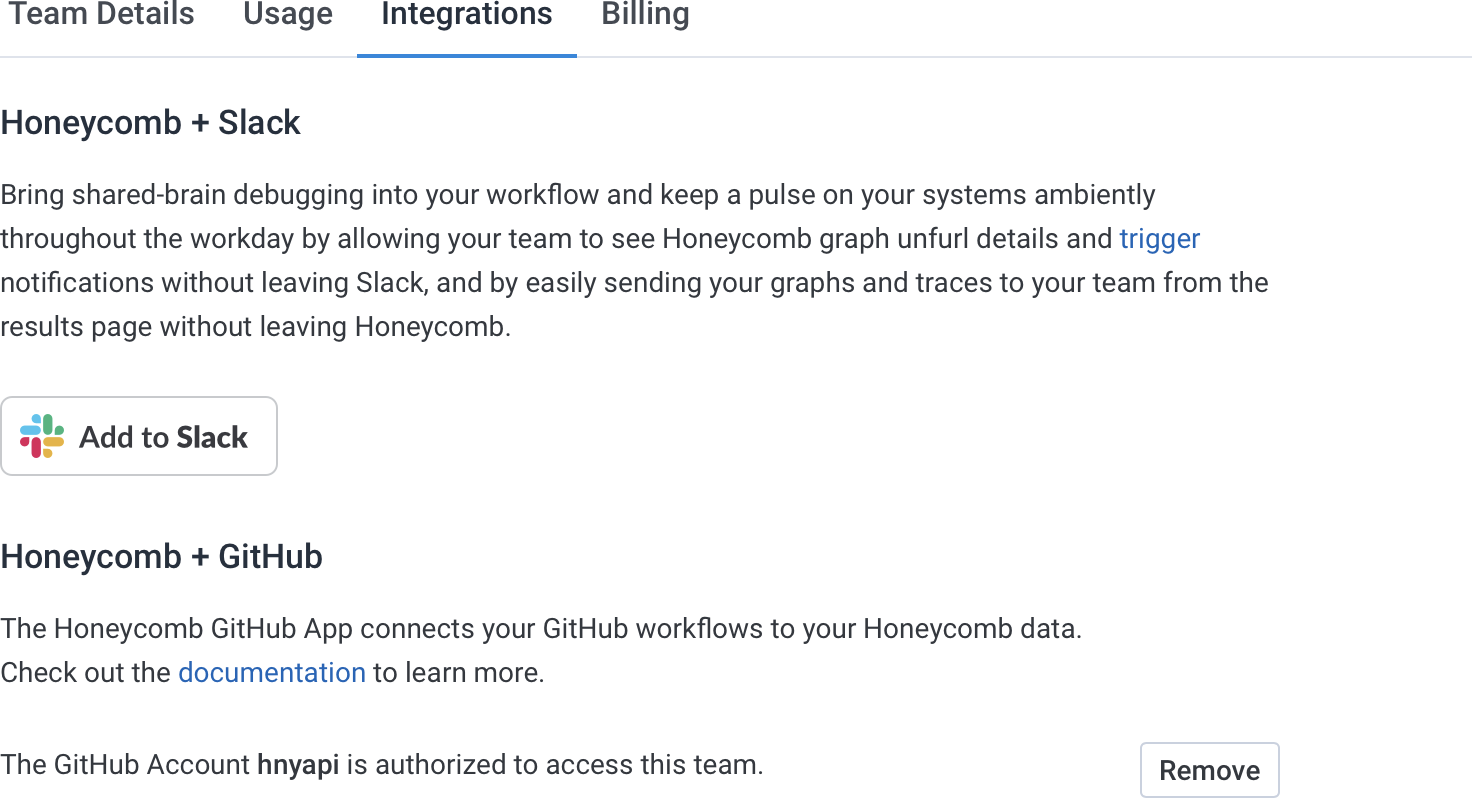
Forcing a Deployment
GitHub Owners can force a deployment when a deployment protection rule is in a failure state. Ensure you have the Allow administrators to bypass configured protection rules setting enabled when enabling the Honeycomb Deployment Protection Rule in your GitHub Environment to allow for this.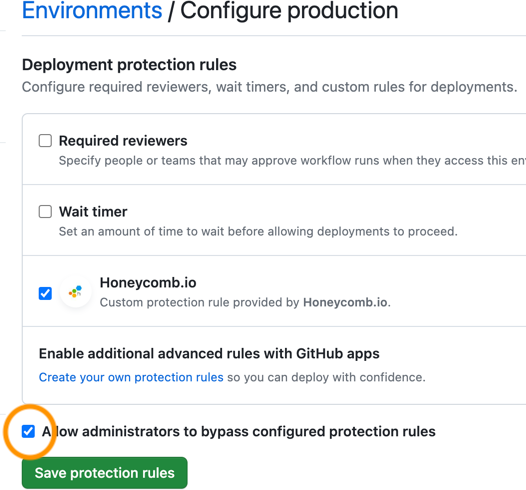
Maximum Query Limits
- Honeycomb deployment protection rules may only query up to the past 24 hours of data
- No more than one Honeycomb query may be defined per GitHub environment in your deployment