Honeycomb creates and uses custom shortcodes on our Docs site. Hugo renders content used with custom shortcodes with specific styling. This page contains descriptions and samples of our custom shortcodes and will be updated as new shortcodes become available.
Currently, subpages do NOT support shortcodes. Hugo errors when it processes this content.
For warnings, callouts, and other things you want the reader to notice, use a variation of the {{<alert>}} shortcode.
A learning resource alert. Highlights a link to a Honeycomb-created video or to Honeycomb Academy content, so readers who prefer alternative learning resources can find them more easily on the page.
Use icons to identify the type. For example:
To watch a video, check out ![]() The Core Analysis Loop.
The Core Analysis Loop.
For more structured learning, check out ![]() The Core Analysis Loop (Honeycomb Academy).
The Core Analysis Loop (Honeycomb Academy).
The alert shortcode has the following named parameters:
type [optional]
: Type of the alert.
Options include: note (default), tip, important, warning, example, and learning-resource.title [optional]
: Title of the alert.
When not included, title defaults to the type, capitalized and with hyphens removed.An example of how to use this shortcode in your markdown:
{{<alert type="tip" title="This is a tip">}}
A **tip** alert.
{{</alert>}}
or
{{<alert tip "This is a tip">}}
A **tip** alert.
{{</alert>}}
The rendered output looks like this:
To include content that is not strictly necessary to complete a task but that beginning users might find helpful, use the {{<accordion>}} shortcode.
By default, accordions are collapsed, so content contained contained within an accordion will be displayed only after a user chooses to expand the accordion.
The accordion shortcode has the following named parameters:
title [optional]
: Title of the accordion.
When not included, title defaults to Learn more.An example of how to use this shortcode in your markdown:
{{<accordion title="This is an accordion">}}
An **accordion**.
{{</accordion>}}
or
{{<accordion "This is an accordion">}}
An **accordion**.
{{</accordion>}}
The rendered output looks like this:
For screenshots, use the {{<image>}} shortcode.
This shortcode will apply standardized CSS styling, including a border, margins, and padding, to your screenshot.
Before adding a screenshot to your PR, trim off any whitespace surrounding the image (or if you have trouble, we will do it for you once the screenshot is added to your PR).
For more details, visit the Images section.
To add a tooltip that contains a glossary definition to a word on the page, use the {{<glossary-tooltip>}} shortcode.
The glossary-tooltip shortcode has the following named parameters:
term-id [required]
: ID of the term for which the tooltip should display the definition.
You can see available terms in the /reference/glossary/ directory.
An ID can be found in the front matter for each term.An example of how to use this shortcode in your markdown:
To use Honeycomb, you first need to get your system's observable external outputs--{{<glossary-tooltip term-id="trace">}}traces{{</glossary-tooltip>}}, metrics, and logs--into Honeycomb.
or
To use Honeycomb, you first need to get your system's observable external outputs--{{<glossary-tooltip "trace">}}traces{{</glossary-tooltip>}}, metrics, and logs--into Honeycomb.
The rendered output looks like this for a term that has an associated concept page defined as the link in its front matter:
To use Honeycomb, you first need to get your system’s observable external outputs– , metrics, and logs–into Honeycomb.
The rendered output looks like this for a term that does not have a link defined in its front matter:
You can scale the Collector in Gateway Mode or by running several instances of the Collector behind a load balancer.
To display the definition of a word on the page, use the {{<glossary-definition>}} shortcode.
The glossary-definition shortcode has the following named parameters:
term-id [required]
: ID of the term for which the definition should display.
You can see available terms in the /reference/glossary/ directory.
An ID can be found in the front matter for each term.override-prepend [optional]
: Text to display before the definition instead of the default_prepend defined within the term’s front matter.
You can use this to customize introductory text and create more complex sentences.
When not included, override-prepend defaults to nothing.
Our practice is to always define a default_prepend in each term’s front matter.
However, if no default_prepend has been defined and you have not included override_prepend, the rendered output will be identical to what is shown for the term in the glossary.An example of how to use this shortcode in your markdown:
{{<glossary-definition term-id="trace" override-prepend="You can use a trace, which is">}}
or
{{<glossary-definition "trace" "You can use a trace, which is">}}
The rendered output looks like this when you have included override-prepend:
You can use a trace, which is data that tracks a user’s experience through the journey of an application request as it moves through a system. A trace that tracks that experience across multiple services is a “distributed” trace.
Traces record how long each application component takes to process a request and pass the result to the next component; they can also identify which parts of an application trigger an error. They allow you to profile and observe systems, especially containerized applications, serverless architectures, or microservices architecture.
To learn more, visit Distributed Tracing. To explore other terms related to observability, visit our glossary.
The rendered output looks like this when you have not included override-prepend:
A trace is data that tracks a user’s experience through the journey of an application request as it moves through a system. A trace that tracks that experience across multiple services is a “distributed” trace.
Traces record how long each application component takes to process a request and pass the result to the next component; they can also identify which parts of an application trigger an error. They allow you to profile and observe systems, especially containerized applications, serverless architectures, or microservices architecture.
To learn more, visit Distributed Tracing. To explore other terms related to observability, visit our glossary.
For images, use the {{<image>}} shortcode.
This shortcode uses Hugo’s built-in image processing to resize images proportionally, and will allow us to build on more complex image handling and styling in the future.
This shortcode accesses each image as a global resource, which requires that all images live within the assets directory or within any directory mounted to the assets directory.
The directory inside assets can be set within the shortcode code; right now, it is images.
To use this shortcode, place all images inside assets/images/ and the appropriate topic-based directory.
For example, for images related to the Honeycomb Telemetry Pipeline, place all images inside assets/images/telemetry-pipeline.
We primarily use PNGs on the Docs site, but this shortcode can handle BMPs, GIFs, JPGs, PNGs, TIFs, and WEBPs.
The image shortcode has the following named parameters:
src [required/optional]
: Source of the image file.
Required for images where type does not equal icon.
When type does equal icon, set either src or icon-alias.
When both are set, src overrides icon-alias.alt [optional]
: Text description of the image that is used by screen readers.
We highly recommend including this parameter.
When not included, alt defaults to “Image of the content just described.”width [optional]
: Pixel value of the width to which you would like to resize the image.
Images will be resized proportionally using the resampling filter set in the shortcode code, which is currently CatmullRom.
When not included, the desired height is assumed to be whatever is proportional to the included value for height.
If values for neither height nor width are set, the original width of the image will be used.height [optional]
: Pixel value of the height to which you would like to resize the image.
Images will be resized proportionally using the resampling filter set in the shortcode code, which is currently CatmullRom.
When not included, the desired height is assumed to be whatever is proportional to the included value for width.
If values for neither height nor width are set, the original height of the image will be used.type [optional]
: Type of image, which applies standard formatting to the image.
When not included, defaults to image.
Options include:
screenshot
: Applies standard CSS screenshot styling, including a border, margins, and padding.
Before adding a screenshot to your PR, trim off any whitespace surrounding the image (or if you have trouble, we will do it for you once the screenshot is added to your PR).image
: Applies no formatting to the image.icon
: Applies standard CSS icon styling, including sizing and inline format.icon-alias [optional]
: Alias used to pull the standard icon in the Honeycomb UI.
Only used when type is set to icon.
When icon-alias and src are set, src takes precedence.Standard icons in the Honeycomb UI can be pulled with the following aliases.
| Type | Name | Icon | Alias |
|---|---|---|---|
| Navigation Section | Home | home-menu |
|
| Navigation Section | Query | query-menu |
|
| Navigation Section | Boards | boards-menu |
|
| Navigation Section | Triggers | triggers-menu |
|
| Navigation Section | SLOs | slos-menu |
|
| Navigation Section | Service Map | service-map-menu |
|
| Navigation Section | History | history-menu |
|
| Navigation Section | Manage Data | manage-data-menu |
|
| Navigation Section | Usage | usage-menu |
|
| Indicator | Dataset, Standard | standard-dataset |
|
| Indicator | Dataset, Trace | trace-dataset |
|
| Indicator | Dataset, All | all-datasets |
|
| Indicator | Color Assignment | color-assignment |
|
| Indicator | Usage, OK | usage-ok |
|
| Indicator | Usage, Warning | usage-warning |
|
| Indicator | Usage, Danger | usage-danger |
|
| View | Trace Waterfall | trace-waterfall |
|
| View | Span Link | link |
|
| View | Table | table |
|
| View | Log Lines | log-lines |
|
| View | Chart | chart |
|
| Object | Honeycomb Home | home |
|
| Object | Marker | marker |
|
| Object | Resize Handle |
|
resize-handle |
| Action | Download | download |
|
| Action | Share | share |
|
| Action | Add | add |
|
| Action | Remove | remove |
|
| Action | Delete | delete |
|
| Action | Persist | persist |
|
| Action | Close | close |
|
| Action | Copy | copy |
|
| Action | Edit | edit |
|
| Action | Move | move |
|
| Action | Zoom In | zoom-in |
|
| Action | Zoom Out | zoom-out |
|
| Action | Drag | drag |
|
| Action | Show Settings | show-settings |
|
| Action | Show Actions | show-actions |
|
| Action | Show Legend | show-legend |
|
| Action | Show Details | show-details |
|
| Action | Show Query Details | show-query-details |
|
| Action | Show Marker Options | show-marker-options |
|
| Action | Open Query Builder | open-query-builder |
|
| Action | Run in Query Builder | run-in-query-builder |
An example of how to use this shortcode in your markdown:
{{<image src="/telemetry-pipeline/bindplane-architecture-diagram-2024.png" alt="Architecture diagram for BindPlane as of 2024" width="600" height="400" type="screenshot">}}
The rendered output looks like this:
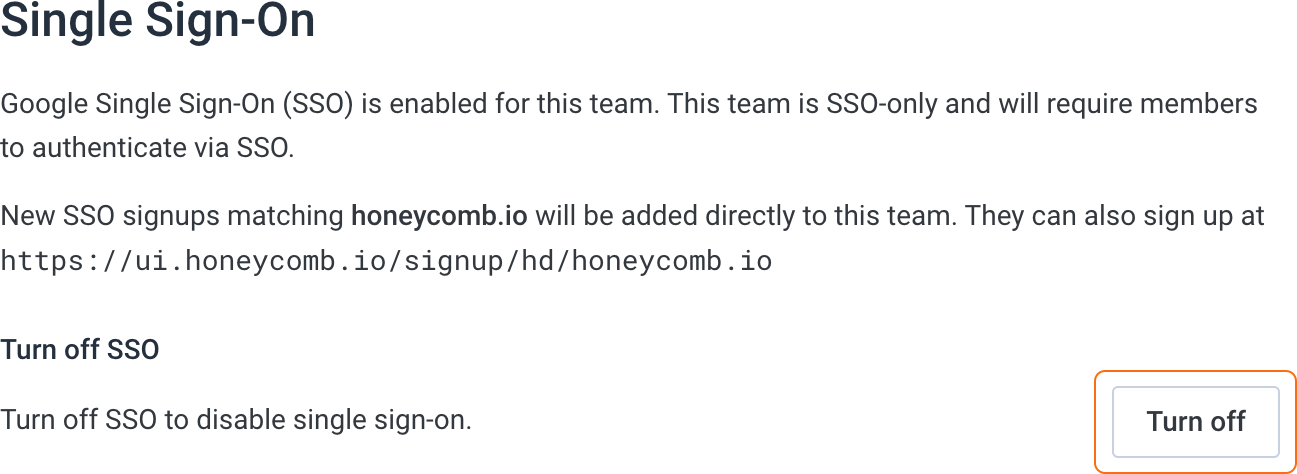
For a screenshot:

For a standard image:
For an icon:
![]()
To embed code contained in a separate file inside other content, use the {{/*import-code*/}} shortcode.
Embedded code includes syntax highlighting.
The import-code shortcode has the following named parameters:
filepath [required]
: Absolute path of the source code to import, relative to the root.
For example, if you want to import code from a file called content/x/y/z.yaml, reference this shortcode with {{<import-code filepath="/x/y/z.yaml">}} to insert the file content.language [required]
: Language in which the code is written.
Acceptable languages are those supported by the Hugo syntax highlighter.options [optional]
: List of options to pass to the Hugo syntax highlighter.
For a list of possible options, visit Hugo Syntax Highlighting: Highlight shortcode.An example of how to use this shortcode in your markdown:
{{<import-code filepath="/send-data/kubernetes/values-files/values-daemonset.yaml" language="yaml">}}
or
{{<import-code "/send-data/kubernetes/values-files/values-daemonset.yaml" "yaml">}}
The rendered output looks like this:
mode: daemonset

image:
  repository: ghcr.io/open-telemetry/opentelemetry-collector-releases/opentelemetry-collector-k8s

# Required to use the kubeletstats cpu/memory utilization metrics
clusterRole:
  create: true
  rules:
    - apiGroups:
        - ""
      resources:
        - nodes/proxy
      verbs:
        - get

extraEnvs:
  - name: HONEYCOMB_API_KEY
    valueFrom:
      secretKeyRef:
        name: honeycomb
        key: api-key

presets:
  # enables the k8sattributesprocessor and adds it to the traces, metrics, and logs pipelines
  kubernetesAttributes:
    enabled: true
    extractAllPodLabels: true
    extractAllPodAnnotations: true
  # enables the kubeletstatsreceiver and adds it to the metrics pipelines
  kubeletMetrics:
    enabled: true

config:
  receivers:
    jaeger: null
    zipkin: null
    kubeletstats:
      insecure_skip_verify: true # required as most clusters use self-signed certificates
      collection_interval: 30s
      metric_groups:
        - node
        - pod
      metrics:
        k8s.node.uptime:
          enabled: true
        k8s.pod.uptime:
          enabled: true
        k8s.pod.cpu_limit_utilization:
          enabled: true
        k8s.pod.cpu_request_utilization:
          enabled: true
        k8s.pod.memory_limit_utilization:
          enabled: true
        k8s.pod.memory_request_utilization:
          enabled: true

  exporters:
    otlp:
      endpoint: "api.honeycomb.io:443" # US instance
      #endpoint: "api.eu1.honeycomb.io:443" # EU instance
      headers:
        "x-honeycomb-team": "${env:HONEYCOMB_API_KEY}"
    otlp/k8s-metrics:
      endpoint: "api.honeycomb.io:443" # US instance
      #endpoint: "api.eu1.honeycomb.io:443" # EU instance
      headers:
        "x-honeycomb-team": "${env:HONEYCOMB_API_KEY}"
        "x-honeycomb-dataset": "k8s-metrics"
    otlp/k8s-logs:
      endpoint: "api.honeycomb.io:443" # US instance
      #endpoint: "api.eu1.honeycomb.io:443" # EU instance
      headers:
        "x-honeycomb-team": "${env:HONEYCOMB_API_KEY}"
        "x-honeycomb-dataset": "k8s-logs"

  service:
    pipelines:
      traces:
        receivers: [otlp]
        exporters: [otlp]
      metrics:
        exporters: [otlp/k8s-metrics]
      logs:
        exporters: [otlp/k8s-logs]

ports:
  jaeger-compact:
    enabled: false
  jaeger-thrift:
    enabled: false
  jaeger-grpc:
    enabled: false
  zipkin:
    enabled: false
To include a reusable content fragment inside other content, use the {{<include>}} shortcode.
Content fragments must be written in Markdown.
To use this shortcode, place content inside content/_common/ and the appropriate topic-based directory.
For example, for reusable content related to the Honeycomb Telemetry Pipeline, place all images inside content/_common/telemetry-pipeline.
You may use nested shortcodes within this shortcode.
If a content fragment includes headings, they will show up in the on-page TOC of the calling page.
The include shortcode has the following named parameters:
filepath [required]
: Absolute path of the reusable content fragment, relative to the root.
For example, if you want to import code from a file called content/_common/x/y.md, reference this shortcode with {{<include filepath="/_common/x/y/">}} to insert the file content.An example of how to use this shortcode in your markdown:
{{% include filepath="/_common/shortcode-examples/include-example-md" %}}
The rendered output looks like this:
Use environment variables to configure the OpenTelemetry SDK:
export OTEL_SERVICE_NAME="your-service-name"
export OTEL_EXPORTER_OTLP_PROTOCOL="http/protobuf"
export OTEL_EXPORTER_OTLP_ENDPOINT="https://api.honeycomb.io:443" # US instance
#export OTEL_EXPORTER_OTLP_ENDPOINT="https://api.eu1.honeycomb.io:443" # EU instance
export OTEL_EXPORTER_OTLP_HEADERS="x-honeycomb-team=your-api-key"
| Variable | Description |
|---|---|
OTEL_SERVICE_NAME |
Service name. When you send data, Honeycomb creates a dataset in which to store your data and uses this as the name. Can be any string. |
OTEL_EXPORTER_OTLP_PROTOCOL |
The data format that the SDK uses to send telemetry to Honeycomb. For more on data format configuration options, read Choosing between gRPC and HTTP. |
OTEL_EXPORTER_OTLP_ENDPOINT |
Honeycomb endpoint to which you want to send your data. |
OTEL_EXPORTER_OTLP_HEADERS |
Adds your Honeycomb API Key to the exported telemetry headers for authorization. Learn how to find your Honeycomb API Key. |
Some lovely text.
To continue, you must install OpenTelemetry’s API package. Once you have installed the API package, you can use it to add instrumentation for everything you care about in your application.
npm dependency manager.
For instructions with yarn or if using TypeScript, read our OpenTelemetry Node.js documentation.npm install --save @opentelemetry/api
To continue, you must install OpenTelemetry’s API package. Once you have installed the API package, you can use it to add instrumentation for everything you care about in your application.
pip package manager.
For instructions with poetry, read our OpenTelemetry Python documentation.python -m pip install opentelemetry-api
To continue, you must install the OpenTelemetry API. Once you have installed the API, you can use it to add instrumentation for everything you care about in your application.
dependencies {
  // Replace '2.13.1' below with the version of the OTel JavaAgent in use.
  implementation(platform("io.opentelemetry.instrumentation:opentelemetry-instrumentation-bom:2.13.1"))
  implementation("io.opentelemetry:opentelemetry-api")
  implementation("io.opentelemetry.instrumentation:opentelemetry-instrumentation-annotations")
}
Because you already installed all necessary dependencies when implementing automatic instrumentation, you can skip this step.
Because you already installed all necessary dependencies when implementing automatic instrumentation, you can skip this step.
Because you already installed all necessary dependencies when implementing automatic instrumentation, you can skip this step.
If your preferred language is not covered here, you can find relevant instrumentation information in the OpenTelemetry community documentation.
And more lovely text.
Numbered text
Numbered text
And final lovely text.