

Not ready to instrument and deploy an application, but want to see what Honeycomb can do for you?
Check out this interactive demo that requires no setup, or learn what is possible from the guided tutorials in our Honeycomb sandbox!
Before You Begin
Before you run the code, you’ll need to do a few things.Create a Honeycomb Account
Before you can use Honeycomb products, you’ll need to decide whether you would like Honeycomb to store your data in a US-based or EU-based location. Then, create a Honeycomb account in the US or create a Honeycomb account in the EU. Signup is free!Create a Honeycomb Team
Complete your account creation by giving us a team name. Honeycomb uses teams to organize groups of users, grant them access to data, and create a shared work history in Honeycomb.Get Your Honeycomb API Key
To send data to Honeycomb, you’ll need your Honeycomb API Key. Once you create your team, you will be able to view or copy it. Make note of your API Key; for security reasons, you will not be able to see it again, and you will need it later! You can also find your Honeycomb API Key any time in your Environment Settings.Send Telemetry Data to Honeycomb
Once you have your Honeycomb API key and have chosen an application, it’s time to send telemetry data to Honeycomb!This guide helps users who are new to observability get their trace data into Honeycomb using OpenTelemetry.
If you already have an OpenTelemetry implementation and are switching to Honeycomb, read about OpenTelemetry Collector.
Choose Your Application
Choose a single application or service that will send data to Honeycomb. To successfully complete this Quick Start, you should have access to modify your application’s source code. To test the application when you are finished, you must be able to run your application or service in a development environment.Add Automatic Instrumentation to Your Code
The quickest way to start seeing your trace data in Honeycomb is to use OpenTelemetry, an open-source collection of tools, APIs, and SDKs, to automatically inject instrumentation code into your application without requiring explicit changes to your codebase.Automatic instrumentation works slightly differently within each language, but the general idea is that it attaches hooks into popular tools and frameworks and
“watches” for certain functions to be called.
When they’re called, the instrumentation automatically starts and completes trace spans on behalf of your application.
- JavaScript
- Python
- Java
- .NET
- Go
- Ruby
- Kubernetes
- Other
This Quick Start uses the
npm dependency manager.
For instructions with yarn or if using TypeScript, read our OpenTelemetry Node.js documentation.Acquire Dependencies
Open your terminal, navigate to the location of your project on your drive, and install OpenTelemetry’s automatic instrumentation meta package and OpenTelemetry’s Node.js SDK package:Alternatively, install individual instrumentation packages.If using TypeScript, install
ts-node to run the code:Initialize
Create an initialization file, commonly known as thetracing.js file:Configure the OpenTelemetry SDK
Create anotelconfig.yaml file with the following content:If you are using the EU instance, replace
https://api.honeycomb.io with https://api.eu1.honeycomb.io in the configuration file.When
OTEL_CONFIG_FILE is set, the configuration file is the single source of truth for the SDK. Other OTEL_* environment variables are ignored by design, so set all SDK options in the YAML file. You can still reference environment variables from inside the YAML using ${VAR_NAME} substitution.The OpenTelemetry declarative configuration is stable at the specification level. Individual fields still under active development are marked with a
/development suffix in the YAML (see configuration versioning). Check the language support status for per-SDK maturity.If you use Honeycomb Classic, you must also specify the Dataset using the
x-honeycomb-dataset header.If you are sending data directly to Honeycomb, you must configure the API key and service name.
If you are using an OpenTelemetry Collector, configure your API key at the Collector level instead.
Run Your Application
Point the SDK at your configuration file using theOTEL_CONFIG_FILE environment variable, then run the Node.js app with the initialization file:YOUR_APPLICATION_NAME with the name of your application’s main file.Alternatively, you can import the initialization file as the first step in your application lifecycle.In Honeycomb’s UI, you should now see your application’s incoming requests and outgoing HTTP calls generate traces.Generate Automated Data
Now that you have added automatic instrumentation to your application and have it running in your development environment, interact with your application by making a few requests. Making requests to your service will generate telemetry data and send it to Honeycomb where it will appear in the Honeycomb UI within seconds.View an Example Trace
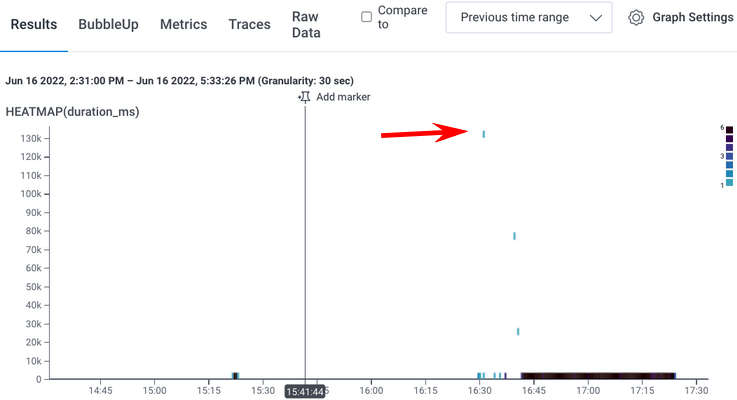
Before you move on, take a look at the data that you have generated using automatic instrumentation by viewing an example trace, which is a visual diagram that represents the complete journey of a request or transaction as it traverses a distributed system. Traces provide a way to visualize and understand the flow of execution and the interactions between various components involved in serving a request. They can help you find the source of errors in a system, identify the slowest processes, and break down the user experience in great detail. While Honeycomb helps you analyze all of your outputs, where we particularly shine is when working with traces to give you a visual representation of where requests spend time in your system. In this example, we want to see a count of events, an average latency for those events, and a heatmap of latency. To see your trace:- Depending on where you created your account, either log in to Honeycomb US or log in to Honeycomb EU using your Honeycomb account.
- From the left sidebar, navigate to Query.
- In the SELECT clause, add
HEATMAP(duration_ms) - Select Run Query.
- In the heatmap results, click on a dot to get a trace.
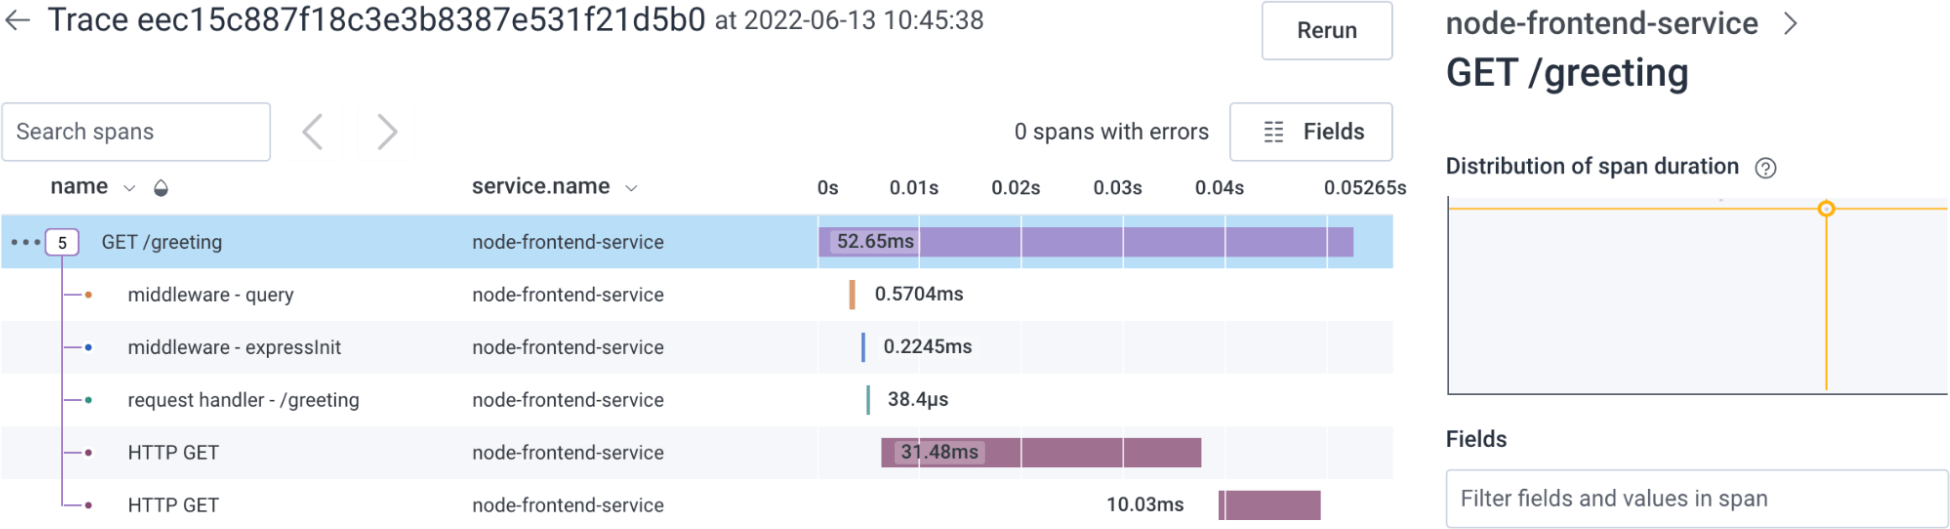
- the spans within the trace
- how long each span took
- which spans contain errors (none, in this example)
What’s Next?
Excellent work! If you made it this far, you should now have telemetry data from your application flowing into Honeycomb. You can deploy to production and start gaining new insights on real traffic! But there is so much more to explore! To learn more about what you can do with Honeycomb, check out:- Customize Instrumentation: Walk through the process of adding custom instrumentation, so you can get additional visibility into the inner workings of your business logic.
- Ways to Explore Your Data: Get a quick run-through of the different ways you can explore your data in Honeycomb.
- Board Templates: Get key insights with one-click with out-of-the-box Board Templates.
- Honeycomb’s Sandbox: Explore common scenarios with real data.
- DevRel Office Hours: Join in on observability talk with world-class experts.
- Integrations: Learn about other types of data you can explore with Honeycomb.