> ## Documentation Index
> Fetch the complete documentation index at: https://docs.honeycomb.io/llms.txt
> Use this file to discover all available pages before exploring further.
# Send Alerts to Slack
> Route Honeycomb Trigger and SLO burn alerts to a Slack channel using the official Honeycomb app for Slack.
export const HnyIcon = ({alias, path, size = 16, iconColor}) => {
const iconMap = {
"home": "house.svg",
"marker": "caretFilledDown.svg",
"show-marker-options": "chatTextLeft.svg",
"download": "arrowLineDown.svg",
"trace-waterfall": "trace.svg",
"show-query-details": "listDashes.svg",
"table": "table.svg",
"log-lines": "logLines.svg",
"chart": "chartLine.svg",
"show-settings": "gear.svg",
"add": "plus.svg",
"remove": "delete.svg",
"persist": "caretDown.svg",
"close": "close.svg",
"copy": "copy.svg",
"zoom-in": "magnifyingGlassPlus.svg",
"zoom-out": "magnifyingGlassMinus.svg",
"color-assignment": "drop.svg",
"drag": "dots-six-vertical.svg",
"drawer": "drawer.svg",
"show-actions": "dotsThree.svg",
"edit": "pencil.svg",
"delete": "trash.svg",
"move": "arrowsOutCardinal.svg",
"show-legend": "circleInfo.svg",
"usage-ok": "usageGood.svg",
"usage-warning": "usageWarning.svg",
"usage-danger": "usageDanger.svg",
"open-query-builder": "query.svg",
"home-menu": "house.svg",
"query-menu": "query.svg",
"boards-menu": "board.svg",
"triggers-menu": "bell.svg",
"slos-menu": "handshake.svg",
"service-map-menu": "serviceMap.svg",
"history-menu": "clockCounterClockwise.svg",
"manage-data-menu": "cube.svg",
"usage-menu": "usageGood.svg",
"canvas-menu": "sparkle.svg",
"anomalies-menu": "anomalies.svg",
"show-details": "dotsThreeVertical.svg",
"resize-handle": "board-panel-resize-handle.png",
"standard-dataset": "cube.svg",
"trace-dataset": "cubeChat.svg",
"all-datasets": "linkedSquares.svg",
"share": "arrowBentRight.svg",
"run-in-query-builder": "arrowSquareUpRight.svg",
"link": "link.svg",
"text": "text.svg",
"receive": "arrowLineDown.svg",
"process": "lightning.svg",
"sample": "drop.svg",
"send": "arrowLineUp.svg",
"submit": "arrowUp.svg",
"canvas-menu": "sparkle.svg",
"canvas": "sparkle.svg",
"chat-about-this-page": "sparkle.svg",
"private": "lockKey.svg",
"shared": "people.svg",
"expand": "caretDown.svg",
"previous": "caretLeft.svg",
"next": "caretRight.svg",
"expand-chat": "caretLeft.svg",
"minimize-chat": "caretRight.svg",
"open-in-canvas": "arrowSquareUpRight.svg"
};
const iconBasePath = "/_assets/icons/";
const iconPath = path || (alias ? `${iconBasePath}${iconMap[alias]}` : undefined);
return ;
};
Connecting Honeycomb to Slack sends [Trigger](/notify/triggers/) and [Service Level Objective (SLO)](/notify/slos/) burn alert notifications directly to your team's Slack channels, so the right people get notified where they already work.
Honeycomb maintains and supports this integration as the [Honeycomb app for Slack](https://slack.com/apps/A4ADZPBC4) in the Slack app directory.
## Before you begin
Before you set up the integration, you need:
* a user account in your team's Slack organization
* a user account in your Honeycomb Team
## Setting up your integration
Setting up the integration installs the Honeycomb app into your Slack workspace and authorizes Honeycomb to post alert notifications to your channels.
A team owner completes this step once; depending on your Slack workspace settings, a Slack admin may need to approve the installation.
To set up your integration:
1. Select **Account** from the navigation menu, then select **Team Settings**.
2. Select the **Integrations** view.
3. Locate the **Honeycomb + Slack** section, and select **Add to Slack**.
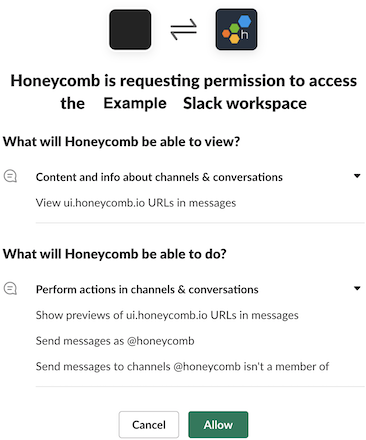
4. When Slack requests that you authorize Honeycomb, select **Allow**.
 5. Invite the Honeycomb Slack app to each Slack channel where you want to receive alerts.
Once authorized and invited to a channel, Honeycomb sends alerts to Slack with features like link unfurling, which shows a preview of your Honeycomb query result graphs.
## Configuring alerts to use Slack as a recipient
After your integration is set up, you can configure individual Triggers and SLOs to send alert notifications to a Slack channel.
Each trigger and SLO recipient is configured separately.
### Configuring triggers to alert Slack
Adding Slack as a recipient on a trigger means Honeycomb posts a notification to your chosen channel whenever that trigger fires.
To configure a trigger to alert Slack:
1. Select **Triggers** () from the navigation menu.
2. Select the name of the trigger you want to configure, or select **New Trigger** to create a new one.
3. Locate the **Recipients** section and select **Add Recipient**.
4. In the **Add Trigger Recipient** modal, locate the **Recipient** dropdown and choose your Slack integration, then select **Add**.
5. Select **Save Trigger**.
### Configuring SLO burn alerts to alert Slack
Adding Slack as a recipient on a burn alert means Honeycomb posts a notification to your chosen channel whenever that burn alert fires.
To configure an SLO burn alert to alert Slack:
1. Select **SLOs** () from the navigation menu.
2. Locate the SLO you want to configure, or select **New SLO** to create a new one.
3. Select **Configure** in the **Burn Alerts** column.
4. Select an existing burn alert to edit, or select **New Burn Alert** to create a new one.
5. Set your desired exhaustion time, then choose your Slack integration in the **Notify** dropdown.
6. Set your desired **Severity** (Critical is the default).
7. Select **Create Burn Alert**.
## Removing the integration
Removing the integration disconnects Honeycomb from your Slack workspace and stops alert delivery to all associated triggers and SLOs.
To remove the integration:
1. Select **Account** from the navigation menu, then select **Team Settings**.
2. Select the **Integrations** view.
3. Locate the **Honeycomb + Slack** section and select **Revoke**.
## Getting AI-powered investigations in Slack
If your team has [Honeycomb Canvas](/investigate/canvas), the [Honeycomb Canvas Slack App](/investigate/canvas/slack-app) can automatically post AI-powered investigations into alert threads when a trigger, SLO burn alert, or anomaly fires.
Once installed, Canvas joins the alert thread and streams its findings directly in Slack, so your on-call team gets immediate context without switching tools.
5. Invite the Honeycomb Slack app to each Slack channel where you want to receive alerts.
Once authorized and invited to a channel, Honeycomb sends alerts to Slack with features like link unfurling, which shows a preview of your Honeycomb query result graphs.
## Configuring alerts to use Slack as a recipient
After your integration is set up, you can configure individual Triggers and SLOs to send alert notifications to a Slack channel.
Each trigger and SLO recipient is configured separately.
### Configuring triggers to alert Slack
Adding Slack as a recipient on a trigger means Honeycomb posts a notification to your chosen channel whenever that trigger fires.
To configure a trigger to alert Slack:
1. Select **Triggers** () from the navigation menu.
2. Select the name of the trigger you want to configure, or select **New Trigger** to create a new one.
3. Locate the **Recipients** section and select **Add Recipient**.
4. In the **Add Trigger Recipient** modal, locate the **Recipient** dropdown and choose your Slack integration, then select **Add**.
5. Select **Save Trigger**.
### Configuring SLO burn alerts to alert Slack
Adding Slack as a recipient on a burn alert means Honeycomb posts a notification to your chosen channel whenever that burn alert fires.
To configure an SLO burn alert to alert Slack:
1. Select **SLOs** () from the navigation menu.
2. Locate the SLO you want to configure, or select **New SLO** to create a new one.
3. Select **Configure** in the **Burn Alerts** column.
4. Select an existing burn alert to edit, or select **New Burn Alert** to create a new one.
5. Set your desired exhaustion time, then choose your Slack integration in the **Notify** dropdown.
6. Set your desired **Severity** (Critical is the default).
7. Select **Create Burn Alert**.
## Removing the integration
Removing the integration disconnects Honeycomb from your Slack workspace and stops alert delivery to all associated triggers and SLOs.
To remove the integration:
1. Select **Account** from the navigation menu, then select **Team Settings**.
2. Select the **Integrations** view.
3. Locate the **Honeycomb + Slack** section and select **Revoke**.
## Getting AI-powered investigations in Slack
If your team has [Honeycomb Canvas](/investigate/canvas), the [Honeycomb Canvas Slack App](/investigate/canvas/slack-app) can automatically post AI-powered investigations into alert threads when a trigger, SLO burn alert, or anomaly fires.
Once installed, Canvas joins the alert thread and streams its findings directly in Slack, so your on-call team gets immediate context without switching tools.