> ## Documentation Index
> Fetch the complete documentation index at: https://docs.honeycomb.io/llms.txt
> Use this file to discover all available pages before exploring further.
# Send Alerts to PagerDuty
> Route Honeycomb Trigger and SLO burn alerts to PagerDuty to notify on-call responders when your data crosses a defined threshold.
export const HnyIcon = ({alias, path, size = 16, iconColor}) => {
const iconMap = {
"home": "house.svg",
"marker": "caretFilledDown.svg",
"show-marker-options": "chatTextLeft.svg",
"download": "arrowLineDown.svg",
"trace-waterfall": "trace.svg",
"show-query-details": "listDashes.svg",
"table": "table.svg",
"log-lines": "logLines.svg",
"chart": "chartLine.svg",
"show-settings": "gear.svg",
"add": "plus.svg",
"remove": "delete.svg",
"persist": "caretDown.svg",
"close": "close.svg",
"copy": "copy.svg",
"zoom-in": "magnifyingGlassPlus.svg",
"zoom-out": "magnifyingGlassMinus.svg",
"color-assignment": "drop.svg",
"drag": "dots-six-vertical.svg",
"drawer": "drawer.svg",
"show-actions": "dotsThree.svg",
"edit": "pencil.svg",
"delete": "trash.svg",
"move": "arrowsOutCardinal.svg",
"show-legend": "circleInfo.svg",
"usage-ok": "usageGood.svg",
"usage-warning": "usageWarning.svg",
"usage-danger": "usageDanger.svg",
"open-query-builder": "query.svg",
"home-menu": "house.svg",
"query-menu": "query.svg",
"boards-menu": "board.svg",
"triggers-menu": "bell.svg",
"slos-menu": "handshake.svg",
"service-map-menu": "serviceMap.svg",
"history-menu": "clockCounterClockwise.svg",
"manage-data-menu": "cube.svg",
"usage-menu": "usageGood.svg",
"canvas-menu": "sparkle.svg",
"anomalies-menu": "anomalies.svg",
"show-details": "dotsThreeVertical.svg",
"resize-handle": "board-panel-resize-handle.png",
"standard-dataset": "cube.svg",
"trace-dataset": "cubeChat.svg",
"all-datasets": "linkedSquares.svg",
"share": "arrowBentRight.svg",
"run-in-query-builder": "arrowSquareUpRight.svg",
"link": "link.svg",
"text": "text.svg",
"receive": "arrowLineDown.svg",
"process": "lightning.svg",
"sample": "drop.svg",
"send": "arrowLineUp.svg",
"submit": "arrowUp.svg",
"canvas-menu": "sparkle.svg",
"canvas": "sparkle.svg",
"chat-about-this-page": "sparkle.svg",
"private": "lockKey.svg",
"shared": "people.svg",
"expand": "caretDown.svg",
"previous": "caretLeft.svg",
"next": "caretRight.svg",
"expand-chat": "caretLeft.svg",
"minimize-chat": "caretRight.svg",
"open-in-canvas": "arrowSquareUpRight.svg"
};
const iconBasePath = "/_assets/icons/";
const iconPath = path || (alias ? `${iconBasePath}${iconMap[alias]}` : undefined);
return ;
};
The PagerDuty + Honeycomb integration uses [Honeycomb Triggers](/notify/triggers/) or [Honeycomb Service Level Objective (SLO) Burn Alerts](/notify/slos/) to notify on-call responders based on alerts sent from Honeycomb.
We maintain and support this integration.
## Before You Begin
Before you set up the integration, you'll need a few things:
* a user account in your team's PagerDuty organization
* a user account in your Honeycomb Team
## Setting Up Your Integration
Before you can configure Honeycomb to send alerts to PagerDuty, you must set up your integration.
### Link Your Service to a New Integration in PagerDuty
In PagerDuty, you must create an integration and link it to a specific service.
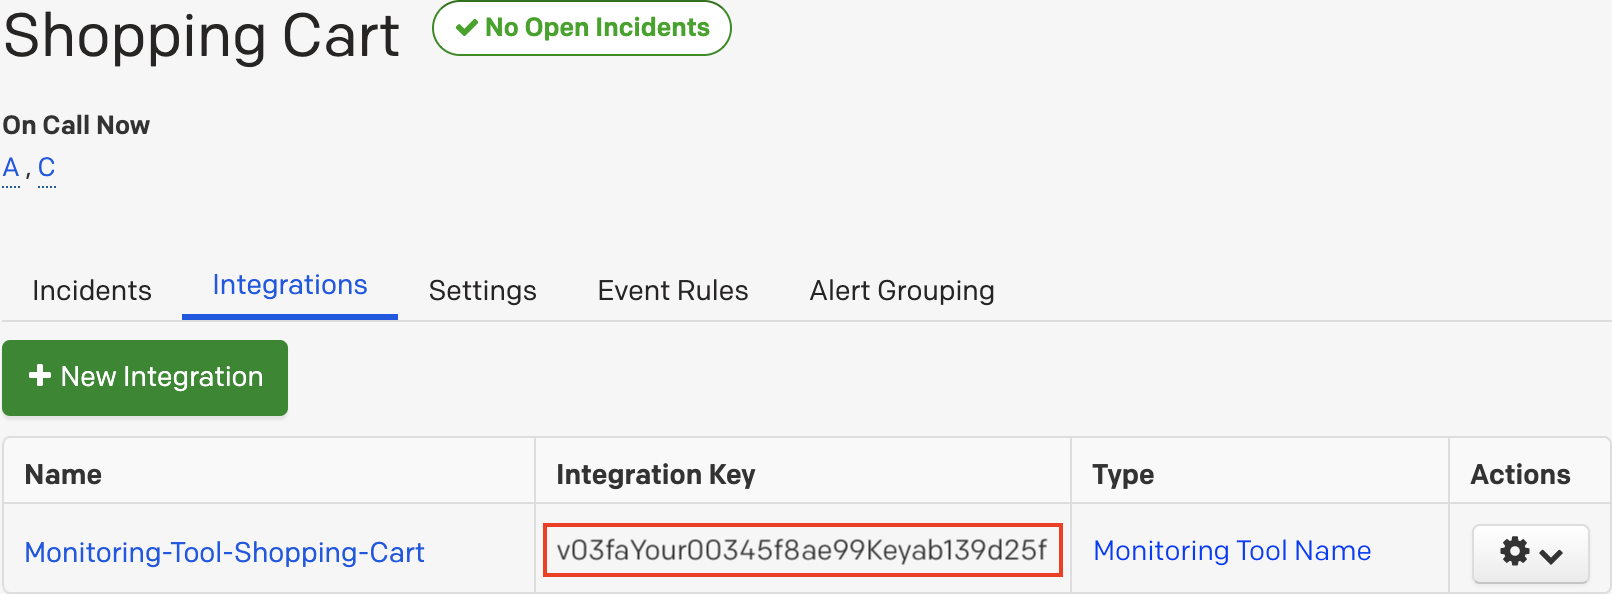
Once you have linked your integration and service, you will receive an integration key that you can use to link your PagerDuty integration to Honeycomb.
1. Navigate to **PagerDuty Configuration** > **Services**.
2. Select the name of an existing service to which you want to add the integration, then select the **Integrations** view, and click the **New Integration** button.
To learn how to create a new service in PagerDuty, visit PagerDuty's [Configuring Services and Integrations](https://support.pagerduty.com/docs/services-and-integrations).
3. Enter details for your integration:
| Field | Value |
| ---------------- | -------------------------------------------------------------------------------------------------------------- |
| Integration Name | Name of your integration in the format `monitoring-tool-service-name` (for example, `Honeycomb-Shopping-Cart`) |
| Integration Type | **Honeycomb** |
4. Click the **Add Integration** button to save.
You will be redirected to the **Integrations** view for your service.
5. Locate the generated **Integration Key**.
Save this key in a safe place; you will need it later!
 ### Connect Your Integration to Honeycomb
To use your integration, you must add your PagerDuty Integration Key to Honeycomb.
1. Navigate to **Team Settings**, and select the **Integrations** view.
2. Locate the **Trigger and SLO Recipients** section, and select **Add Integration**.
3. For **Provider**, select **PagerDuty**, then enter a name that will be easy to find when you configure alerts in the future, and paste the PagerDuty **Integration Key**.
4. Select **Add**.
## Configuring Alerts to Use PagerDuty as a Recipient
After your integration is set up in Honeycomb, you can configure Triggers and SLOs to use PagerDuty as a recipient for alerts.
### Configuring Triggers to Alert PagerDuty
1. In the Honeycomb UI, navigate to **Triggers**.
2. Select the name of the trigger you want to configure, or create a new trigger by clicking **New Trigger**.
3. Locate the **Recipients** section, and select **Add Recipient**.
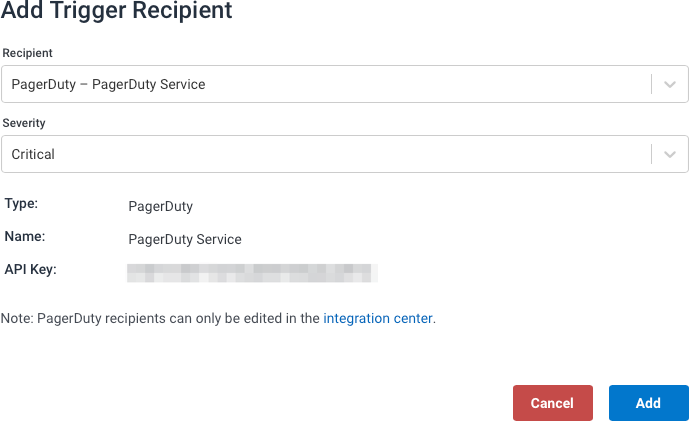
4. In the pop-up form titled **Add Trigger Recipient**, locate the **Recipient** dropdown, and choose your service's PagerDuty integration and desired severity (Critical is the default). Select **Add**.
### Connect Your Integration to Honeycomb
To use your integration, you must add your PagerDuty Integration Key to Honeycomb.
1. Navigate to **Team Settings**, and select the **Integrations** view.
2. Locate the **Trigger and SLO Recipients** section, and select **Add Integration**.
3. For **Provider**, select **PagerDuty**, then enter a name that will be easy to find when you configure alerts in the future, and paste the PagerDuty **Integration Key**.
4. Select **Add**.
## Configuring Alerts to Use PagerDuty as a Recipient
After your integration is set up in Honeycomb, you can configure Triggers and SLOs to use PagerDuty as a recipient for alerts.
### Configuring Triggers to Alert PagerDuty
1. In the Honeycomb UI, navigate to **Triggers**.
2. Select the name of the trigger you want to configure, or create a new trigger by clicking **New Trigger**.
3. Locate the **Recipients** section, and select **Add Recipient**.
4. In the pop-up form titled **Add Trigger Recipient**, locate the **Recipient** dropdown, and choose your service's PagerDuty integration and desired severity (Critical is the default). Select **Add**.
 5. Select **Save Trigger**.
### Configuring SLO Burn Alerts to Alert PagerDuty
1. In the Honeycomb UI, navigate to **SLOs**.
2. In the list, locate the SLO you want to configure, or create a new SLO by clicking **New SLO**.
3. Find your SLO in the list, and click the **Configure** button in the **Burn Alerts** column.
4. Click **New Burn Alert**.
5. In the **Create Burn Alert** form, set your desired exhaustion time, then choose your PagerDuty integration in the **Notify** dropdown. Set your desired **Severity** (Critical is the default).
6. Select **Create Burn Alert**.
### Example: PagerDuty Alert from Honeycomb
When a configured Trigger or Burn Alert fires, you can expect to see a PagerDuty display that looks similar to this example:
5. Select **Save Trigger**.
### Configuring SLO Burn Alerts to Alert PagerDuty
1. In the Honeycomb UI, navigate to **SLOs**.
2. In the list, locate the SLO you want to configure, or create a new SLO by clicking **New SLO**.
3. Find your SLO in the list, and click the **Configure** button in the **Burn Alerts** column.
4. Click **New Burn Alert**.
5. In the **Create Burn Alert** form, set your desired exhaustion time, then choose your PagerDuty integration in the **Notify** dropdown. Set your desired **Severity** (Critical is the default).
6. Select **Create Burn Alert**.
### Example: PagerDuty Alert from Honeycomb
When a configured Trigger or Burn Alert fires, you can expect to see a PagerDuty display that looks similar to this example:
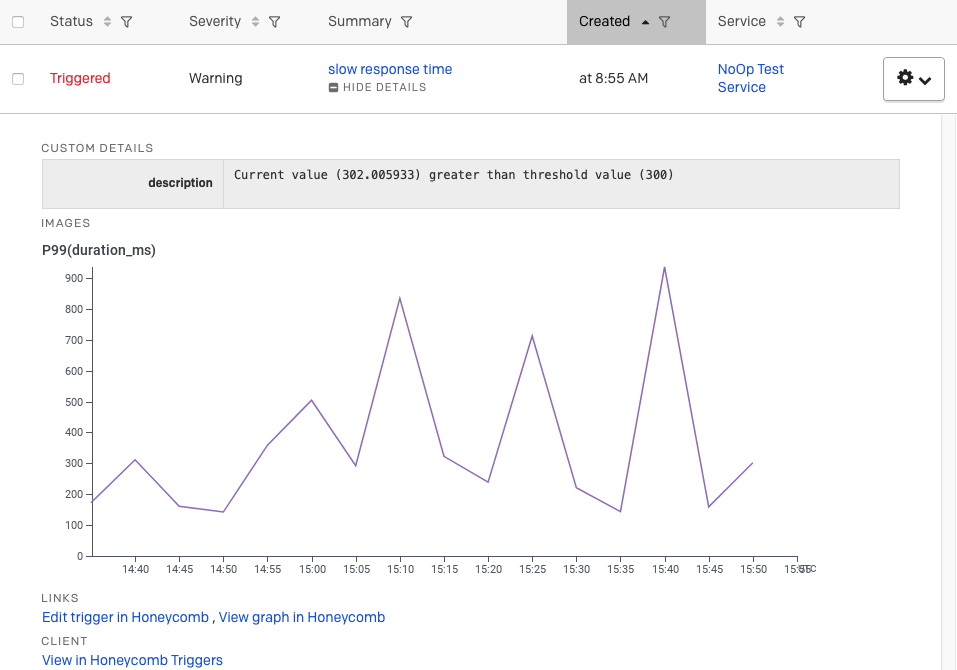 PagerDuty alerts will show Honeycomb graphs for Triggers only.
## Removing Integrations
To remove the PagerDuty integration, you may need administrator privileges in PagerDuty.
### Delete the Integration from PagerDuty
To remove the entire PagerDuty integration, you should begin by deleting the integration in PagerDuty.
You may need admin privileges.
1. Navigate to the **Service Directory** in PagerDuty.
2. Locate the service that contains your Honeycomb integration.
3. Click on the **Integrations** tab.
4. Click the Settings icon () for the integration and select **Delete**.
### Remove the Integration from Honeycomb
Once the integration is deleted from PagerDuty, you should also remove it from your Honeycomb team.
Deleting the integration from your team will remove it from all associated triggers and SLOs.
1. Navigate to **Team Settings**, and select the **Integrations** view.
2. Locate **Trigger and SLO Recipients** and find your PagerDuty integration, then select **Edit**.
3. In the form editor, select **Remove**.
## Troubleshooting
### I don't receive alerts from PagerDuty when a trigger fires
If you are not receiving alerts, examine your PagerDuty escalation policy to ensure that a responder is always on call in PagerDuty.
PagerDuty will not create an incident if no responder is on-call at the time the trigger fires.
PagerDuty alerts will show Honeycomb graphs for Triggers only.
## Removing Integrations
To remove the PagerDuty integration, you may need administrator privileges in PagerDuty.
### Delete the Integration from PagerDuty
To remove the entire PagerDuty integration, you should begin by deleting the integration in PagerDuty.
You may need admin privileges.
1. Navigate to the **Service Directory** in PagerDuty.
2. Locate the service that contains your Honeycomb integration.
3. Click on the **Integrations** tab.
4. Click the Settings icon () for the integration and select **Delete**.
### Remove the Integration from Honeycomb
Once the integration is deleted from PagerDuty, you should also remove it from your Honeycomb team.
Deleting the integration from your team will remove it from all associated triggers and SLOs.
1. Navigate to **Team Settings**, and select the **Integrations** view.
2. Locate **Trigger and SLO Recipients** and find your PagerDuty integration, then select **Edit**.
3. In the form editor, select **Remove**.
## Troubleshooting
### I don't receive alerts from PagerDuty when a trigger fires
If you are not receiving alerts, examine your PagerDuty escalation policy to ensure that a responder is always on call in PagerDuty.
PagerDuty will not create an incident if no responder is on-call at the time the trigger fires.