> ## Documentation Index
> Fetch the complete documentation index at: https://docs.honeycomb.io/llms.txt
> Use this file to discover all available pages before exploring further.
# Use Calculated Fields
> Create new fields by applying functions and logic to existing data. Calculated fields let you standardize metrics and run consistent, reusable queries across datasets.
export const SchemaTable = ({children}) => {
return
{children}
;
};
export const HnyIcon = ({alias, path, size = 16, iconColor}) => {
const iconMap = {
"home": "house.svg",
"marker": "caretFilledDown.svg",
"show-marker-options": "chatTextLeft.svg",
"download": "arrowLineDown.svg",
"trace-waterfall": "trace.svg",
"show-query-details": "listDashes.svg",
"table": "table.svg",
"log-lines": "logLines.svg",
"chart": "chartLine.svg",
"show-settings": "gear.svg",
"add": "plus.svg",
"remove": "delete.svg",
"persist": "caretDown.svg",
"close": "close.svg",
"copy": "copy.svg",
"zoom-in": "magnifyingGlassPlus.svg",
"zoom-out": "magnifyingGlassMinus.svg",
"color-assignment": "drop.svg",
"drag": "dots-six-vertical.svg",
"drawer": "drawer.svg",
"show-actions": "dotsThree.svg",
"edit": "pencil.svg",
"delete": "trash.svg",
"move": "arrowsOutCardinal.svg",
"show-legend": "circleInfo.svg",
"usage-ok": "usageGood.svg",
"usage-warning": "usageWarning.svg",
"usage-danger": "usageDanger.svg",
"open-query-builder": "query.svg",
"home-menu": "house.svg",
"query-menu": "query.svg",
"boards-menu": "board.svg",
"triggers-menu": "bell.svg",
"slos-menu": "handshake.svg",
"service-map-menu": "serviceMap.svg",
"history-menu": "clockCounterClockwise.svg",
"manage-data-menu": "cube.svg",
"usage-menu": "usageGood.svg",
"canvas-menu": "sparkle.svg",
"anomalies-menu": "anomalies.svg",
"show-details": "dotsThreeVertical.svg",
"resize-handle": "board-panel-resize-handle.png",
"standard-dataset": "cube.svg",
"trace-dataset": "cubeChat.svg",
"all-datasets": "linkedSquares.svg",
"share": "arrowBentRight.svg",
"run-in-query-builder": "arrowSquareUpRight.svg",
"link": "link.svg",
"text": "text.svg",
"receive": "arrowLineDown.svg",
"process": "lightning.svg",
"sample": "drop.svg",
"send": "arrowLineUp.svg",
"submit": "arrowUp.svg",
"canvas-menu": "sparkle.svg",
"canvas": "sparkle.svg",
"chat-about-this-page": "sparkle.svg",
"private": "lockKey.svg",
"shared": "people.svg",
"expand": "caretDown.svg",
"previous": "caretLeft.svg",
"next": "caretRight.svg",
"expand-chat": "caretLeft.svg",
"minimize-chat": "caretRight.svg",
"open-in-canvas": "arrowSquareUpRight.svg"
};
const iconBasePath = "/_assets/icons/";
const iconPath = path || (alias ? `${iconBasePath}${iconMap[alias]}` : undefined);
return ;
};
export const CalloutExample = ({children}) => {
return
{children}
;
};
For clearer insights and consistency, use calculated fields to create new fields by applying functions and logic to existing data.
## What is a Calculated Field?
Calculated fields (also called Derived Columns) let you create new data properties by applying functions, math, or logic to existing fields--similar to spreadsheet formulas.
Use Calculated Fields to:
* Simplify complex data to make event details more readable
* Track business measures that change over time
* Align disparate datasets
## How Calculated Fields Work
In Honeycomb, Calculated Fields behave like any other field in your data and can be used in queries, boards, and alerts, depending on the [scope](#choosing-the-scope).
If you have on-the-fly needs to combine or extract values from multiple columns, we've got you covered!
Honeycomb generates calculated fields at query-time, so you can run them on historical data.
To learn more about syntax and available functions, visit [Calculated Field Formula Reference](/reference/calculated-field-expression/).
### Choosing the Scope
In Honeycomb, you can create calculated fields that are tied to a query session or save calculated fields for use across Honeycomb resources.
#### Calculated Fields Scoped to a Query
By default, calculated fields created through the Query Builder are scoped to your query, which means you can find the field again by name as long as you're in the same query session.
This helps reduce dataset bloat and makes it easier to iterate quickly without needing to manage one-off or exploratory formulas long-term.
Use query-scoped calculated fields when you:
* Need a one-off calculation for an investigation or exploratory query
* Want to avoid cluttering your dataset with fields you’ll only use once
* Are iterating rapidly and don’t want to manage permanent schema changes
#### Saved Calculated Fields
You can also save calculated fields to either a specific dataset or an entire environment:
* When a calculation is relevant to only a specific dataset or service, use a dataset-specific calculated field.
* When a calculation needs to be shared across multiple datasets and services, use an environment-wide calculated field.
By default, Honeycomb shows environment calculated fields when building environment-wide queries and dataset calculated fields when building dataset queries.
Saved calculated fields can be used across Honeycomb resources, including in queries, Boards, and alerts.
## Use Cases for Calculated Fields
To understand how you can use calculated fields in practical situations, explore these example scenarios.
### Comparing Values
For advanced comparisons, calculated fields enable you to transform or categorize data dynamically, which not only simplifies data exploration but also ensures consistency in how comparisons are made across different investigations.
**Use a calculated field to compare values**
**Scenario:**
Your team manages a web server that handles requests with varying sizes of content.
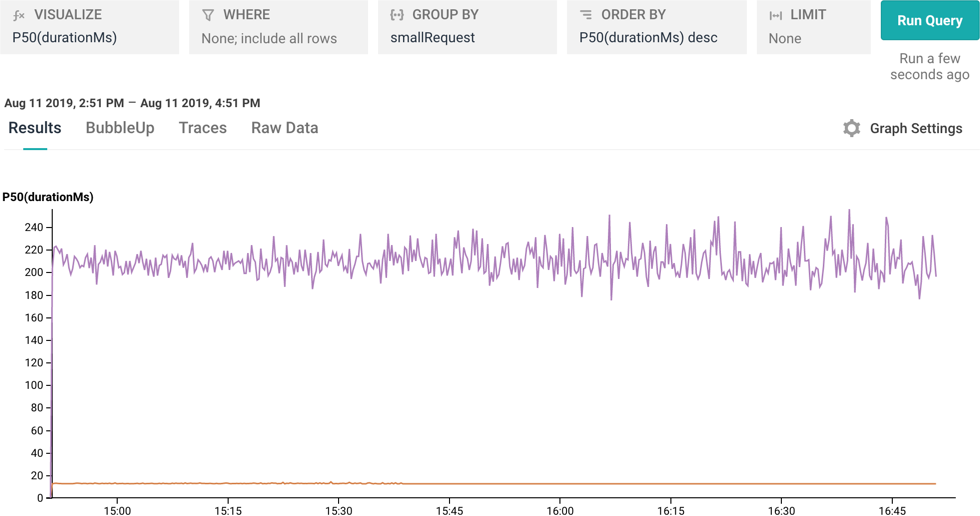
Querying in Honeycomb with the **GROUP BY** clause set to `content_length` returns a time series graph that displays the count for each value of `content_length`.
You want to compare small requests to all other requests.
Your team internally categorizes a small request as having a `content_length` of less than or equal to 1000.
**Solution:**
[Create a calculated field](#creating-calculated-fields) named `smallRequest` as a boolean with the function `LTE($content_length, 1000)`.
[Build a query](/investigate/query/build/) with the **GROUP BY** clause set to `smallRequest`.
Your query will return a time series graph that displays the small requests alongside the other requests.
 ### Standardizing Fields Across Multiple Datasets
Calculated fields let you standardize data across multiple datasets by defining consistent field names and expressions, which ensures queries return comparable results even when services implement fields differently.
This enables seamless cross-dataset analysis within an environment.
**Standardize a field across multiple datasets**
**Scenario:**
Your organization has three different services running in production: Payment, Checkout, and Support.
You want to get the total amount of purchases in USD from each service, but the services are implemented differently.
**Solution:**
In Honeycomb, create an environment named `Production`.
Inside your environment, send the data from each service to a different dataset: `PaymentService`, `CheckoutService`, and `SupportService`.
Inside each dataset, create a calculated field with the alias `total_amount_in_usd` and construct it using an appropriate expression.
For example:
| Dataset Name | Calculated Field Name | Calculated Field Expression |
| :---------------- | :-------------------- | :-------------------------------------------------------------- |
| `PaymentService` | `total_amount_in_usd` | `COALESCE($usd_total, ADD(MUL($tax_rate, $item_total), $fees))` |
| `CheckoutService` | `total_amount_in_usd` | `MUL($cart_total, $tax_rate)` |
| `SupportService` | `total_amount_in_usd` | `SUM(0)` |
When you query across the `Production` environment, you can use the `total_amount_in_usd` field to get the correct calculation for each dataset.
Because a calculated field named `total_amount_in_usd` now exists in a dataset, you cannot create an environment-wide calculated field with the same name.
Name any environment-wide calculated fields something unique to your environment, or change your instrumentation to rename the calculated fields in the datasets.
## Creating Calculated Fields
You can create calculated fields in Honeycomb's UI through:
* the Query Builder
* the Dataset's schema for dataset-specific calculated fields
* the environment's schema for environment-wide calculate fields
1. Log in to the Honeycomb UI.
2. In the navigation menu, select **Query**.
3. From the **New Query in** dropdown, choose the dataset or environment you want to query.
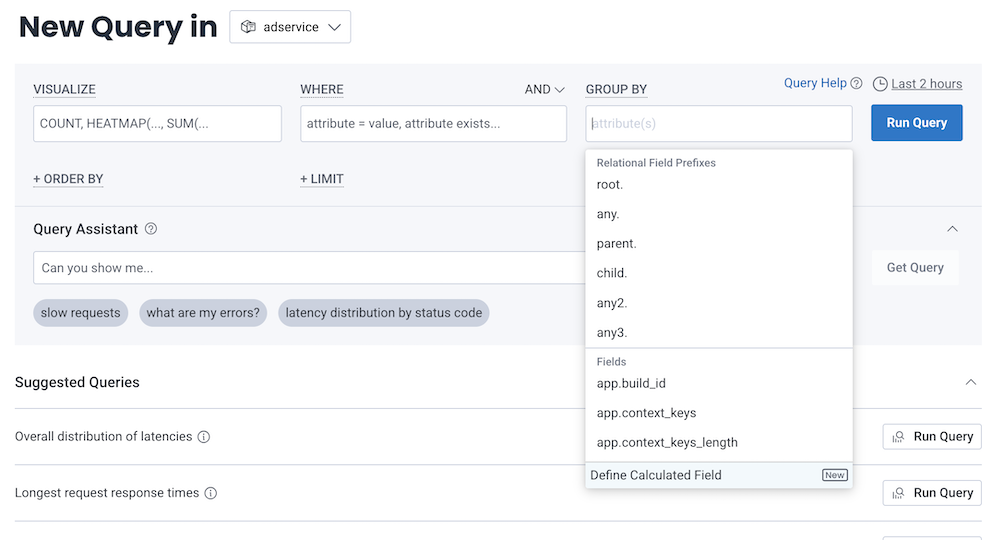
4. Select either the **SELECT**, **WHERE**, or **GROUP BY** clause.
5. From the list of suggested fields, choose **Create Calculated Field**.
### Standardizing Fields Across Multiple Datasets
Calculated fields let you standardize data across multiple datasets by defining consistent field names and expressions, which ensures queries return comparable results even when services implement fields differently.
This enables seamless cross-dataset analysis within an environment.
**Standardize a field across multiple datasets**
**Scenario:**
Your organization has three different services running in production: Payment, Checkout, and Support.
You want to get the total amount of purchases in USD from each service, but the services are implemented differently.
**Solution:**
In Honeycomb, create an environment named `Production`.
Inside your environment, send the data from each service to a different dataset: `PaymentService`, `CheckoutService`, and `SupportService`.
Inside each dataset, create a calculated field with the alias `total_amount_in_usd` and construct it using an appropriate expression.
For example:
| Dataset Name | Calculated Field Name | Calculated Field Expression |
| :---------------- | :-------------------- | :-------------------------------------------------------------- |
| `PaymentService` | `total_amount_in_usd` | `COALESCE($usd_total, ADD(MUL($tax_rate, $item_total), $fees))` |
| `CheckoutService` | `total_amount_in_usd` | `MUL($cart_total, $tax_rate)` |
| `SupportService` | `total_amount_in_usd` | `SUM(0)` |
When you query across the `Production` environment, you can use the `total_amount_in_usd` field to get the correct calculation for each dataset.
Because a calculated field named `total_amount_in_usd` now exists in a dataset, you cannot create an environment-wide calculated field with the same name.
Name any environment-wide calculated fields something unique to your environment, or change your instrumentation to rename the calculated fields in the datasets.
## Creating Calculated Fields
You can create calculated fields in Honeycomb's UI through:
* the Query Builder
* the Dataset's schema for dataset-specific calculated fields
* the environment's schema for environment-wide calculate fields
1. Log in to the Honeycomb UI.
2. In the navigation menu, select **Query**.
3. From the **New Query in** dropdown, choose the dataset or environment you want to query.
4. Select either the **SELECT**, **WHERE**, or **GROUP BY** clause.
5. From the list of suggested fields, choose **Create Calculated Field**.
 6. In the modal, enter details:
| Field | Description |
| ------------------ | ------------------------------------------------------------------------------------------------------------------------------------------------------------------------------------------------------------------------------------------------------------------------------------------------------------------------------------------------------------------------------ |
| Save toggle switch | Controls where the query is saved. Save to the query session only \[off], or save to the selected dataset or environment \[on]. |
| **Display Name** | Name that appears in the Query Builder. Enter a name that is unique across all datasets and the containing environment. Although Honeycomb tries to prevent duplicate field names, they can still occur. For help resolving naming conflicts, visit [Common Issues with Queries: Calculated Fields](/troubleshoot/common-issues/queries/#a-link-points-to-the-wrong-location). |
| **Description** | Description of your field. Use a maximum of 255 characters. |
| **Prompt** (beta) | Use natural language to generate a Calculated Field. For example, `return "slow" if $duration_ms > 1000`. Be sure to explicitly reference any schema fields using the $ syntax (for example, `$field\_name\`). For help resolving errors, visit [Common Issues with Queries: Calculated Fields](/troubleshoot/common-issues/queries/#calculated-fields). |
| Editor | Formula that defines your field. For syntax, available functions, and example formulas, visit [Calculated Field Formula Reference](/reference/calculated-field-expression/). |
Hover over syntax errors (red underlines or red triangles) for suggestions on how to fix them.
7. Select **Use in New Query**.
Your calculated field may take up to one minute to appear.
Saved calculated fields and query-scoped calculated fields in the **SELECT** clause will appear in dropdowns at the bottom of the field list.
Query-scoped calculated fields in the **WHERE** and **GROUP BY** clauses will appear in dropdowns under the **In this query session** section.
To create a dataset-specific calculated field:
1. Log in to the Honeycomb UI.
2. In the navigation menu, select the **Environment** label, then choose the environment that includes the dataset to which you want to add a calculated field.
3. In the navigation menu, select **Manage Data**, then choose **Datasets**.
4. Locate the dataset to which you want to add a calculated field, and select its name to open its settings.
5. Go to the **Schema** view.
6. Expand the **Calculated Fields** section.
7. Select **Add New Calculated Field**.
8. In the modal, enter details:
| Field | Description |
| ----------------- | ----------------------------------------------------------------------------------------------------------------------------------------------------------------------------------------------------------------------------------------------------------------------------------------------------------------------------------------------------------------------------- |
| **Display Name** | Name that appears in the Query Builder. Enter a name that is unique across the dataset and its containing environment. Although Honeycomb tries to prevent duplicate field names, they can still occur. For help resolving naming conflicts, visit [Common Issues with Queries: Calculated Fields](/troubleshoot/common-issues/queries/#a-link-points-to-the-wrong-location). |
| **Prompt** (beta) | Use natural language to generate a Calculated Field. For example, `return "slow" if $duration_ms > 1000`. Be sure to explicitly reference any schema fields using the $ syntax (for example, `$field\_name\`). For help resolving errors, visit [Common Issues with Queries: Calculated Fields](/troubleshoot/common-issues/queries/#calculated-fields). |
| Editor | Formula that defines your field. For syntax, available functions, and example formulas, visit [Calculated Field Formula Reference](/reference/calculated-field-expression/). |
Hover over syntax errors (red underlines or red triangles) for suggestions on how to fix them.
9. Select **Save**.
The screen refreshes, and your new field appears in the list.
To create an environment-wide calculated field:
1. Log in to the Honeycomb UI.
2. In the navigation menu, select the **Environment** label, then choose **Manage Environments**.
3. Locate the environment to which you want to add a calculated field, and select its name to open its settings.
4. Go to the **Schema** view.
5. Select **Add New Calculated Field**.
6. In the modal, enter details:
| Field | Description |
| ----------------- | ------------------------------------------------------------------------------------------------------------------------------------------------------------------------------------------------------------------------------------------------------------------------------------------------------------------------------------------------------------------------------ |
| **Display Name** | Name that appears in the Query Builder. Enter a name that is unique across all datasets and the containing environment. Although Honeycomb tries to prevent duplicate field names, they can still occur. For help resolving naming conflicts, visit [Common Issues with Queries: Calculated Fields](/troubleshoot/common-issues/queries/#a-link-points-to-the-wrong-location). |
| **Prompt** (beta) | Use natural language to generate a Calculated Field. For example, `return "slow" if $duration_ms > 1000`. Be sure to explicitly reference any schema fields using the $ syntax (for example, `$field\_name\`). For help resolving errors, visit [Common Issues with Queries: Calculated Fields](/troubleshoot/common-issues/queries/#calculated-fields). |
| Editor | Formula that defines your field. For syntax, available functions, and example formulas, visit [Calculated Field Formula Reference](/reference/calculated-field-expression/). |
Hover over syntax errors (red underlines or red triangles) for suggestions on how to fix them.
7. Select **Save**.
The screen refreshes, and your new field appears in the list.
## Managing Calculated Fields
Once created, edit query-scoped calculated fields in a clause by selecting their Edit icon ().
Saved calculated fields are part of the schema for a dataset or environment and must be managed within the settings for those areas.
To modify a saved calculated field, access the configuration associated with its scope:
* For dataset-specific calculated fields, visit [Manage Dataset Calculated Fields](/configure/datasets/calculated-fields/).
* For environment-wide calculated fields, visit [Manage Environment Calculated Fields](/configure/environments/calculated-fields/).
## Troubleshooting
For guidance when troubleshooting calculated fields in Honeycomb, visit [Common Issues with Queries](/troubleshoot/common-issues/queries/).
## Related Topics
* Organizing Data: Best Practices - [Datasets](/get-started/best-practices/organizing-data/#datasets-group-data-together) or [Environments](/get-started/best-practices/organizing-data/#use-environments-to-group-datasets-based-on-a-theme)
6. In the modal, enter details:
| Field | Description |
| ------------------ | ------------------------------------------------------------------------------------------------------------------------------------------------------------------------------------------------------------------------------------------------------------------------------------------------------------------------------------------------------------------------------ |
| Save toggle switch | Controls where the query is saved. Save to the query session only \[off], or save to the selected dataset or environment \[on]. |
| **Display Name** | Name that appears in the Query Builder. Enter a name that is unique across all datasets and the containing environment. Although Honeycomb tries to prevent duplicate field names, they can still occur. For help resolving naming conflicts, visit [Common Issues with Queries: Calculated Fields](/troubleshoot/common-issues/queries/#a-link-points-to-the-wrong-location). |
| **Description** | Description of your field. Use a maximum of 255 characters. |
| **Prompt** (beta) | Use natural language to generate a Calculated Field. For example, `return "slow" if $duration_ms > 1000`. Be sure to explicitly reference any schema fields using the $ syntax (for example, `$field\_name\`). For help resolving errors, visit [Common Issues with Queries: Calculated Fields](/troubleshoot/common-issues/queries/#calculated-fields). |
| Editor | Formula that defines your field. For syntax, available functions, and example formulas, visit [Calculated Field Formula Reference](/reference/calculated-field-expression/). |
Hover over syntax errors (red underlines or red triangles) for suggestions on how to fix them.
7. Select **Use in New Query**.
Your calculated field may take up to one minute to appear.
Saved calculated fields and query-scoped calculated fields in the **SELECT** clause will appear in dropdowns at the bottom of the field list.
Query-scoped calculated fields in the **WHERE** and **GROUP BY** clauses will appear in dropdowns under the **In this query session** section.
To create a dataset-specific calculated field:
1. Log in to the Honeycomb UI.
2. In the navigation menu, select the **Environment** label, then choose the environment that includes the dataset to which you want to add a calculated field.
3. In the navigation menu, select **Manage Data**, then choose **Datasets**.
4. Locate the dataset to which you want to add a calculated field, and select its name to open its settings.
5. Go to the **Schema** view.
6. Expand the **Calculated Fields** section.
7. Select **Add New Calculated Field**.
8. In the modal, enter details:
| Field | Description |
| ----------------- | ----------------------------------------------------------------------------------------------------------------------------------------------------------------------------------------------------------------------------------------------------------------------------------------------------------------------------------------------------------------------------- |
| **Display Name** | Name that appears in the Query Builder. Enter a name that is unique across the dataset and its containing environment. Although Honeycomb tries to prevent duplicate field names, they can still occur. For help resolving naming conflicts, visit [Common Issues with Queries: Calculated Fields](/troubleshoot/common-issues/queries/#a-link-points-to-the-wrong-location). |
| **Prompt** (beta) | Use natural language to generate a Calculated Field. For example, `return "slow" if $duration_ms > 1000`. Be sure to explicitly reference any schema fields using the $ syntax (for example, `$field\_name\`). For help resolving errors, visit [Common Issues with Queries: Calculated Fields](/troubleshoot/common-issues/queries/#calculated-fields). |
| Editor | Formula that defines your field. For syntax, available functions, and example formulas, visit [Calculated Field Formula Reference](/reference/calculated-field-expression/). |
Hover over syntax errors (red underlines or red triangles) for suggestions on how to fix them.
9. Select **Save**.
The screen refreshes, and your new field appears in the list.
To create an environment-wide calculated field:
1. Log in to the Honeycomb UI.
2. In the navigation menu, select the **Environment** label, then choose **Manage Environments**.
3. Locate the environment to which you want to add a calculated field, and select its name to open its settings.
4. Go to the **Schema** view.
5. Select **Add New Calculated Field**.
6. In the modal, enter details:
| Field | Description |
| ----------------- | ------------------------------------------------------------------------------------------------------------------------------------------------------------------------------------------------------------------------------------------------------------------------------------------------------------------------------------------------------------------------------ |
| **Display Name** | Name that appears in the Query Builder. Enter a name that is unique across all datasets and the containing environment. Although Honeycomb tries to prevent duplicate field names, they can still occur. For help resolving naming conflicts, visit [Common Issues with Queries: Calculated Fields](/troubleshoot/common-issues/queries/#a-link-points-to-the-wrong-location). |
| **Prompt** (beta) | Use natural language to generate a Calculated Field. For example, `return "slow" if $duration_ms > 1000`. Be sure to explicitly reference any schema fields using the $ syntax (for example, `$field\_name\`). For help resolving errors, visit [Common Issues with Queries: Calculated Fields](/troubleshoot/common-issues/queries/#calculated-fields). |
| Editor | Formula that defines your field. For syntax, available functions, and example formulas, visit [Calculated Field Formula Reference](/reference/calculated-field-expression/). |
Hover over syntax errors (red underlines or red triangles) for suggestions on how to fix them.
7. Select **Save**.
The screen refreshes, and your new field appears in the list.
## Managing Calculated Fields
Once created, edit query-scoped calculated fields in a clause by selecting their Edit icon ().
Saved calculated fields are part of the schema for a dataset or environment and must be managed within the settings for those areas.
To modify a saved calculated field, access the configuration associated with its scope:
* For dataset-specific calculated fields, visit [Manage Dataset Calculated Fields](/configure/datasets/calculated-fields/).
* For environment-wide calculated fields, visit [Manage Environment Calculated Fields](/configure/environments/calculated-fields/).
## Troubleshooting
For guidance when troubleshooting calculated fields in Honeycomb, visit [Common Issues with Queries](/troubleshoot/common-issues/queries/).
## Related Topics
* Organizing Data: Best Practices - [Datasets](/get-started/best-practices/organizing-data/#datasets-group-data-together) or [Environments](/get-started/best-practices/organizing-data/#use-environments-to-group-datasets-based-on-a-theme)