> ## Documentation Index
> Fetch the complete documentation index at: https://docs.honeycomb.io/llms.txt
> Use this file to discover all available pages before exploring further.
# Connect to Honeycomb with AWS PrivateLink
> Send telemetry to Honeycomb over a private AWS network connection without exposing traffic to the public internet using AWS PrivateLink.
Ent
This feature is available as part of the [Honeycomb Enterprise plan](https://www.honeycomb.io/pricing/).
[AWS PrivateLink](https://aws.amazon.com/privatelink/) lets you create a private connection to Honeycomb's API over AWS networks.
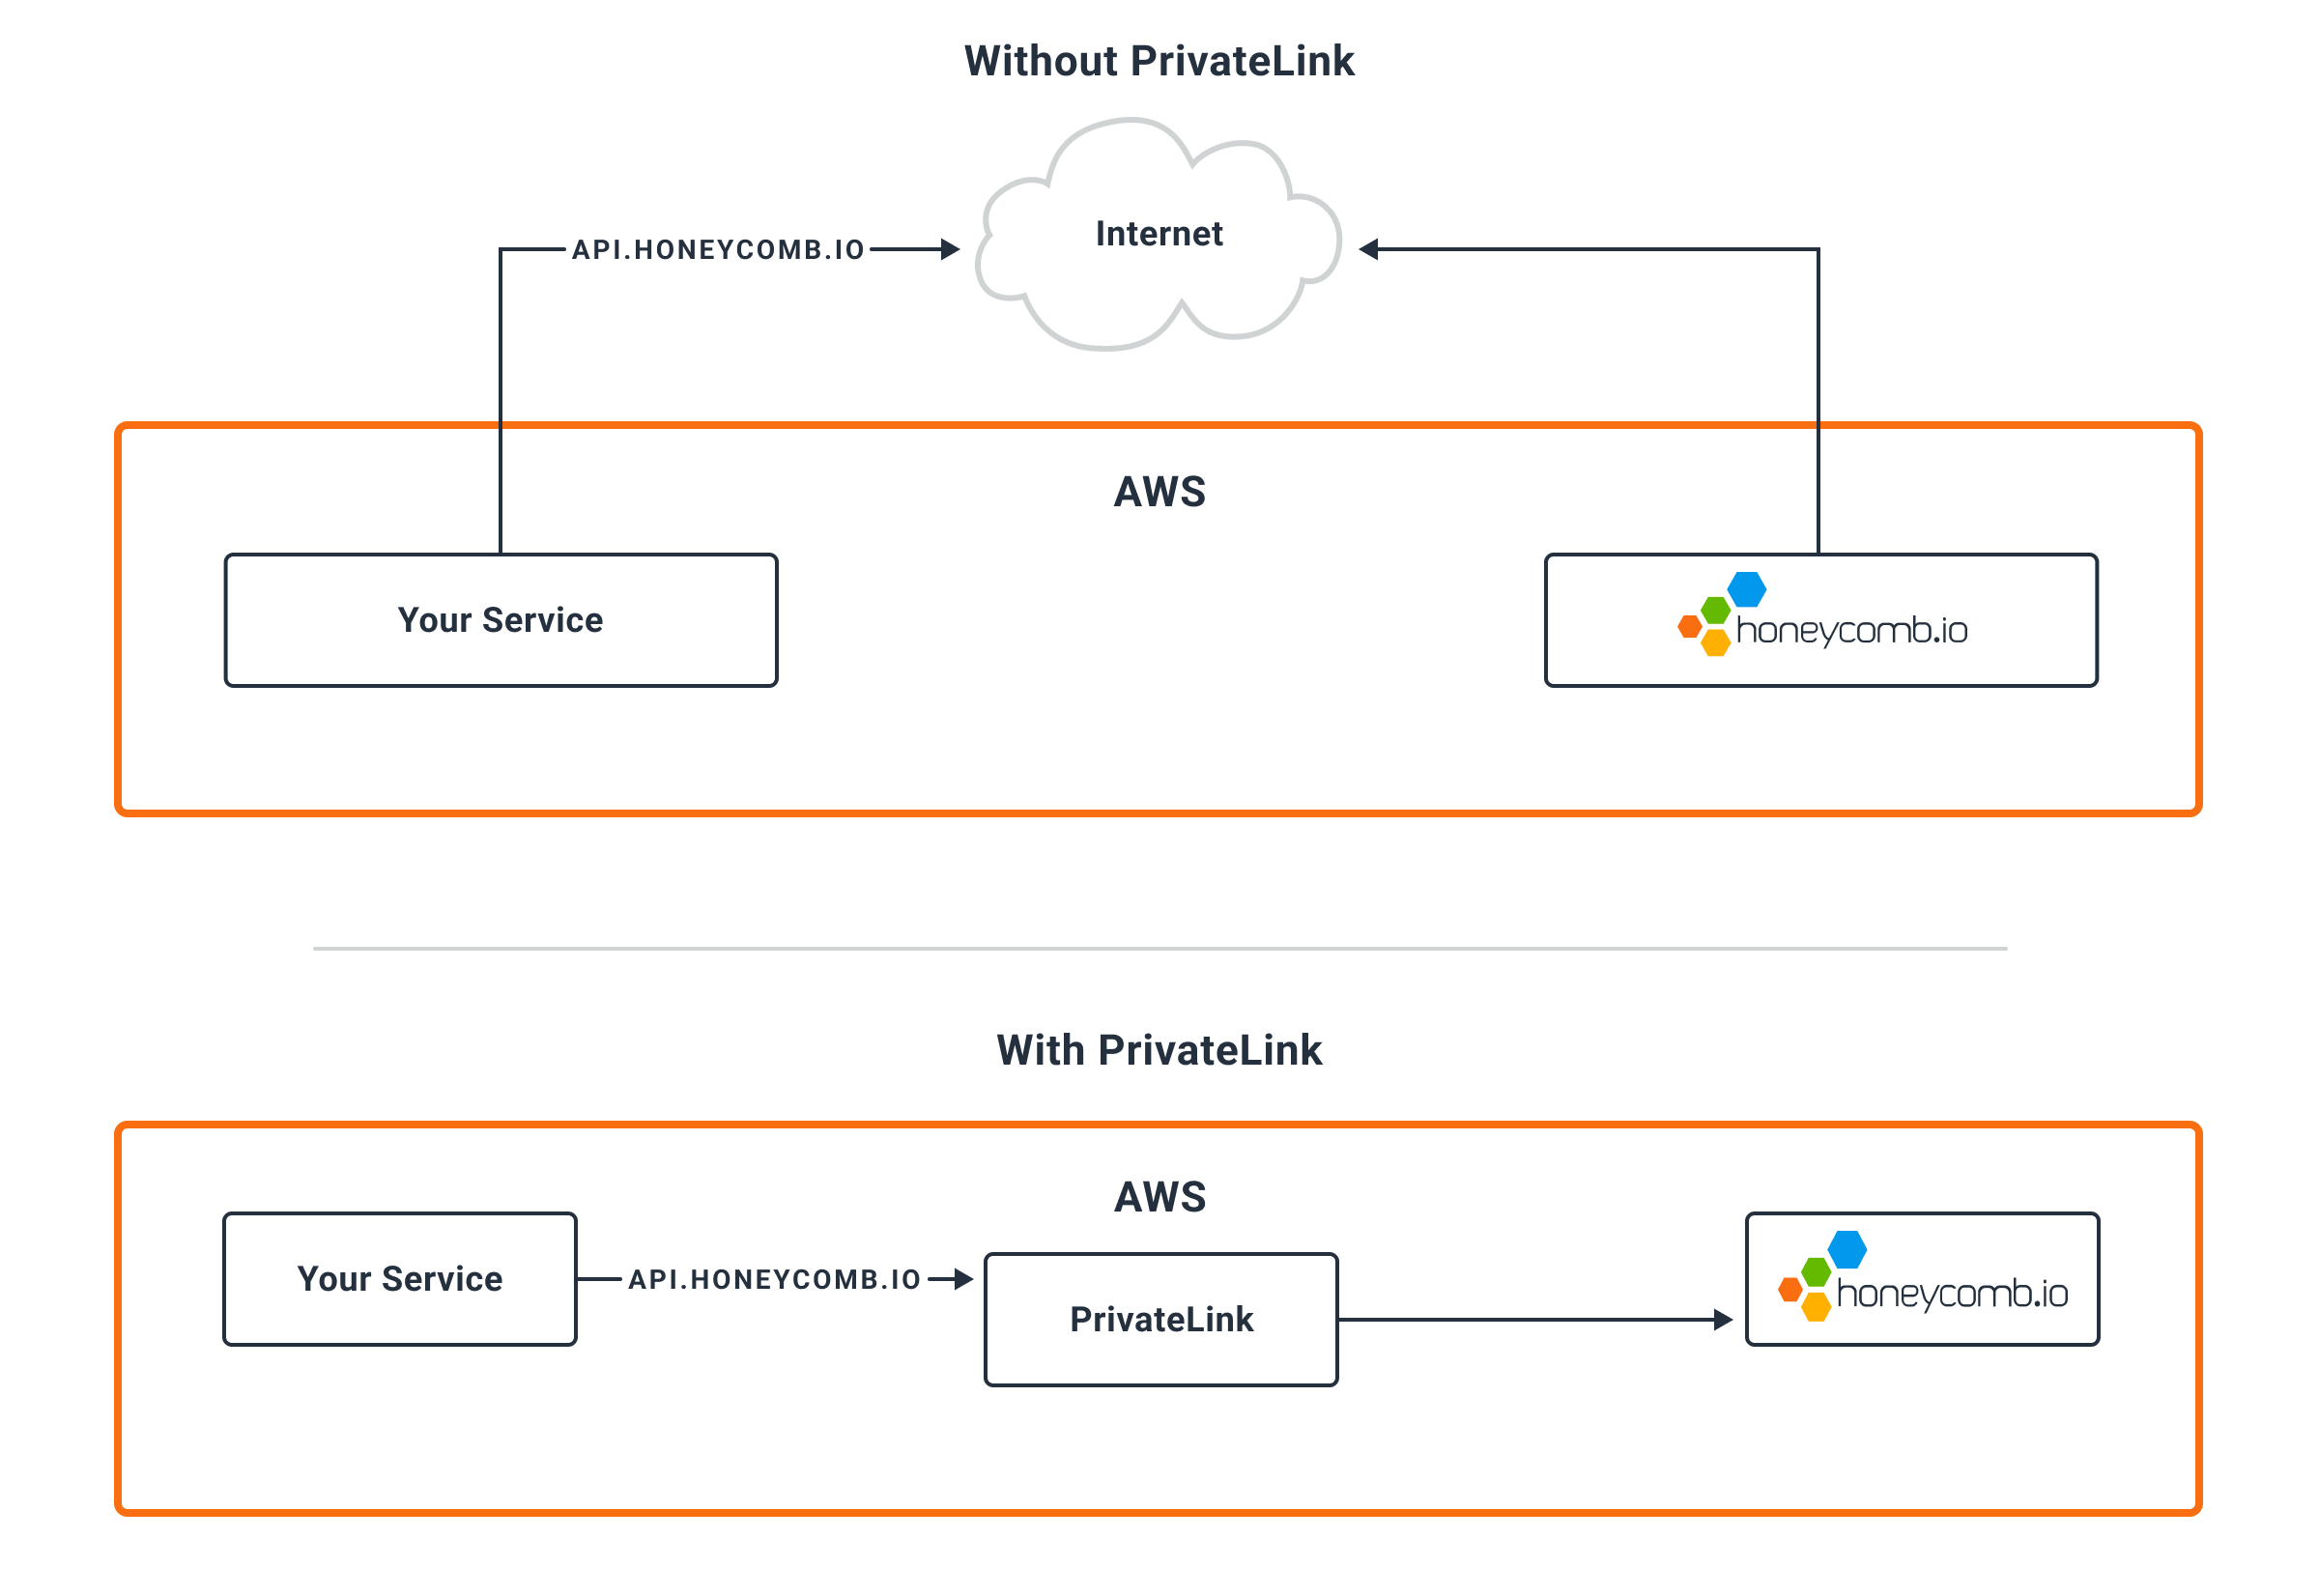 This has the following advantages:
* Limits API traffic over the internet as requests to our API server are transparently handled within AWS networks
* If your infrastructure relies on outbound firewalls, you can manage access to the Honeycomb API with security groups (or rules on your firewall appliance)
* Reduced costs for high volume traffic with [other services on PrivateLink](https://docs.aws.amazon.com/vpc/latest/privatelink/aws-services-privatelink-support).
Contact your Honeycomb account team for details.
## Before You Begin
Honeycomb must grant access to each AWS account that requires access to the Honeycomb API via AWS PrivateLink.
Contact your Honeycomb account team for details.
Honeycomb offers AWS PrivateLink to our US instance from the `us-east-1` region and to our EU instance from the `eu-west-1` region.
VPCs within each region may access it directly, while outside VPCs can use [VPC Peering](https://docs.aws.amazon.com/vpc/latest/userguide/vpc-peering#vpc-peer-region-example).
Honeycomb also offers [cross-region endpoint support](#cross-region-endpoint-support).
## Configuration Using the AWS Console
These instructions configure AWS PrivateLink via the AWS Console.
Configuration of AWS PrivateLink through infrastructure-as-code tools like [Terraform](https://www.terraform.io/) or [CloudFormation](https://aws.amazon.com/cloudformation/) is recommended but not shown.
Refer to the [Terraform example below](#example-configuration-using-terraform).
1. Visit the [Amazon VPC console](https://console.aws.amazon.com/vpc/) in the appropriate region:
1. US instance: `us-east-1`
2. EU instance: `eu-west-1`
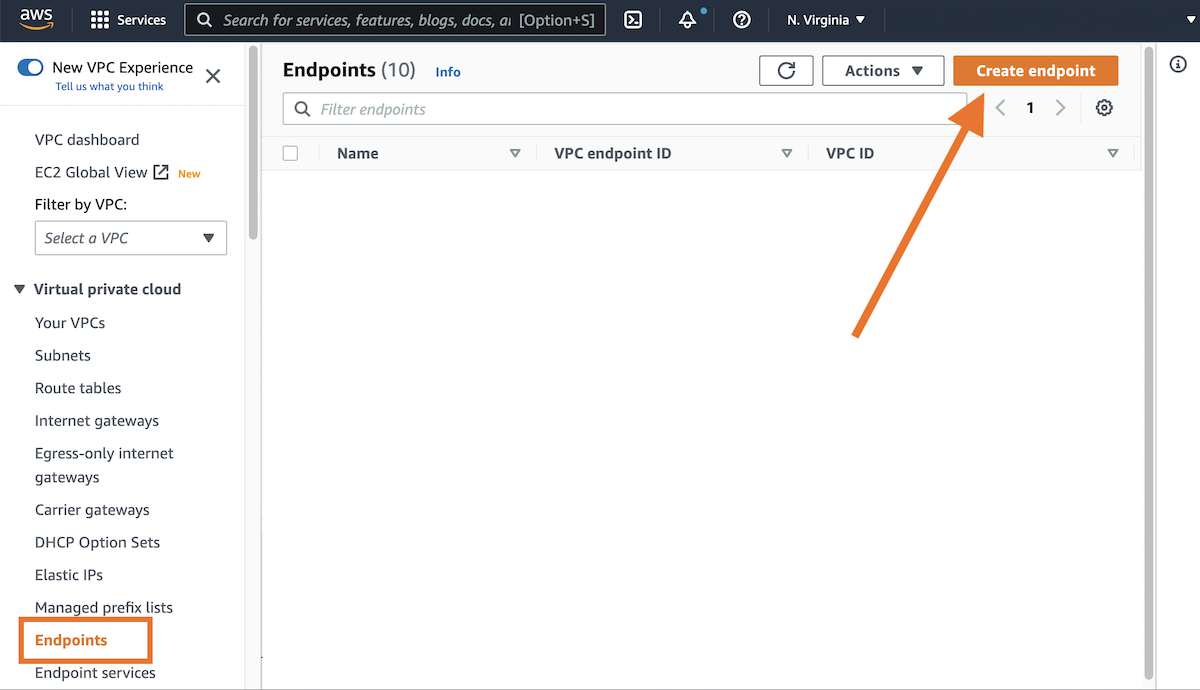
2. From the left navigation, select **Endpoints** and choose **Create endpoint**.
This has the following advantages:
* Limits API traffic over the internet as requests to our API server are transparently handled within AWS networks
* If your infrastructure relies on outbound firewalls, you can manage access to the Honeycomb API with security groups (or rules on your firewall appliance)
* Reduced costs for high volume traffic with [other services on PrivateLink](https://docs.aws.amazon.com/vpc/latest/privatelink/aws-services-privatelink-support).
Contact your Honeycomb account team for details.
## Before You Begin
Honeycomb must grant access to each AWS account that requires access to the Honeycomb API via AWS PrivateLink.
Contact your Honeycomb account team for details.
Honeycomb offers AWS PrivateLink to our US instance from the `us-east-1` region and to our EU instance from the `eu-west-1` region.
VPCs within each region may access it directly, while outside VPCs can use [VPC Peering](https://docs.aws.amazon.com/vpc/latest/userguide/vpc-peering#vpc-peer-region-example).
Honeycomb also offers [cross-region endpoint support](#cross-region-endpoint-support).
## Configuration Using the AWS Console
These instructions configure AWS PrivateLink via the AWS Console.
Configuration of AWS PrivateLink through infrastructure-as-code tools like [Terraform](https://www.terraform.io/) or [CloudFormation](https://aws.amazon.com/cloudformation/) is recommended but not shown.
Refer to the [Terraform example below](#example-configuration-using-terraform).
1. Visit the [Amazon VPC console](https://console.aws.amazon.com/vpc/) in the appropriate region:
1. US instance: `us-east-1`
2. EU instance: `eu-west-1`
2. From the left navigation, select **Endpoints** and choose **Create endpoint**.
 3. For **Service category**, choose **PrivateLink Ready partner services**.
4. For the **Service name**, enter the name of the service:
1. US instance: `com.amazonaws.vpce.us-east-1.vpce-svc-0878e9afcbb4c4333`
2. EU instance: `com.amazonaws.vpce.eu-west-1.vpce-svc-077ead63dd7ebe330`
5. If you are establishing the endpoint from a different region than the Honeycomb instance it will run in, check the **Enable Cross Region endpoint** box, and specify the right region
1. US instance: `us-east-1`
2. EU instance: `eu-west-1`
6. Select **Validate**.
3. For **Service category**, choose **PrivateLink Ready partner services**.
4. For the **Service name**, enter the name of the service:
1. US instance: `com.amazonaws.vpce.us-east-1.vpce-svc-0878e9afcbb4c4333`
2. EU instance: `com.amazonaws.vpce.eu-west-1.vpce-svc-077ead63dd7ebe330`
5. If you are establishing the endpoint from a different region than the Honeycomb instance it will run in, check the **Enable Cross Region endpoint** box, and specify the right region
1. US instance: `us-east-1`
2. EU instance: `eu-west-1`
6. Select **Validate**.
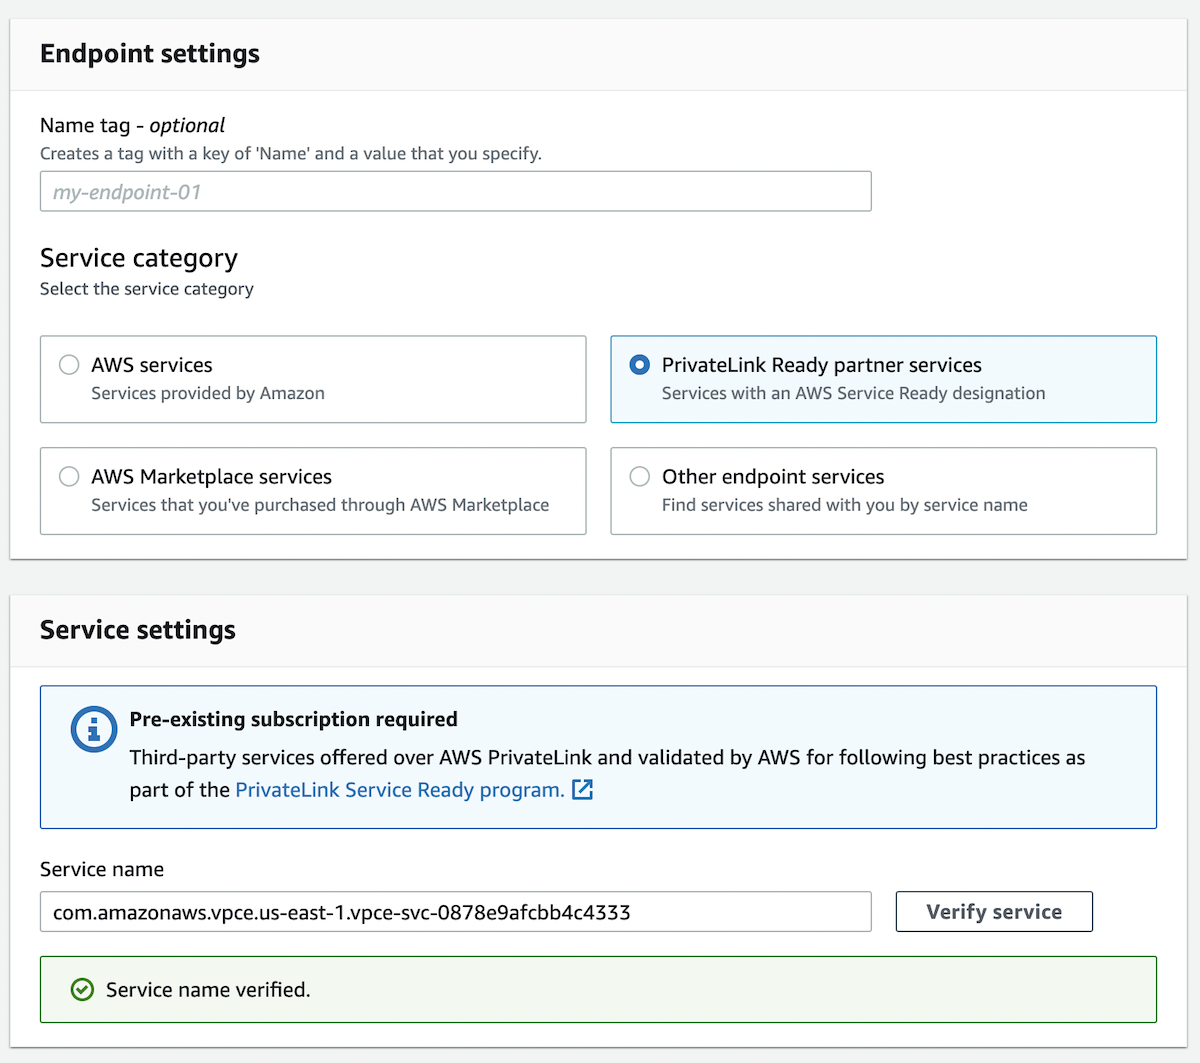 If the service fails to validate, reach out to your Honeycomb account team.
 7. From the **Select a VPC** list, select the VPCs that contain the services sending traffic to Honeycomb.
8. From the **Additional settings** dropdown, ensure that **Enable DNS name** is enabled.
[This requires that "Enable DNS hostnames" and "Enable DNS support" are enabled for this VPC](https://docs.aws.amazon.com/vpc/latest/privatelink/concepts).
9. Select one subnet per Availability Zone that the PrivateLink Endpoint will be created in.
This subnet must contain your services or the ability to route to all subnets where your services are run.
10. Select a security group that allows inbound access on port `443` from your VPC's network block, such as `10.0.0.0/8`.
If you do not see a security group, you may need to create one.
11. Choose **Create endpoint**.
The Endpoint console shows a "Pending" status until it is "Available."
Once available, your infrastructure transparently sends data through the connection.
Refer to the AWS documentation on [Interface Endpoints](https://docs.aws.amazon.com/vpc/latest/privatelink/interface-endpoints) for more details about endpoint configuration.
## Cross-Region Endpoint Support
Cross-Region endpoints are supported in the following regions:
* `af-south-1`
* `ap-east-1`
* `ap-northeast-1`
* `ap-northeast-2`
* `ap-northeast-3`
* `ap-south-1`
* `ap-south-2`
* `ap-southeast-1`
* `ap-southeast-2`
* `ap-southeast-3`
* `ap-southeast-4`
* `ca-central-1`
* `eu-central-1`
* `eu-central-2`
* `eu-north-1`
* `eu-south-1`
* `eu-south-2`
* `eu-west-1`
* `eu-west-2`
* `eu-west-3`
* `me-central-1`
* `me-south-1`
* `sa-east-1`
* `us-east-1`
* `us-east-2`
* `us-west-1`
* `us-west-2`
## Example Configuration Using Terraform
```terraform theme={}
resource "aws_vpc_endpoint" "honeycomb" {
vpc_id = aws_vpc.main.id
vpc_endpoint_type = "Interface"
service_name = "com.amazonaws.vpce.us-east-1.vpce-svc-0878e9afcbb4c4333"
service_region = "us-east-1" # only specify if going cross region from yours
subnet_ids = data.aws_subnets.private.ids
security_group_ids = [
aws_security_group.honeycomb_private_endpoint.id,
]
private_dns_enabled = true
}
data "aws_subnets" "private" {
filter {
name = "vpc-id"
values = [aws_vpc.main.id]
}
}
resource "aws_security_group" "honeycomb_private_endpoint" {
name = "honeycomb_private_endpoint"
description = "Traffic to Honeycomb endpoint"
vpc_id = aws_vpc.main.id
ingress {
description = "TLS from VPC"
from_port = 443
to_port = 443
protocol = "tcp"
cidr_blocks = [aws_vpc.main.cidr_block]
ipv6_cidr_blocks = [aws_vpc.main.ipv6_cidr_block]
}
egress {
from_port = 0
to_port = 0
protocol = "-1"
cidr_blocks = ["0.0.0.0/0"]
ipv6_cidr_blocks = ["::/0"]
}
tags = {
Name = "honeycomb_private_endpoint"
}
}
```
## Monitoring the PrivateLink Endpoint
AWS captures metrics for each VPC endpoint.
These metrics are accessible through the AWS Console and published to [CloudWatch](https://docs.aws.amazon.com/vpc/latest/privatelink/privatelink-cloudwatch-metrics).
Learn how to [send AWS CloudWatch metrics to Honeycomb](/integrations/metrics/aws-cloudwatch/).
From the AWS Console:
1. Visit the [Amazon VPC console](https://console.aws.amazon.com/vpc/) in the appropriate region:
1. US instance: `us-east-1`
2. EU instance: `eu-west-1`
2. From the left navigation, select **Endpoints** and choose the endpoint ID.
3. Select the **Monitoring** tab.
7. From the **Select a VPC** list, select the VPCs that contain the services sending traffic to Honeycomb.
8. From the **Additional settings** dropdown, ensure that **Enable DNS name** is enabled.
[This requires that "Enable DNS hostnames" and "Enable DNS support" are enabled for this VPC](https://docs.aws.amazon.com/vpc/latest/privatelink/concepts).
9. Select one subnet per Availability Zone that the PrivateLink Endpoint will be created in.
This subnet must contain your services or the ability to route to all subnets where your services are run.
10. Select a security group that allows inbound access on port `443` from your VPC's network block, such as `10.0.0.0/8`.
If you do not see a security group, you may need to create one.
11. Choose **Create endpoint**.
The Endpoint console shows a "Pending" status until it is "Available."
Once available, your infrastructure transparently sends data through the connection.
Refer to the AWS documentation on [Interface Endpoints](https://docs.aws.amazon.com/vpc/latest/privatelink/interface-endpoints) for more details about endpoint configuration.
## Cross-Region Endpoint Support
Cross-Region endpoints are supported in the following regions:
* `af-south-1`
* `ap-east-1`
* `ap-northeast-1`
* `ap-northeast-2`
* `ap-northeast-3`
* `ap-south-1`
* `ap-south-2`
* `ap-southeast-1`
* `ap-southeast-2`
* `ap-southeast-3`
* `ap-southeast-4`
* `ca-central-1`
* `eu-central-1`
* `eu-central-2`
* `eu-north-1`
* `eu-south-1`
* `eu-south-2`
* `eu-west-1`
* `eu-west-2`
* `eu-west-3`
* `me-central-1`
* `me-south-1`
* `sa-east-1`
* `us-east-1`
* `us-east-2`
* `us-west-1`
* `us-west-2`
## Example Configuration Using Terraform
```terraform theme={}
resource "aws_vpc_endpoint" "honeycomb" {
vpc_id = aws_vpc.main.id
vpc_endpoint_type = "Interface"
service_name = "com.amazonaws.vpce.us-east-1.vpce-svc-0878e9afcbb4c4333"
service_region = "us-east-1" # only specify if going cross region from yours
subnet_ids = data.aws_subnets.private.ids
security_group_ids = [
aws_security_group.honeycomb_private_endpoint.id,
]
private_dns_enabled = true
}
data "aws_subnets" "private" {
filter {
name = "vpc-id"
values = [aws_vpc.main.id]
}
}
resource "aws_security_group" "honeycomb_private_endpoint" {
name = "honeycomb_private_endpoint"
description = "Traffic to Honeycomb endpoint"
vpc_id = aws_vpc.main.id
ingress {
description = "TLS from VPC"
from_port = 443
to_port = 443
protocol = "tcp"
cidr_blocks = [aws_vpc.main.cidr_block]
ipv6_cidr_blocks = [aws_vpc.main.ipv6_cidr_block]
}
egress {
from_port = 0
to_port = 0
protocol = "-1"
cidr_blocks = ["0.0.0.0/0"]
ipv6_cidr_blocks = ["::/0"]
}
tags = {
Name = "honeycomb_private_endpoint"
}
}
```
## Monitoring the PrivateLink Endpoint
AWS captures metrics for each VPC endpoint.
These metrics are accessible through the AWS Console and published to [CloudWatch](https://docs.aws.amazon.com/vpc/latest/privatelink/privatelink-cloudwatch-metrics).
Learn how to [send AWS CloudWatch metrics to Honeycomb](/integrations/metrics/aws-cloudwatch/).
From the AWS Console:
1. Visit the [Amazon VPC console](https://console.aws.amazon.com/vpc/) in the appropriate region:
1. US instance: `us-east-1`
2. EU instance: `eu-west-1`
2. From the left navigation, select **Endpoints** and choose the endpoint ID.
3. Select the **Monitoring** tab.