> ## Documentation Index
> Fetch the complete documentation index at: https://docs.honeycomb.io/llms.txt
> Use this file to discover all available pages before exploring further.
# Configure Access with Okta/SAML SSO
> Require your Honeycomb Team to authenticate via Okta or another SAML 2.0 identity provider.
EntPro
This feature is available as part of the [Honeycomb Pro and Enterprise plans](https://www.honeycomb.io/pricing/).
In Honeycomb, Team Owners can require that their team members authenticate using Single Sign-On (SSO) via an external SAML 2.0 Identity Provider, such as Okta.
When you configure SSO via an external SAML Identity Provider, you must get information generated during the configuration process from both Honeycomb and your Identity Provider.
Because you will also need to enter information into both Honeycomb and your Identity Provider's user interface, you will need to use more than one browser tab.
In this guide, we demonstrate a typical SAML Identity Provider configuration using Okta.
If you are using a different SAML Identity Provider, field names and locations may vary, so you will need to locate the corresponding fields in your Identity Provider's user interface.
## Before You Begin
To successfully complete this guide, you should have an active [Okta](https://www.okta.com/) account.
Once SSO is enabled for your Honeycomb Team, all users on your team will need to authenticate through that SSO provider to access the team.
Any users that do not exist within your team's chosen SSO provider will not be able to log in.
A Honeycomb account can be linked to more than one SAML IdP, so linking this account won't affect any existing IdP connections.
## Enable SSO in Honeycomb
To begin, enable SSO in Honeycomb, which will allow you to get Honeycomb's Service Provider settings:
1. In Honeycomb, navigate to **Account** > **Team Settings**, and select the **Team Details** view.
2. Locate the **Single Sign-On** section, which displays any previous SSO configuration.
3. If your team is already configured to use Google SSO, turn off Google SSO.
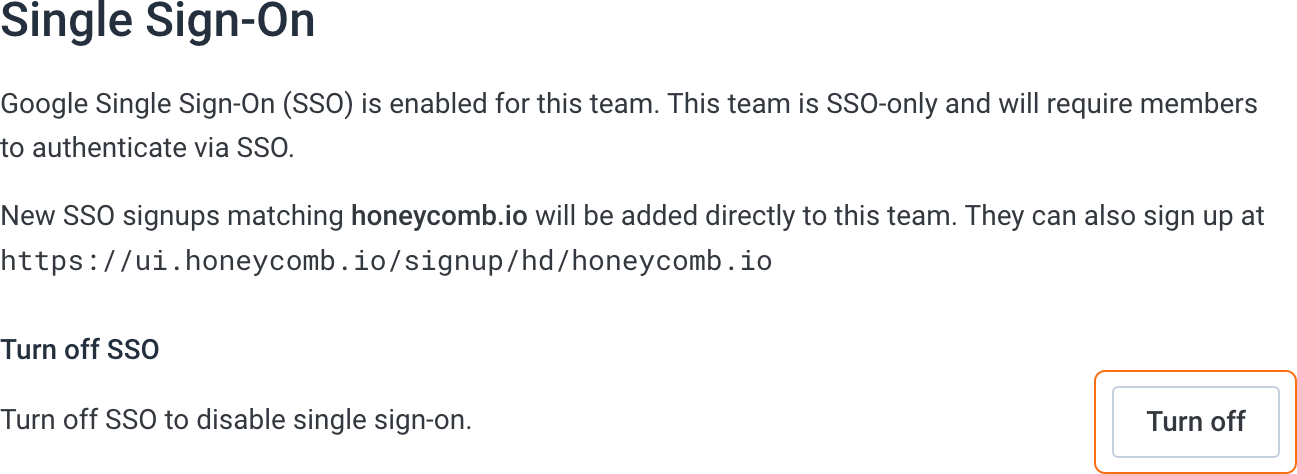 4. Select **Enable SSO**.
 5. In the SSO provider configuration modal, select **SAML/Okta**, then select **Next**.
6. Locate the settings required by your Identity Provider. You will need:
* Service Provider Issuer
* Service Provider ACS URL
* Service Provider Certificate (optional, used when your Identity Provider requires encrypted SAML assertions or signed authentication requests)
Leave this browser tab open, so you will have the information you need to configure your Identity Provider later.
5. In the SSO provider configuration modal, select **SAML/Okta**, then select **Next**.
6. Locate the settings required by your Identity Provider. You will need:
* Service Provider Issuer
* Service Provider ACS URL
* Service Provider Certificate (optional, used when your Identity Provider requires encrypted SAML assertions or signed authentication requests)
Leave this browser tab open, so you will have the information you need to configure your Identity Provider later.
 Honeycomb generates a unique identifier based on your team name. You will see the identifier appended to the values in the **Service Provider Issuer** and **Service Provider ACS URL** fields.
For this example, the team name is "Crewbacca", so the team's generated identifier is `crewbacca`.
## Configure Your Identity Provider
Next, configure your Identity Provider to work with Honeycomb.
To do this, you must set up SSO for an application integration in your Identity Provider, and then specify which users should be able to use SSO to log in to your team in Honeycomb.
In this section, we demonstrate a typical SAML Identity Provider configuration using Okta.
If you are using a different SAML Identity Provider, field names and locations may vary, so you will need to locate the corresponding fields in your Identity Provider's user interface.
### Set Up SSO
Set up SSO in your Identity Provider using the Service Provider settings you retrieved from Honeycomb:
1. Open a new browser tab, and go to your Okta admin console.
2. In Okta, go to **Applications** > **Applications**, and select **Create App Integration**.
Honeycomb generates a unique identifier based on your team name. You will see the identifier appended to the values in the **Service Provider Issuer** and **Service Provider ACS URL** fields.
For this example, the team name is "Crewbacca", so the team's generated identifier is `crewbacca`.
## Configure Your Identity Provider
Next, configure your Identity Provider to work with Honeycomb.
To do this, you must set up SSO for an application integration in your Identity Provider, and then specify which users should be able to use SSO to log in to your team in Honeycomb.
In this section, we demonstrate a typical SAML Identity Provider configuration using Okta.
If you are using a different SAML Identity Provider, field names and locations may vary, so you will need to locate the corresponding fields in your Identity Provider's user interface.
### Set Up SSO
Set up SSO in your Identity Provider using the Service Provider settings you retrieved from Honeycomb:
1. Open a new browser tab, and go to your Okta admin console.
2. In Okta, go to **Applications** > **Applications**, and select **Create App Integration**.
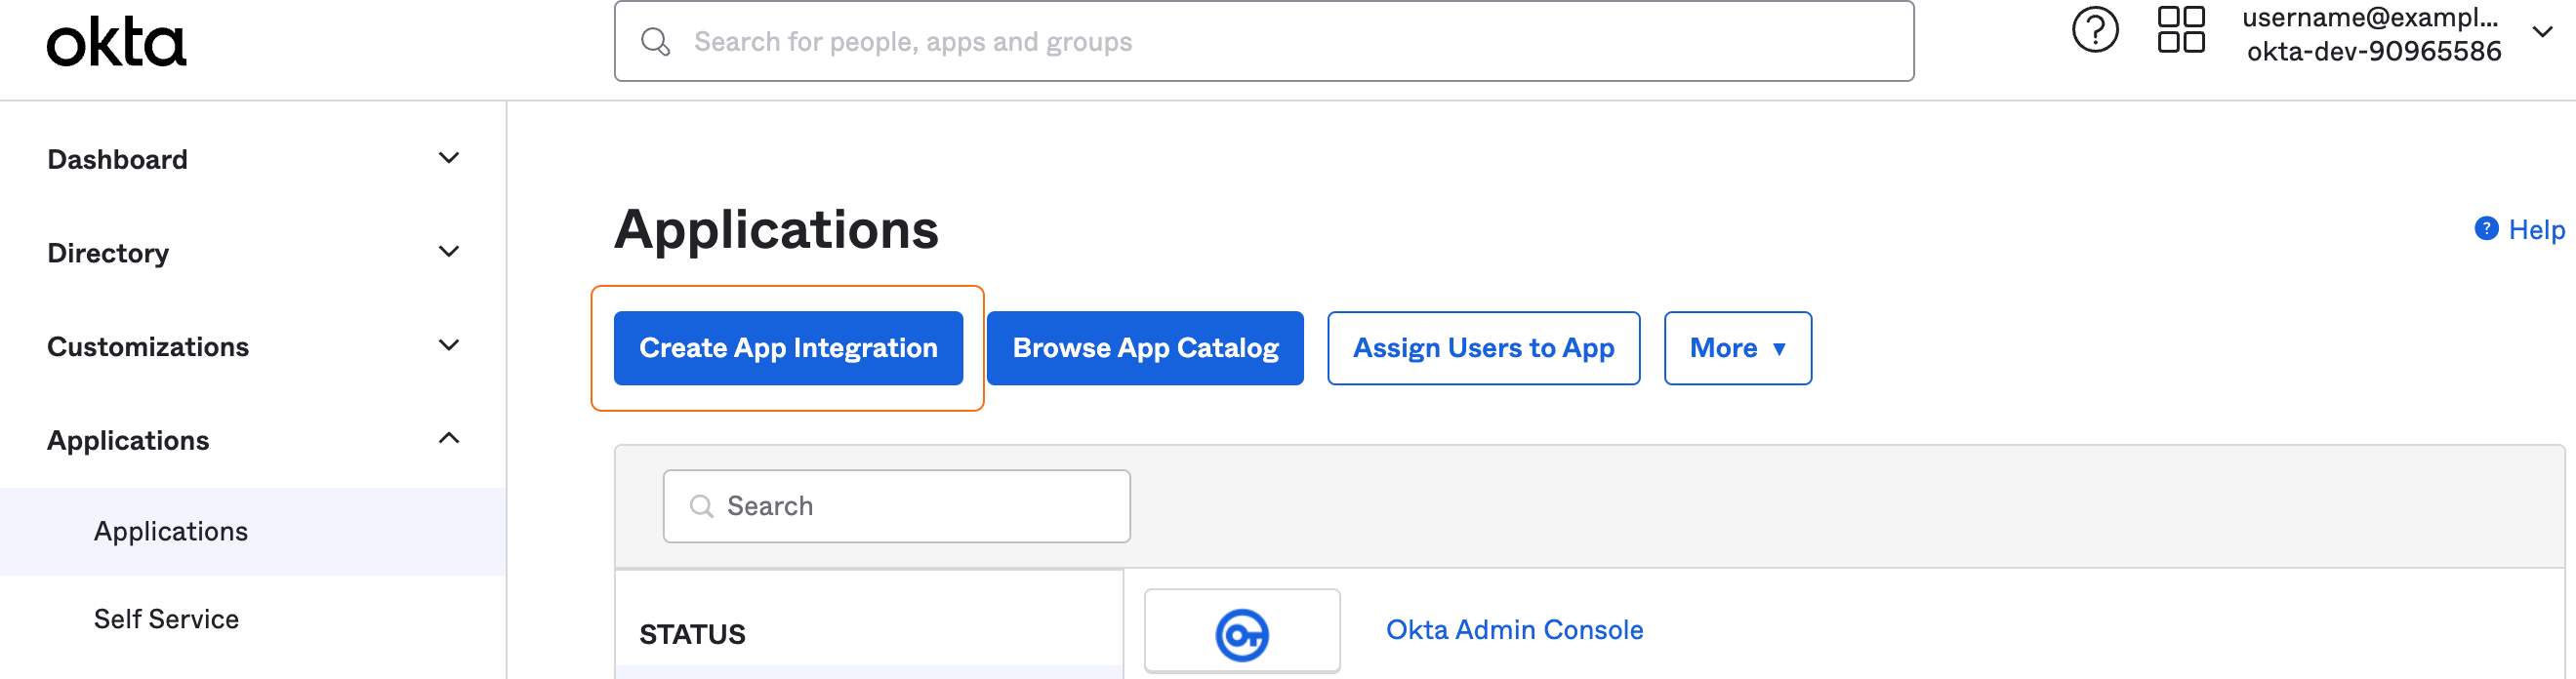 3. In the sign-in method modal, select **SAML 2.0**, then select **Next**.
4. For **General Settings**, locate **App Name** and enter a name for your application, such as in the format `Honeycomb [Your Team Name]`, then select **Next**.
Because you can have multiple Honeycomb teams connected to SSO and separate SSO configurations for each Honeycomb team, be sure the application name you choose clearly defines which team uses this SSO integration. The application name will appear in your application directory after installation.
For this example, our team name is "Crewbacca", so we name our application `Honeycomb Crewbacca`.
5. For **Configure SAML**, locate the **SAML Settings** section, and enter your retrieved Honeycomb setting values according to the following mapping:
| Okta Field | Honeycomb Setting Name |
| ------------------------------- | ------------------------------------- |
| **Single sign-on URL** | **Service Provider ACS URL** |
| **Audience URI (SP Entity ID)** | **Service Provider Issuer/Entity ID** |
3. In the sign-in method modal, select **SAML 2.0**, then select **Next**.
4. For **General Settings**, locate **App Name** and enter a name for your application, such as in the format `Honeycomb [Your Team Name]`, then select **Next**.
Because you can have multiple Honeycomb teams connected to SSO and separate SSO configurations for each Honeycomb team, be sure the application name you choose clearly defines which team uses this SSO integration. The application name will appear in your application directory after installation.
For this example, our team name is "Crewbacca", so we name our application `Honeycomb Crewbacca`.
5. For **Configure SAML**, locate the **SAML Settings** section, and enter your retrieved Honeycomb setting values according to the following mapping:
| Okta Field | Honeycomb Setting Name |
| ------------------------------- | ------------------------------------- |
| **Single sign-on URL** | **Service Provider ACS URL** |
| **Audience URI (SP Entity ID)** | **Service Provider Issuer/Entity ID** |
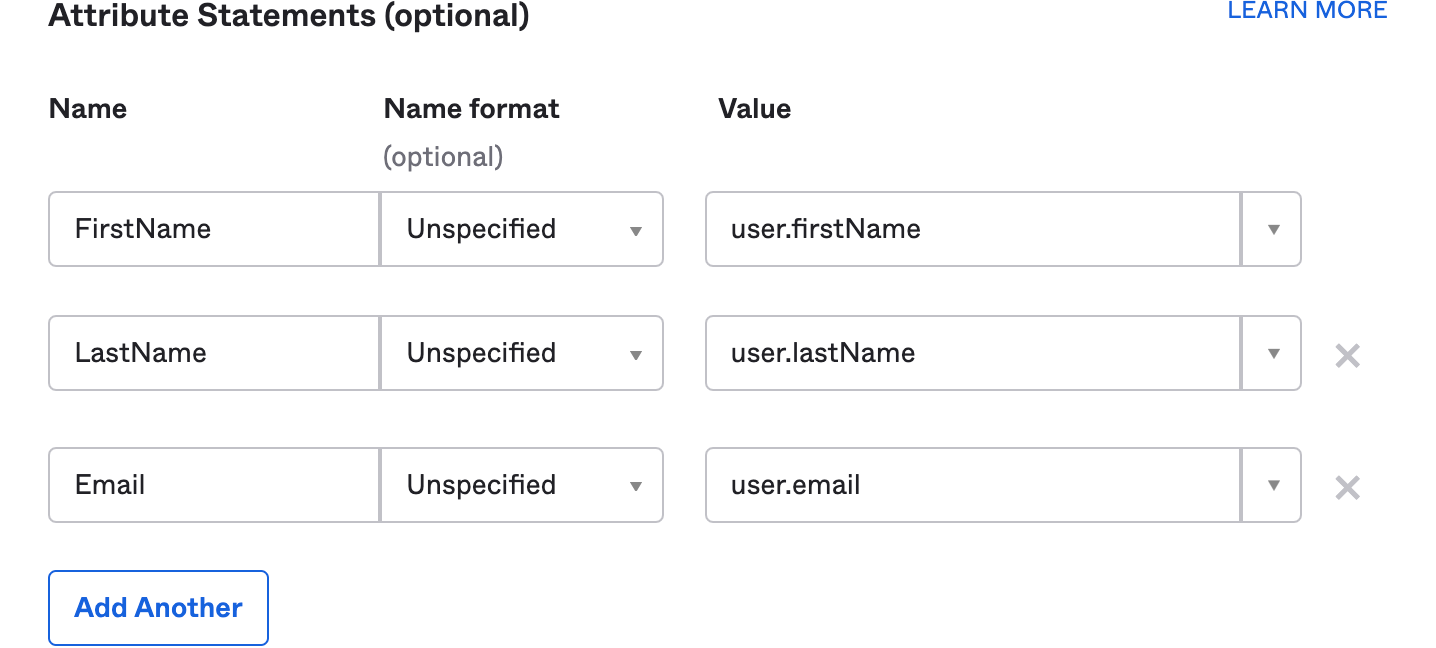
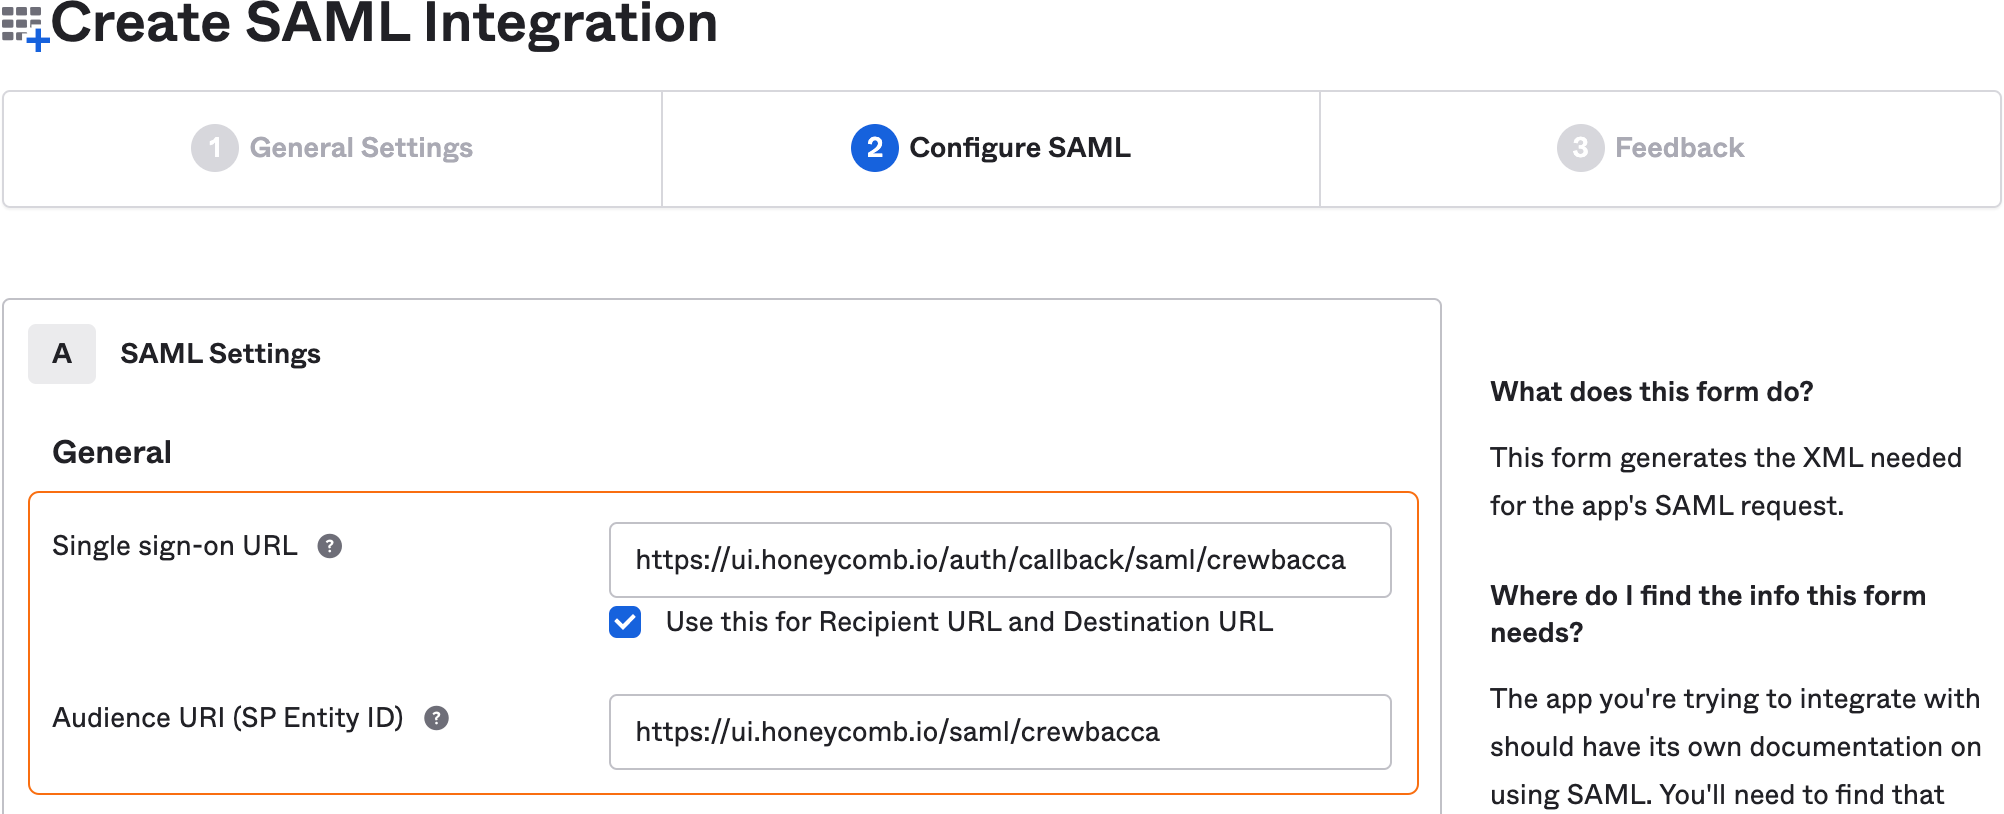 6. Locate the **Attribute Statements** section, and add the following exact values, then select **Next**:
The values for SAML attributes must be the exact values we provide below.
For example, for the `Email` attribute, enter `user.email`--not the actual email address of the user.
| Name | Name format | Value |
| ----------- | ------------- | ---------------- |
| `FirstName` | `Unspecified` | `user.firstName` |
| `LastName` | `Unspecified` | `user.lastName` |
| `Email` | `Unspecified` | `user.email` |
6. Locate the **Attribute Statements** section, and add the following exact values, then select **Next**:
The values for SAML attributes must be the exact values we provide below.
For example, for the `Email` attribute, enter `user.email`--not the actual email address of the user.
| Name | Name format | Value |
| ----------- | ------------- | ---------------- |
| `FirstName` | `Unspecified` | `user.firstName` |
| `LastName` | `Unspecified` | `user.lastName` |
| `Email` | `Unspecified` | `user.email` |
 7. For **Feedback**, select the following values, then select **Finish**:
| Field | Value |
| ------------------------------------ | ---------------------------------------------------- |
| **Are you a customer or a partner?** | `I'm an Okta customer adding an internal app` |
| **Contact app vendor** | `It's required to contact the vendor to enable SAML` |
8. From the application's SSO settings, locate and copy the **Metadata URL**. You will need this information to configure Honeycomb.
7. For **Feedback**, select the following values, then select **Finish**:
| Field | Value |
| ------------------------------------ | ---------------------------------------------------- |
| **Are you a customer or a partner?** | `I'm an Okta customer adding an internal app` |
| **Contact app vendor** | `It's required to contact the vendor to enable SAML` |
8. From the application's SSO settings, locate and copy the **Metadata URL**. You will need this information to configure Honeycomb.
 Although most modern SAML Identity Providers, like Okta, provide a Metadata URL, not all do. If your Identity Provider does not provide a Metadata URL, you must locate the required information to configure Honeycomb. Information you need includes:
* Identity Provider Issuer
* Identity Provider SSO URL
* Identity Provider Certificate (optional, used when your Identity Provider requires signed authentication requests)
### Assign Users
Assign users to the Honeycomb application in your Identity Provider:
To finish your Honeycomb configuration, you must assign your own user account to the Honeycomb application in your Identity Provider. If you want, you can wait and add more users later.
1. Go to your new application, and select the **Assignments** view.
2. Select **Assign** > **Assign to People** or **Assign to Groups**, depending on whether you want to allow individual users or specific groups to log in to your team in Honeycomb.
Although most modern SAML Identity Providers, like Okta, provide a Metadata URL, not all do. If your Identity Provider does not provide a Metadata URL, you must locate the required information to configure Honeycomb. Information you need includes:
* Identity Provider Issuer
* Identity Provider SSO URL
* Identity Provider Certificate (optional, used when your Identity Provider requires signed authentication requests)
### Assign Users
Assign users to the Honeycomb application in your Identity Provider:
To finish your Honeycomb configuration, you must assign your own user account to the Honeycomb application in your Identity Provider. If you want, you can wait and add more users later.
1. Go to your new application, and select the **Assignments** view.
2. Select **Assign** > **Assign to People** or **Assign to Groups**, depending on whether you want to allow individual users or specific groups to log in to your team in Honeycomb.
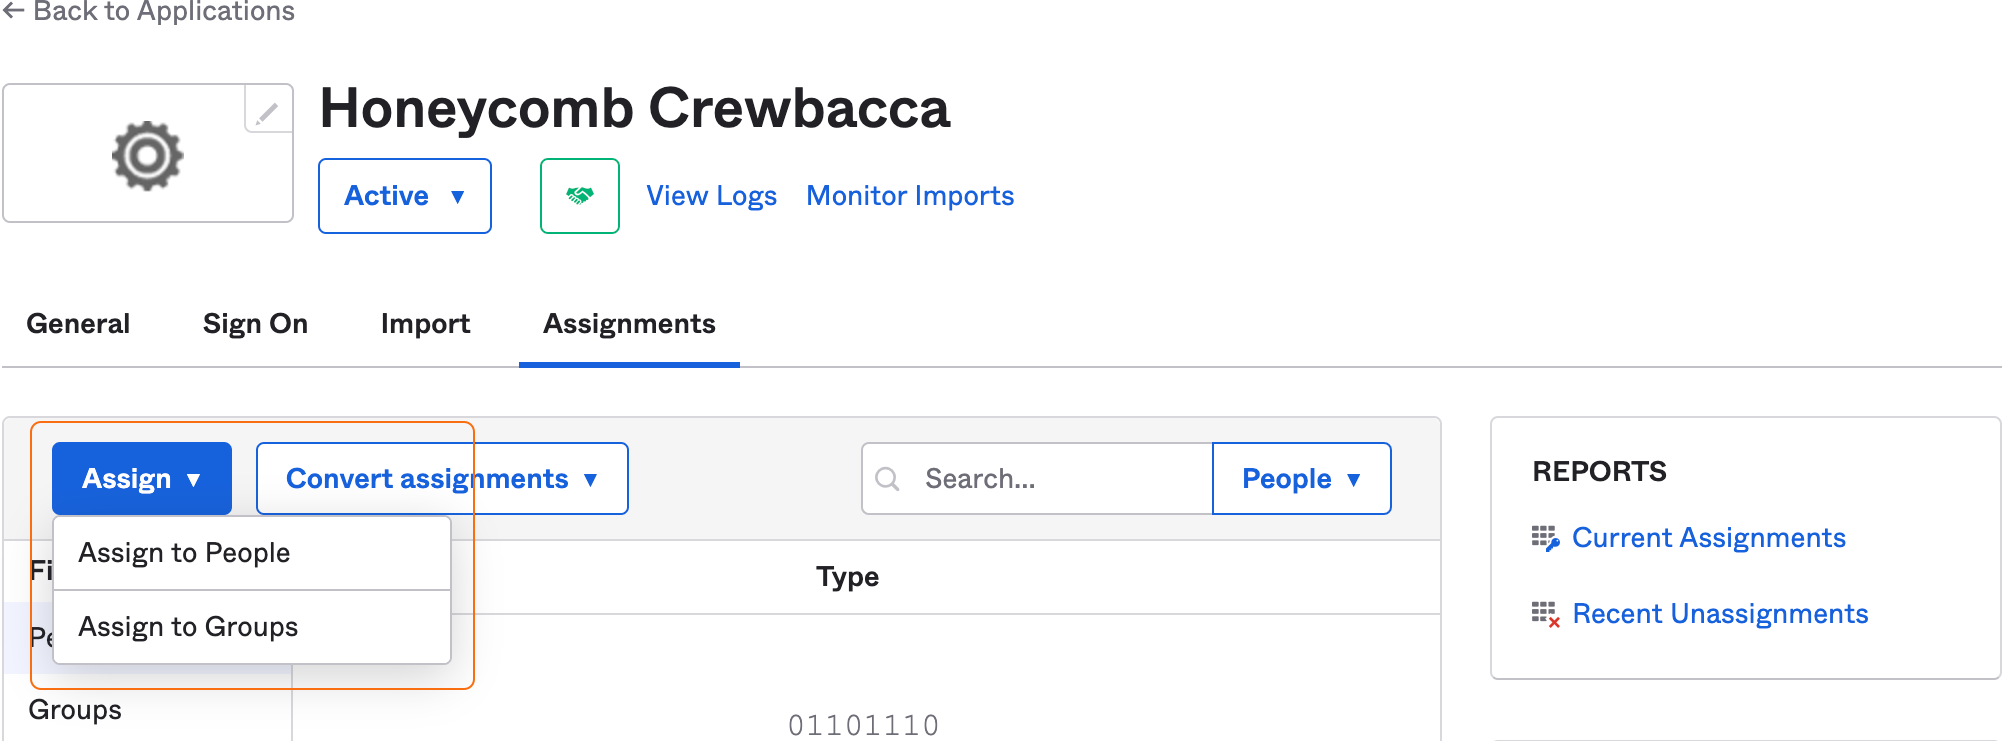 3. In the group assignment modal, search for and select **Assign** next to the individual users or specific groups you want to allow to log in to your team in Honeycomb using SSO, then select **Done**. Remember to assign your own account to the application.
4. Confirm that the **Assignments** view reflects your selections.
## Configure Honeycomb
Finally, configure SSO in Honeycomb using the Identity Provider settings you retrieved from your Identity Provider.
Some Identity Providers, like Okta, provide a metadata URL, which allows Honeycomb to fetch the settings it needs and update them automatically.
Other SAML Identity Providers may not provide metadata URLs.
If your Identity Provider does not provide a metadata URL, you must configure Honeycomb manually and maintain its configuration settings.
If your Identity Provider provided a metadata URL, like Okta does, automatically configure SSO in Honeycomb:
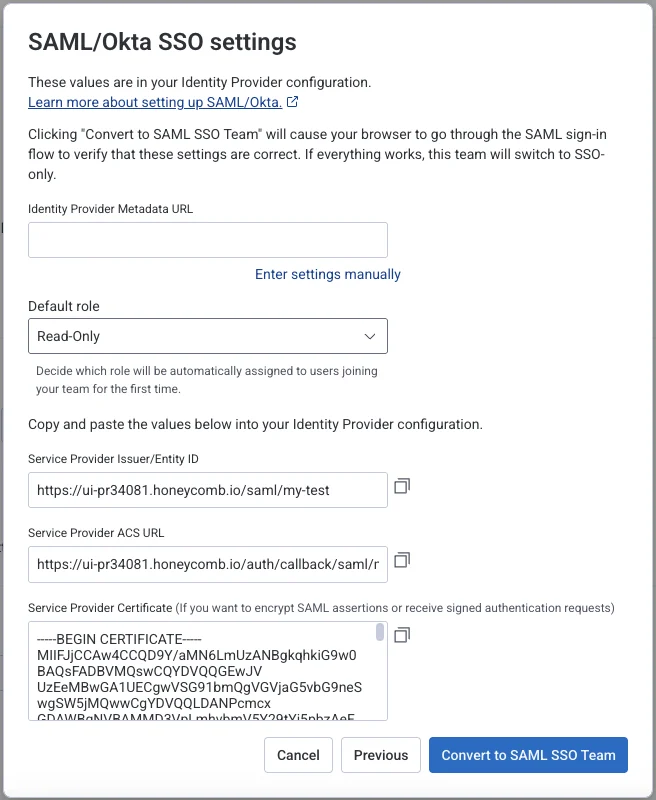
1. Switch to the browser tab that contains your Honeycomb Service Provider settings, locate the **Identity Provider Metadata URL**, and paste the metadata URL you copied from your Identity Provider.
2. You can also choose a **Default Role** to assign to new users joining your team through SSO. If you don't choose a default role, **Read-Only** will be the default role.
3. Select **Convert to SAML SSO Team**.
3. In the group assignment modal, search for and select **Assign** next to the individual users or specific groups you want to allow to log in to your team in Honeycomb using SSO, then select **Done**. Remember to assign your own account to the application.
4. Confirm that the **Assignments** view reflects your selections.
## Configure Honeycomb
Finally, configure SSO in Honeycomb using the Identity Provider settings you retrieved from your Identity Provider.
Some Identity Providers, like Okta, provide a metadata URL, which allows Honeycomb to fetch the settings it needs and update them automatically.
Other SAML Identity Providers may not provide metadata URLs.
If your Identity Provider does not provide a metadata URL, you must configure Honeycomb manually and maintain its configuration settings.
If your Identity Provider provided a metadata URL, like Okta does, automatically configure SSO in Honeycomb:
1. Switch to the browser tab that contains your Honeycomb Service Provider settings, locate the **Identity Provider Metadata URL**, and paste the metadata URL you copied from your Identity Provider.
2. You can also choose a **Default Role** to assign to new users joining your team through SSO. If you don't choose a default role, **Read-Only** will be the default role.
3. Select **Convert to SAML SSO Team**.
 If your Identity Provider does not provide a metadata URL, you must configure Honeycomb manually with the information that you located from your Identity Provider:
1. Switch to the browser tab that contains your Honeycomb Service Provider settings, and select **Enter settings manually**. Notice that the **Identity Provider Metadata URL** field has been replaced by separate fields corresponding to the settings that Honeycomb requires.
2. (Optional) Choose a **Default Role** to assign to new users joining your team through SSO. If you don't choose a default role, **Read-Only** will be the default role.
3. Enter the retrieved Identity Provider setting values:
* Identity Provider Issuer
* Identity Provider SSO URL
* Identity Provider Certificate (optional, used when your Identity Provider requires signed authentication requests)
4. Select **Convert to SAML SSO Team**.
If a "SAML Assertion" error appears, verify that your SSO Identity Provider **Audience** and **Recipient** fields match your Honeycomb team settings SSO **Service Provider Issuer/Entity ID** and **Service Provider ACS URL** fields.
The **Audience** field should contain: `https://ui.honeycomb.io/saml/`, while the **Recipient** field should contain: `https://ui.honeycomb.io/auth/callback/saml/`.
You should see the SAML authentication flow begin.
If you configured Okta as your Identity Provider, you see an Okta animation.
If successful, your team should now be able to use SAML SSO to authenticate.
## Log in to Honeycomb using your Okta / SAML SSO account
To learn how to log in when Okta / SAML SSO is configured for your Team, visit [Log in with SAML SSO](/get-started/honeycomb/log-in-with-saml-sso/).
## Certificate rotation
When Honeycomb releases updated Service Provider certificates, you will see a warning notification in your team's SAML settings.
To update to the new certificate, see [SAML Certificate Rotation](/configure/teams/configure-access/saml-certificate-rotation/).
## Troubleshooting
To explore common issues when configuring access, visit [Common Issues with Configuring Honeycomb: SAML SSO](/troubleshoot/common-issues/configuring-honeycomb/#saml-sso).
If your Identity Provider does not provide a metadata URL, you must configure Honeycomb manually with the information that you located from your Identity Provider:
1. Switch to the browser tab that contains your Honeycomb Service Provider settings, and select **Enter settings manually**. Notice that the **Identity Provider Metadata URL** field has been replaced by separate fields corresponding to the settings that Honeycomb requires.
2. (Optional) Choose a **Default Role** to assign to new users joining your team through SSO. If you don't choose a default role, **Read-Only** will be the default role.
3. Enter the retrieved Identity Provider setting values:
* Identity Provider Issuer
* Identity Provider SSO URL
* Identity Provider Certificate (optional, used when your Identity Provider requires signed authentication requests)
4. Select **Convert to SAML SSO Team**.
If a "SAML Assertion" error appears, verify that your SSO Identity Provider **Audience** and **Recipient** fields match your Honeycomb team settings SSO **Service Provider Issuer/Entity ID** and **Service Provider ACS URL** fields.
The **Audience** field should contain: `https://ui.honeycomb.io/saml/`, while the **Recipient** field should contain: `https://ui.honeycomb.io/auth/callback/saml/`.
You should see the SAML authentication flow begin.
If you configured Okta as your Identity Provider, you see an Okta animation.
If successful, your team should now be able to use SAML SSO to authenticate.
## Log in to Honeycomb using your Okta / SAML SSO account
To learn how to log in when Okta / SAML SSO is configured for your Team, visit [Log in with SAML SSO](/get-started/honeycomb/log-in-with-saml-sso/).
## Certificate rotation
When Honeycomb releases updated Service Provider certificates, you will see a warning notification in your team's SAML settings.
To update to the new certificate, see [SAML Certificate Rotation](/configure/teams/configure-access/saml-certificate-rotation/).
## Troubleshooting
To explore common issues when configuring access, visit [Common Issues with Configuring Honeycomb: SAML SSO](/troubleshoot/common-issues/configuring-honeycomb/#saml-sso).