> ## Documentation Index
> Fetch the complete documentation index at: https://docs.honeycomb.io/llms.txt
> Use this file to discover all available pages before exploring further.
# Rotate Your SAML Certificate
> Update your Honeycomb SAML Service Provider certificate when Honeycomb releases a new one to keep SSO authentication working without interruption.
EntPro
This feature is available as part of the [Honeycomb Pro and Enterprise plans](https://www.honeycomb.io/pricing/).
Honeycomb periodically updates the Service Provider certificates used for SAML Single Sign-On (SSO) authentication.
When a new certificate is available, Team Owners will see a notification in their team's SAML settings and should update their Identity Provider configuration to use the new certificate.
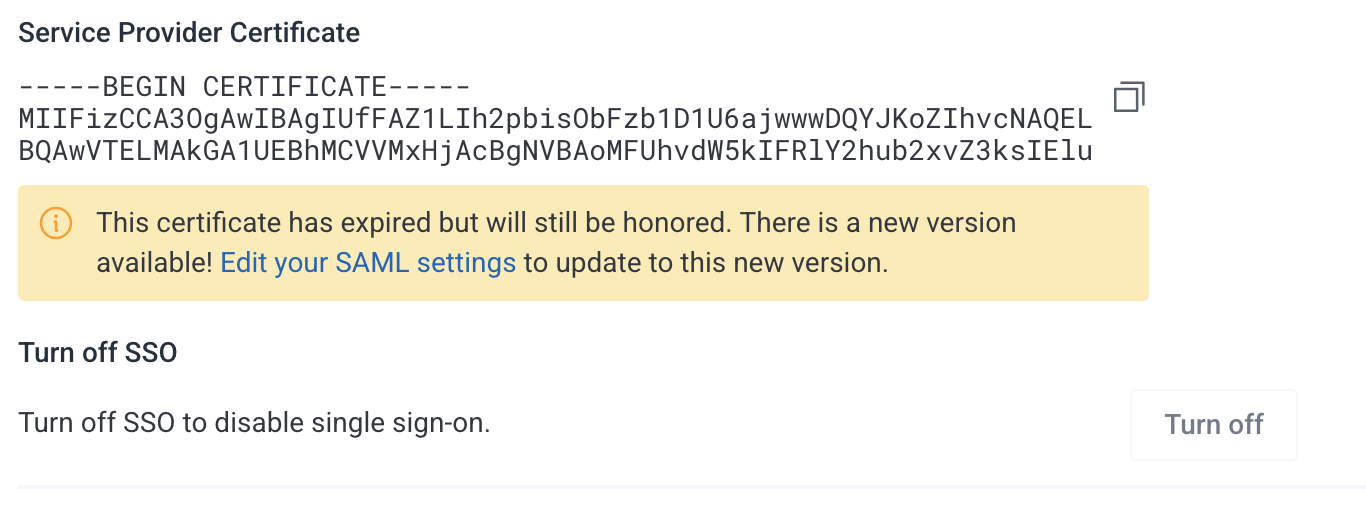 Honeycomb continues to honor older certificates even after newer ones are available.
However, we recommend updating to the latest certificate for improved security and to ensure continued support.
## Before you begin
To successfully complete this guide, you should have:
* Team Owner permissions in Honeycomb
* Administrative access to your SAML Identity Provider (IdP) (such as Okta or Microsoft Entra ID)
* A SAML Identity Provider that is configured to encrypt assertions
* An active SAML SSO configuration for your Team
## Copy the new certificate
1. In Honeycomb, navigate to **Account** > **Team Settings**.
2. Select the **Team Details** view.
3. Locate the **Single Sign-On** section.
4. Select **Change** next to your SAML configuration.
5. In the SAML configuration form, locate the **Service Provider Certificate** field.
This field displays the latest certificate that your IdP needs to use.
6. Select the copy button next to the Service Provider Certificate.
7. Save the copied Certificate to a local file. Most Identity Providers require it in `.pem` format.
## Update your Identity Provider
Now update your Identity Provider configuration with the new Service Provider Certificate.
The specific steps vary depending on your Identity Provider.
### Okta
To update the certificate in Okta:
1. Open a new browser tab and navigate to your Okta admin console.
2. Go to **Applications** > **Applications**.
3. Select your Honeycomb application from the list.
4. Select the **General** tab.
5. In the **SAML Settings** section, select **Edit**.
6. Select **Next** to advance past the General Settings.
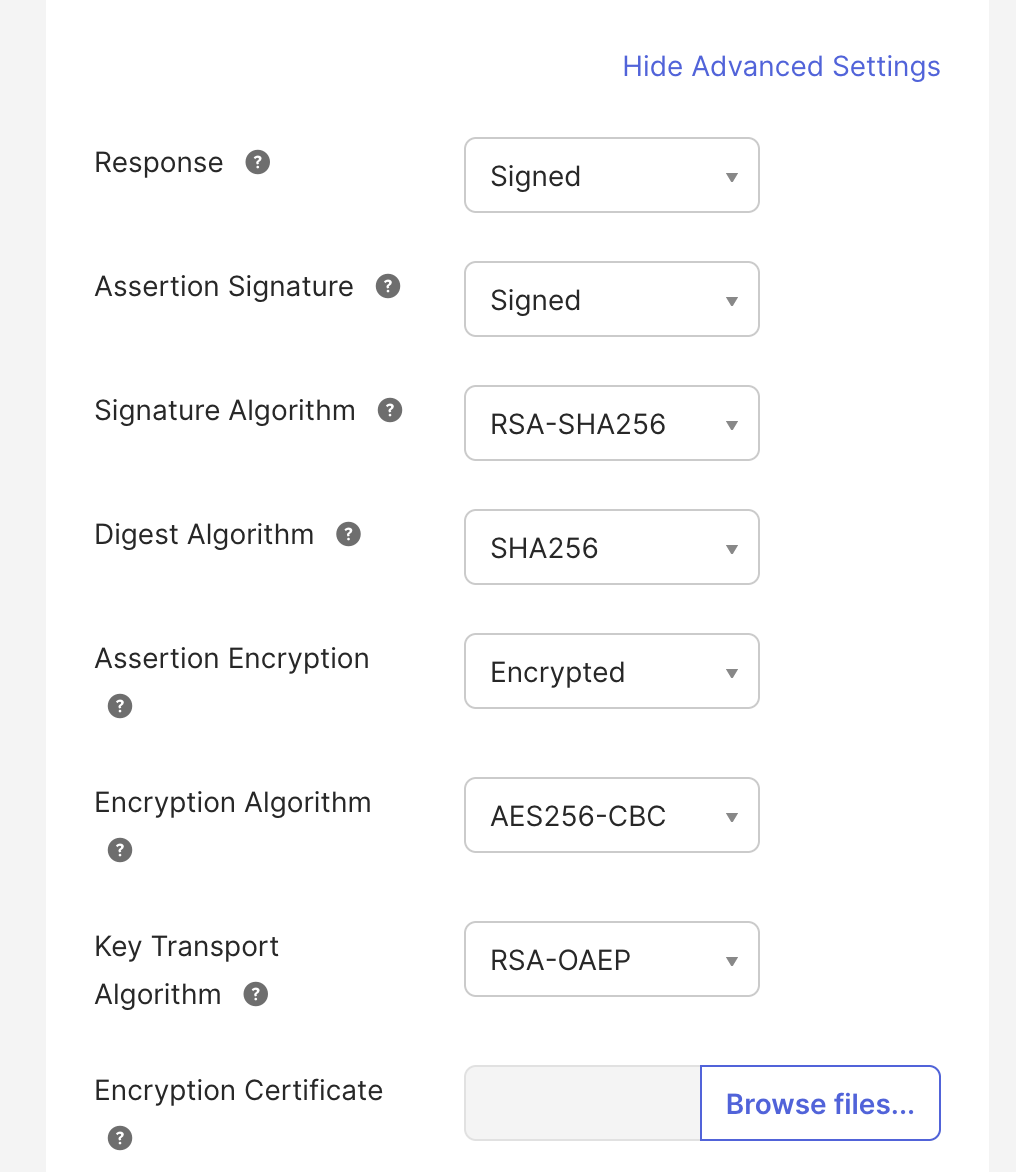
7. Select **Show Advanced Settings**.
8. Ensure that the "Assertion Encryption" field is set to "Encrypted". If it is set to "Unencrypted", you do not need to do anything.
9. In the **Encryption Certificate** field, upload the certificate file you saved from Honeycomb.
10. Select **Next**, then **Finish**.
Honeycomb continues to honor older certificates even after newer ones are available.
However, we recommend updating to the latest certificate for improved security and to ensure continued support.
## Before you begin
To successfully complete this guide, you should have:
* Team Owner permissions in Honeycomb
* Administrative access to your SAML Identity Provider (IdP) (such as Okta or Microsoft Entra ID)
* A SAML Identity Provider that is configured to encrypt assertions
* An active SAML SSO configuration for your Team
## Copy the new certificate
1. In Honeycomb, navigate to **Account** > **Team Settings**.
2. Select the **Team Details** view.
3. Locate the **Single Sign-On** section.
4. Select **Change** next to your SAML configuration.
5. In the SAML configuration form, locate the **Service Provider Certificate** field.
This field displays the latest certificate that your IdP needs to use.
6. Select the copy button next to the Service Provider Certificate.
7. Save the copied Certificate to a local file. Most Identity Providers require it in `.pem` format.
## Update your Identity Provider
Now update your Identity Provider configuration with the new Service Provider Certificate.
The specific steps vary depending on your Identity Provider.
### Okta
To update the certificate in Okta:
1. Open a new browser tab and navigate to your Okta admin console.
2. Go to **Applications** > **Applications**.
3. Select your Honeycomb application from the list.
4. Select the **General** tab.
5. In the **SAML Settings** section, select **Edit**.
6. Select **Next** to advance past the General Settings.
7. Select **Show Advanced Settings**.
8. Ensure that the "Assertion Encryption" field is set to "Encrypted". If it is set to "Unencrypted", you do not need to do anything.
9. In the **Encryption Certificate** field, upload the certificate file you saved from Honeycomb.
10. Select **Next**, then **Finish**.
 {/*
### Microsoft Entra ID
To update the certificate in Microsoft Entra ID:
1. Open a new browser tab and navigate to the Microsoft Entra admin center.
1. Go to **Applications** > **Enterprise applications**.
1. Select your Honeycomb application from the list.
1. In the left navigation, select **Token encryption**, and then select **Import certificate**.
1. Upload the certificate file you saved from Honeycomb.
1. Select **Save**.
*/}
### Other SAML providers
If you use a different SAML Identity Provider, locate the equivalent certificate or encryption certificate settings in your provider's administration interface.
Upload or paste the new Service Provider Certificate that you copied from Honeycomb.
## Complete the certificate update
After updating your Identity Provider with the new certificate, complete the update process in Honeycomb:
1. Return to the browser tab with your Honeycomb SAML configuration form.
2. Select **Update SAML Configuration**.
3. Complete the authentication flow with your Identity Provider.
If successful, you return to your team's Home page in Honeycomb.
The warning notification in your team's SAML settings should no longer appear.
For more information about SAML configuration, see:
* [Configure Access with Okta/SAML SSO](/configure/teams/configure-access/sso-okta-saml/)
* [Configure Access with Microsoft Entra ID/SAML SSO](/configure/teams/configure-access/sso-microsoft-entra-id-saml/)
* [Log in with SAML SSO]("/get-started/honeycomb/log-in-with-saml-sso")
{/*
### Microsoft Entra ID
To update the certificate in Microsoft Entra ID:
1. Open a new browser tab and navigate to the Microsoft Entra admin center.
1. Go to **Applications** > **Enterprise applications**.
1. Select your Honeycomb application from the list.
1. In the left navigation, select **Token encryption**, and then select **Import certificate**.
1. Upload the certificate file you saved from Honeycomb.
1. Select **Save**.
*/}
### Other SAML providers
If you use a different SAML Identity Provider, locate the equivalent certificate or encryption certificate settings in your provider's administration interface.
Upload or paste the new Service Provider Certificate that you copied from Honeycomb.
## Complete the certificate update
After updating your Identity Provider with the new certificate, complete the update process in Honeycomb:
1. Return to the browser tab with your Honeycomb SAML configuration form.
2. Select **Update SAML Configuration**.
3. Complete the authentication flow with your Identity Provider.
If successful, you return to your team's Home page in Honeycomb.
The warning notification in your team's SAML settings should no longer appear.
For more information about SAML configuration, see:
* [Configure Access with Okta/SAML SSO](/configure/teams/configure-access/sso-okta-saml/)
* [Configure Access with Microsoft Entra ID/SAML SSO](/configure/teams/configure-access/sso-microsoft-entra-id-saml/)
* [Log in with SAML SSO]("/get-started/honeycomb/log-in-with-saml-sso")